
Related Manuals for Doro DFB-0250


Summary of Contents for Doro DFB-0250
- Page 1 Questo manuale d’istruzione è fornito da trovaprezzi.it. Scopri tutte le offerte per Doro 6060 o cerca il tuo prodotto tra le migliori offerte di Cellulari e Smartphone Doro 6060 English...
- Page 3 You can obtain additional ac- cessories from your local Doro dealer. The supplied accessories provide the best per- formance with your phone.
-
Page 4: Table Of Contents
English Contents Congratulations on your purchase ..............1 Get started ..................... 1 Insert SIM card, memory card and battery ........... 1 Charge the phone................... 3 Get to know your phone................5 Assistive functions.................. 5 Turn the phone on and off..............5 Start-up wizard.................. - Page 5 ..................39 Idle display ................... 39 LCD backlight..................39 Brightness ..................39 Additional functions ..................40 Response by Doro ................40 Alarm ....................40 Organiser ....................40 Calculator ..................... 42 Torch..................... 42 Display status symbols ................. 42 Display main symbols................43...
- Page 6 English Troubleshooting ................... 44 Safety instructions..................46 Network services and costs ..............46 Operating environment ............... 47 Medical units..................47 Areas with explosion risk ..............47 Li-Ion battery ..................48 Protect your hearing ................48 Emergency calls..................48 GPS/Location based functions ............. 48 Vehicles ....................
-
Page 7: Congratulations On Your Purchase
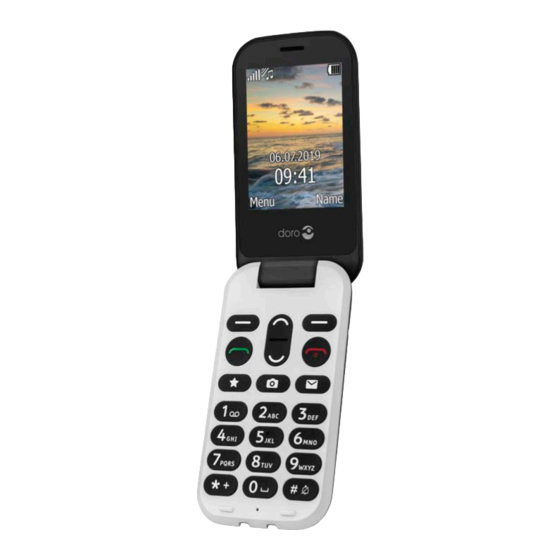
See everything easier and experience effortless calling and texting on a phone that combines a large 2.8" screen with widely separated, high con- trast keys. The Doro 6060features an external display for quick notifications and Caller ID. It also has an easy to use 3MP camera that makes taking and sending photos to family and friends more fun. - Page 8 English Insert the SIM cards (required) Remove the battery if it is already installed. Locate the SIM card holder and gently slide the card in the holder. See the label right next to the holder for guidance on how to insert the card.
-
Page 9: Charge The Phone
English Tip: Take care not to scratch or bend the contacts on the memory or on the SIM card when inserting them into the card holders. Insert the battery and replace the battery cover Insert the battery by sliding it into the battery compartment with the contacts facing down- wards to the right. - Page 10 English When the battery is running low, is displayed and a warning signal is heard. Connect the mains adapter to a wall socket and to the charging socket The battery charge indicator is animated while charging. It takes ap- proximately 3 hours to fully charge the battery. When the charger is connected to the phone, is displayed briefly, and when it is...
-
Page 11: Get To Know Your Phone
English Save energy When you have fully charged the battery and disconnected the charger from the device, unplug the charger from the wall socket. Get to know your phone Assistive functions Use the symbols below to guide you through supporting sections in the manual. -
Page 12: Phone Indicators
Ok. Example: Press Menu � Phonebook � -New contact- � Add. • To perform the example on your Doro 6060 you should do the following: Press Menu, scroll to Phonebook and press Ok. Select -New contact- and press Add. -
Page 13: Enter Text
English Enter text Enter text manually Select character Press a numerical key repeatedly until the desired character is shown. • Wait a second before entering the next character from same numeri- cal key. Special characters Press * for a list of special characters. Select the desired character with and press Ok to confirm. -
Page 14: Hearing Aid Compatible
English Note! See Predictive text, p.27 for more information. Input mode • Press # to change input mode. The icon on the top left of the display indicates the input mode. Sentence case with predictive text UPPER CASE with predictive text lower case with predictive text Sentence case UPPER CASE... -
Page 15: Phone Settings
English Phone settings Time & date Set the time and date Press Menu � Settings � General � Time & date: Set time to enter the time (HH:MM). • Set date to enter the date (DD/MM/YYYY). • Press Ok to confirm. Tip: You can also set the phone to automatically update the time and date according to the current time zone. - Page 16 English • On to activate the PIN code. You need to enter the PIN code every time the phone is started. • Off to deactivate the PIN code. IMPORTANT! If enabling Off-mode and the SIM card is lost or stolen, it is unprotected.
-
Page 17: Calls
English Whitelist A whitelist works much like a spam filter, once activated, you can only re- ceive incoming calls from contacts saved in the phonebook. People not stored in the phonebook gets a busy signal when trying to call you. Press Menu �... -
Page 18: Call Options
English If you use a hearing aid or have hearing difficulties when using the tele- phone in a noisy environment, you can adjust the phone's audio settings, see Audio setup , p.37. Silent Silent is a fixed profile with Keypad tone, Message tone and Ringtone dis- abled, while Tasks, Daily reminder and Alarm are unchanged. -
Page 19: Sos Calls
English Press SPK on to activate. Speak clearly into the phone microphone at a maximum distance of 1 m. Use to adjust the loudspeaker volume. Press SPK off to return to normal mode. Note! Loud background noises (music, etc.) may interfere with the sound quality. -
Page 20: Call Settings
English Call settings Call timer During a call, the duration of the call is shown. You can check the duration of your calls. Press Menu � Settings � Calls � Call timer: Last call to show the elapsed time of the most recent call. •... - Page 21 English Press Menu � Settings � Calls � Call setup � Call divert: Voice calls to divert all voice calls. • Unreachable to divert incoming calls if the phone is turned off or • out of range. No reply to divert incoming calls if unanswered. •...
-
Page 22: Phonebook
English Fixed dial (FDN) You can limit calls to certain numbers saved on the SIM card. The list of al- lowed numbers is protected by your PIN2-code. Note! The PIN2-code is needed to apply fixed dial. Contact your service provider to get the PIN2-code. Press Menu �... -
Page 23: Manage Phonebook Contacts
English • My pictures to select an existing picture. Press Save. Tip: For international calls, always use + before the country code for best operation. Press * twice for the international prefix +. Manage phonebook contacts Press Menu � Phonebook. Select a contact, then press Options: •... -
Page 24: Phonebook Settings
English • Send by MMS to send the selected phonebook contact as a vCard via picture message. See Create and send picture mes- sage (MMS), p.25. Send by Bluetooth to send the selected phonebook contact • ® ® as a vCard via Bluetooth . - Page 25 English To edit or delete an existing entry, select it and press Options � Edit or Delete. Call voice mail Press and hold shortcut button 1 . • Speed dial Use 0 and 2 – 9 to speed dial an entry from standby. •...
-
Page 26: Ice (In Case Of Emergency)
English Enter name and number, see Enter text , p.7. When done, press Ok. ICE (In Case of Emergency) First responders can access additional information such as medical infor- mation from the victim's phone in case of emergency. In the event of a trauma, it is critical to have this information as early as possible to in- crease the chances of survival. -
Page 27: Assistance Button
Response by Doro, then the below descriptions are not valid. Response by Doro is a new easy-to-use service from Doro that is designed to give seniors and your relatives extra security in everyday life. Read more at Response by Doro, p.40 and www.doro.com. -
Page 28: Activation
English Tip: The assistance function may be configured so that the recipient of the call must press 0 (zero) to confirm, in order to stop the alarm sequence. See Confirm with "0", p.24. IMPORTANT! Information to the recipient of an assistance call, when Confirm with "0" is activated. -
Page 29: Activate Text Messages (Sms)
This function sends a text message with the users position to the recipients in Number list when an assistance call occurs. The message contains date, time, and the positioning information of the Doro user. The message is not editable. If no position can be found the message contains the latest known position. -
Page 30: Confirm With "0
English Confirm with "0" You can activate the Confirm with "0" function. This is especially recom- mended if there is a risk that the assistance call is answered by a voice mail or answering service. If the recipient doesn’t press 0 within 60 seconds the call will be disconnected and the next number in the sequence will be called. -
Page 31: Create And Send Picture Message (Mms)
English Tip: You can modify the recipients by selecting one, press Options � Edit/Delete/Delete all. When done, press Send. Note! If you choose to add multiple recipients, you will be charged for each recipient (maximum 10). For international calls, always use + before the country code for best operation. -
Page 32: Inbox, Outbox And Sent
English The settings for picture message are supplied by your service provider and can be sent to you automatically via text message. If not, see MMS settings, p.29 on how to set your MMS profile. Press the shortcut button or press Menu � Messages. Select Create new �... -
Page 33: Message Settings
English Options � Send MMS to write a new picture message. • Save objects (MMS only) to save text and media objects such as • pictures, sound recordings and video. • Details to view details of the message. • Delete all to delete all. Press Yes to delete or No to return. Press Ok to confirm. - Page 34 English • SIM (default) to store messages on the SIM card. Phone to store messages in the phone memory. • Press Ok to confirm. SMS centre From SMS settings, select SMS centre � Edit. Enter the service centre number. Press Clear to delete. Press Ok to confirm.
- Page 35 English MMS settings Press Menu � Settings � Messages � MMS settings. • Memory status From MMS settings, select Memory status to display the memory space used on the memory card (if inserted) and in the phone memory. Press Back to return. Storage Picture messages are saved by default in the phone memory.
- Page 36 English • User name to add user name. Password to add password. • Homepage to add homepage. • Connection type use the buttons * and # to select connection • enter HTTP or WAP. Use proxy use the buttons * and # to select Yes or No. •...
- Page 37 English Press Ok to confirm. Reminder The reminder alerts you once if you haven't checked your messages or lis- tened to your voice mail within 10 minutes from receipt. When notified, press to end the notification and no more reminder is heard. Press Menu �...
-
Page 38: Camera (Take Photos)
English Camera (take photos) To get sharp photos, wipe the lens clean with a dry cloth. Press shortcut button Alternatively press Menu � Camera. Press to take the photo. Press Options: Send � Send by MMS, see Create and send picture message •... -
Page 39: Image Viewer
Note! With higher quality, less pictures can be stored in the internal memory. If you insert a compatible external memory (micro SD) card into your Doro 6060, you can change the default storage location. This allows you to save more files on your device. -
Page 40: Connectivity
Note! To prevent other devices from finding your device, select Off. Even if you select Off, paired devices can still detect your device. Device name Press Menu � Settings � Bluetooth � Device name. Enter the name your Doro 6060 should appear with for other Blue- ® tooth devices. -
Page 41: Network Setup
English • Rename to change the name of the device. Delete to delete the device from the list. • Delete all to delete all devices from the list. • Press Ok to confirm. Audio path Press Menu � Settings � Bluetooth � Audio path: •... -
Page 42: Connect The Phone To A Computer
English • View (photos/images) for single view. Send � Send by MMS to send as picture message or Send by • Bluetooth to send to a Bluetooth device. • Use as ringtone to use as ringtone. • Details to view detailed information about the file, e.g. date, size, copyright protection. -
Page 43: Sound & Display
English Note! You can transfer files using a USB cable on most devices and operating systems supporting a USB Mass Storage interface. Disconnect the USB cable safely Make sure to enable the hardware to be safely removed. Disconnect the USB cable. Note! Computer instructions may vary depending on your operating system. -
Page 44: Ringtone Volume
English Ringtone volume Press Menu � Settings � Sound � Volume. Use the navigation keys to change the ringtone volume. Press Ok to confirm. Silent Press Menu � Settings � Sound � Silent. Select On to enable, or Off to disable. Press Ok to confirm. -
Page 45: Wallpaper
English Press Ok to confirm. Wallpaper Press Menu � Settings � Display � Wallpaper: System to select predefined images. • User to select user defined images, see File manager, p.35. • to display available wallpapers. Press Ok to confirm. Text size You can adjust the text size for the menu and messages. -
Page 46: Additional Functions
By pressing the assistance button on the Doro phone, the user can easily call for help. First the alarm contacts the relatives, and if no relative is able to answer it is automatically sent to one of our alarm centres, where there is staff on duty 24/7. - Page 47 English Select one of the following options and press Ok. Calendar Add task Press Menu � Organiser � Calendar � Options � Add task. Enter date, then press Enter time, then press Enter subject, see Enter text , p.7. When done, press Ok. Options Press Menu �...
-
Page 48: Calculator
English Tip: For more options select an existing entry, and press Options � Skip reminder, Add, Edit, Delete or Delete all. Calculator Calculator can perform basic mathematical operations. Press Menu � Calculator. Enter the first number. Use # to enter decimal points. Use the arrow buttons to select an operation (+, -, x, ÷) and press Ok. -
Page 49: Display Main Symbols
English Silent Call divert activated Bluetooth on, visible to Roaming (in other network) others Bluetooth on, invisible to Missed call others Headset connected Bluetooth connected Unread text message/SMS Display main symbols Charger connected Mute Message sending success Charger removed Message sending failed Headset in Error Headset out... -
Page 50: Reset Settings
English Reset settings Press Menu � Settings � Security. Select Reset settings to reset the phone settings. All the changes that you have made to the phone settings will be reset to default settings. Enter the phone code and press Ok to reset. Tip: The default phone code is 1234. - Page 51 English Standby time decreases Battery charge capacity Install a new battery. too low Searching the network consumes battery power. Too far from base sta- Find a place with a stronger signal, or temporarily tion, phone is constantly turn off the phone. searching for signal Failure to place or receive calls Deactivate call barring.
-
Page 52: Safety Instructions
English Sound Ensure that you do not cover the built-in Others cannot hear you microphone. clearly on a call If using a headset, ensure that it is properly connected. Failure to add a contact Phonebook memory full Delete contacts to free up memory. Failure to set a function Contact your service provider. -
Page 53: Operating Environment
English Operating environment Follow the rules and laws that apply wherever you are, and always turn off the unit when- ever its use is prohibited or can cause interference or hazards. Only use the unit in its nor- mal user position. Parts of the unit are magnetic. -
Page 54: Li-Ion Battery
English Li-Ion battery This product contains a Li-Ion battery. There is a risk of fire and burns if the battery pack is handled improperly. WARNING Danger of explosion if battery is incorrectly replaced. To reduce risk of fire or burns, do not disassemble, crush, puncture, short external contacts, expose to temperature above 60°... -
Page 55: Vehicles
English Vehicles Radio signals can affect electronic systems in motor vehicles (for example, electronic fuel injection, ABS brakes, automatic cruise control, air bag systems) that have been incorrectly installed or are inadequately protected. Contact the manufacturer or its representative for more information about your vehicle or any additional equipment. -
Page 56: Care And Maintenance
English Do not edit registry settings or modify the device’s operating system. • Care and maintenance Your unit is a technically advanced product and should be treated with the greatest care. Negligence may void the warranty. • Protect the unit from moisture. Rain, snow, humidity, and all types of liquids can con- tain substances that corrode the electronic circuits. -
Page 57: Warranty
Doro reserves the right to revise this document or withdraw it at any time without prior notice. -
Page 58: Content Copyright
Doro does not provide a warranty for or take any responsibility for the functionality, con- tent, or end-user support of third-party apps provided with your device. By using an app, you acknowledge that the app is provided as is. -
Page 59: Specific Absorption Rate (Sar)
English The standard for hearing aid compatibility contains two types of ratings: M: To use your hearing aid in this mode, make sure that your hearing aid is set to • "M-mode" or acoustic coupling mode, and position the phones receiver near the hearing aid’s built-in microphone. -
Page 60: Correct Disposal Of This Product
Declaration of Conformity Hereby, Doro declares that the radio equipment type DFB-0250 (Doro 6060) is in compli- ance with Directives: 2014/53/EU and 2011/65/EU including delegated Directive (EU) 2015/863 amending Annex II. - Page 61 English...
- Page 62 DFB-0250 (Doro 6060) (3021,3031,3041,3051) English Version 1.1 © 2019 Doro AB. All rights reserved. www.doro.com REV 18831 — STR 20190521...
Need help?
Do you have a question about the DFB-0250 and is the answer not in the manual?
Questions and answers