Table of Contents
Advertisement
Advertisement
Table of Contents

Related Manuals for Doro 7010


Summary of Contents for Doro 7010
- Page 1 Doro 7010 English...
- Page 2 The items supplied with your phone might vary depending on the software and accessories available in your region or offered by your service provider. You can obtain additional accessories from your local Doro dealer. The sup- plied accessories provide the best performance with your phone.
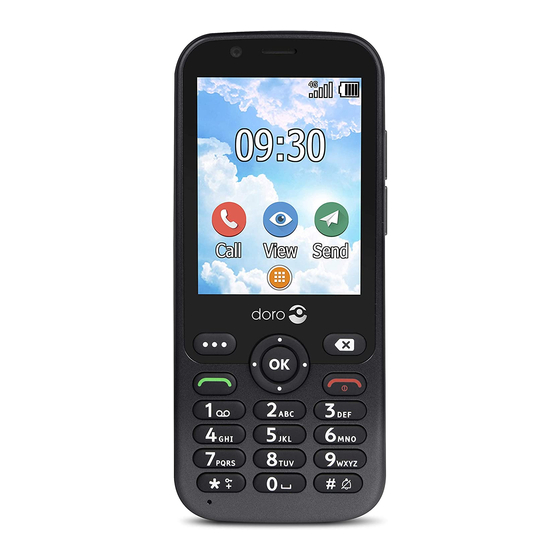
- Page 3 Front camera 12. Clear button Speaker 13. End call / Back / Power on/ Menu button 14. OK-button Four-way navigation keys 15. Input method/ Silent mode Call button 16. Second microphone Voicemail 17. Assistance button International prefix/ Symbols 18. Main camera Microphone 19.
-
Page 4: Table Of Contents
English Contents Congratulations on your purchase ..............1 Getting started ....................1 Unbox your new phone ................. 1 Insert SIM card, memory card and battery ........... 2 Charge the phone................... 4 Save energy .................... 5 Turn the phone on and off..............5 Get to know your phone................ - Page 5 English Number list................... 25 Activate text messages (SMS) .............. 25 Position SMS..................26 Signal type .................... 26 MyDoro......................27 For the helper(s) ................27 For the senior ................. 28 Messaging..................... 29 Create and send text message (SMS)/picture message (MMS) ..29 Read and handle messages..............
- Page 6 English Security & location................60 Start-up Wizard ..................62 Tutorials....................62 SIM Toolkit ................... 62 System ....................62 Additional functions ..................65 Display status symbols ................. 65 Display main symbols................66 Safety instructions..................66 Network services and costs ..............66 Operating environment ...............
-
Page 7: Congratulations On Your Purchase
3MP camera. Other features include enhanced audio with HD voice, easy navigation, a torch and an assistance button, as well as reas- ™ suring safety features such as support for Response by Doro with GPS po- sitioning. For more information about accessories or other Doro products please visit www.doro.com... -
Page 8: Insert Sim Card, Memory Card And Battery
English Insert SIM card, memory card and battery The SIM and memory card holder’s are located inside the battery compartment. Tip: Take care not to scratch the metallic contacts on the cards when inserting them into the card holders. Remove the battery cover IMPORTANT! Turn off the phone and disconnect the charger before removing the... - Page 9 English Insert the SIM and memory cards Insert the micro-SIM (3FF) card by gen- tly sliding it into the SIM card slot. Make sure that the SIM card’s contacts are facing inwards and that the cut off cor- ner is as shown. You can insert a second SIM card so you can have two phone numbers or service providers on a single device.
-
Page 10: Charge The Phone
English Insert the battery Insert the battery by sliding it into the battery compartment. Replace the back cover. Charge the phone While it’s possible that your phone will already come with enough power to be turned on right out of the box, we recommend charging the device fully before using it. -
Page 11: Save Energy
English Use a computer or other power source to charge Connect the small head of the USB charging cable to the phone. Plug the large head of standard USB cable to the computer’s USB port. Note! Generally charging is quicker if plugged directly into the wall. If the phone is turned off during charging, the phone is still charging. -
Page 12: Get To Know Your Phone
English Get to know your phone Assistive functions Use the symbols below to guide you through supporting sections in the manual. Seeing Handling Hearing Safety Start-up Wizard When starting the device for the first time, a Start-up Wizard will be initi- ated to set some basic settings. -
Page 13: Descriptions In This Document
English To view the notifications, press the options/notifications button • Press Clear all to remove all notifications. • Note! You do not delete the item itself, just the notification. IMPORTANT! When a new system software is available, a notification message is sent. Select to start downloading. - Page 14 English Assistance Press to make an assistance call. Back Return to the previous screen. Clear Press to clear the previous character. Options The options button have multiple functions. In idle mode it will display eventual notifications. In different menus and features it will display avail- able options for that feature.
-
Page 15: Navigate Your Phone
Meet “EVA” – ”Enkel, Vänlig och för Alla” (Swedish) (Easy, friendly and for everyone) Doro aim to take simplicity even further thanks to our intuitive, action- based interface, EVA. EVA makes using a phone even easier. It’s like having someone who understands your needs always by your side. Users never need to look around for things they can’t find. - Page 16 English For example, if you want to send a message to a contact that is available in your contact book. Tap the Send button. You are asked, Send What? and responds by se- lecting A message. You are asked To whom? and responds by selecting A contact. Select or search for a contact.
-
Page 17: Sharing Content
English My alarms to view your alarms or add a new one, see Alarm, p.35. My organiser Calculator to make some calculations, see Calculator, p.42. Calendar to view the calendar and your events, see Calendar, p.43. File manager to view stored videos, see File manager, p.43. Notes to view your notes, see Notes, p.44. -
Page 18: Enter Text
English Press Share to share a selected item: Messaging to send via a message. See Create and send text message • (SMS)/picture message (MMS), p.29. ® • Bluetooth to send to a Bluetooth device, see Bluetooth , p.54. • Email to send via e-mail, see Create and send e-mail, p.39. •... -
Page 19: Hearing Aid Compatible
English • Press each key once, even if the displayed character is not the one you want. The dictionary will suggest words based on the keys you have pressed. Example Press 3 , 7 , 3 , 3 to write the word “Fred”. Complete the word be- fore looking at the suggestions. -
Page 20: Connect The Phone To A Computer
English hearing aid—for example, placing the receiver slightly above the ear may result in better performance for hearing aids with microphones positioned behind the ear. T: To use your hearing aid in this mode, make sure that your hearing • aid is set to "T-mode"... -
Page 21: Calls
English Calls Make a call Enter the phone number including the area code. Delete with Press to make a call. Note! If you have more than one SIM card installed, you will be asked what SIM card to use. To set the preferred SIM card, see Dual SIM settings, p.53. -
Page 22: Call Options
English Call options Mute Select and press to disable the microphone. Press to re-enable the microphone. Loudspeaker Select and press to activate loudspeaker mode. Speak clearly into the phone microphone at a maximum distance of 1 m. Press to deactivate loudspeaker mode. -
Page 23: Call Settings
English Incoming call Outgoing call Missed call Select wanted entry and press to dial, or... Select an entry and press • Create new contact to save the number for a new contact. • Add to a contact to add the number for an existing contact. Send a message to send a text message. - Page 24 English Press Menu Phone Settings Display options Name format: Select First name first or Surname first. Calls Note! You need to select the SIM card you want to handle. Fixed dialling numbers (FDN) You can limit calls to certain numbers saved on the SIM card. The list of al- lowed numbers is protected by your PIN2-code.
- Page 25 English • When busy to divert incoming calls if the line is busy. When unanswered to divert incoming calls if unanswered. • When unreachable to divert incoming calls if the phone is turned • off or out of range. Call barring Your phone can be restricted to disallow certain types of calls.
- Page 26 English • Hide number to never show your number. Show number to always show your number. • Call waiting You can handle more than one call at a time, put the current call on hold and answer the incoming call. When activated, an alert tone is heard if there is an incoming call while talking.
-
Page 27: Contacts
English network service and you may need to subscribe to it first. For more infor- mation and for the voicemail number, contact your service provider. Press select Menu Phone Settings Voicemail SIM card (if applicable) Advanced settings Setup Voicemail number. Enter number and press OK to confirm. -
Page 28: Ice (In Case Of Emergency)
English • Set ringtone to send the selected contact as a vCard via selected method. ICE (In Case of Emergency) First responders can access additional information such as medical infor- mation from the victim's phone in case of emergency. In the event of a trauma, it is critical to have this information as early as possible to in- crease the chances of survival. -
Page 29: Assistance Button
In some markets you can also increase personal safety by adding the serv- ice Response by Doro, First the alarm contacts the relatives, and if no rela- tive is able to answer it is automatically sent to one of our alarm centres, where there is staff on duty 24/7. -
Page 30: Setting The Mode For The Assistance Button
English The assistance button allows easy access to contact your predefined help numbers should you need help. Make sure that the assistance function is activated before use, enter recipients in the numbers list and edit the text message. Setting the mode for the Assistance button Press Menu Settings... -
Page 31: Number List
English Press Menu Settings Assistance Activation: On normal to press and hold the button for approximately 3 sec- • onds, or press it twice within 1 second. On (3) to press the button 3 times within 1 second. • Off to disable the assistance button. •... -
Page 32: Position Sms
This function sends a text message with the users position to the recipients in numbers list when an assistance call occurs. The message contains date, time, and the positioning information of the Doro 7010 user. If no position can be found the message contains the latest known position. The position- ing message is sent after the editable assistance message, but before the assistance call sequence starts. -
Page 33: Mydoro
You need an Internet connection to use this service. Contact your service provider for detailed subscription costs before activating. The Doro 7010 user needs to have a MyDoro account to use the service. To be able to use the MyDoro web portal or the app any helpers also need a MyDoro account which they can set up on the web portal. -
Page 34: For The Senior
Login to the service and start using it by inviting the Senior you want to help, see Add senior., p.28. Note! To help the Doro 7010 user remotely from their phone the helpers can also install the MyDoro application from Play store or App store. -
Page 35: Messaging
English Note! You should never use the same password for multiple web sites/services. You can now close the invitation screen. MyDoro to open it Press Menu Login to the service. Messaging Create and send text message (SMS)/picture message (MMS) A text message (SMS) is a short text message that can be sent to other mo- bile phones. -
Page 36: Read And Handle Messages
English • Videos to add videos from your library. Capture video to use the camera to capture a video. • Audio to add audio from your library. • Record audio to record sound. • Slideshow to make a slideshow. • Contact to add a contact from your phonebook. - Page 37 English Settings Text message (SMS) Request delivery report You can select if you want the phone to notify you when your text message has reached the recipient. Note! Contact your service provider for detailed subscription costs before activating. Press Menu Messaging Settings Text message...
- Page 38 English Input mode With Input method you can select to write your text messages with special, distinguishing language specific characters (Unicode) or to write with more simple characters. Unicode or Automatic allows special characters. Special characters takes up more space and the size of each message might be re- duced to 70 characters.
- Page 39 English IMPORTANT! To receive and send picture messages (MMS) while roaming can be costly. Contact your service provider for data roaming rates before you use data roaming. General Cell broadcast You can receive messages on various topics from your service provider, such as weather or traffic conditions in a particular region.
-
Page 40: Whatsapp
English WhatsApp WhatsApp is a cross-platform messaging and Voice over IP (VoIP) service. The application allows you to send and receive text messages, voice calls, video calls, images and other media, documents, and user location. The service requires you to provide your mobile number. For more information, see www.whatsapp.com. -
Page 41: Alarm
English Switch camera To switch between the front and the back camera. • Flash Auto to automatically use the flash/lamp depending on the sur- • rounding light. Off to force the flash/lamp to on regardless of the surrounding • light. On to force the flash/lamp to off regardless of the surrounding •... -
Page 42: Media
English • Label to set a name for the alarm. Snooze or turn off • When the alarm goes off a signal will sound. Press Stop to turn off the alarm or press Snooze to repeat the alarm after 10 minutes. Tip: Select an alarm and press to edit , enable or disable... -
Page 43: Music
English • Rotate left to rotate the selected items left. Rotate right to rotate the selected items right. • Group by to group the photos. Select between Location and • Time Select a photo/video and press Press for picture/video options. Share to share a picture/video. -
Page 44: Recorder
English Press . The radio is on. The Menu Media FM Radio tuned frequency is displayed. Press to switch it off. Tip: Press to return to standby mode. The radio will continue to play. Disconnecting the headset will turn off the radio. Stations manual search Search station with •... -
Page 45: Videos
English Press Save to save the recording. Press Discard to discard the recording. Press for the list of recordings and press to play the recording. Recorder settings Press for options: • Voice quality to set the recording quality. Select between High, Mid and Low. High gives better quality, but consumes more memory space. - Page 46 English Press Menu Email. Press and then If you have more than one email account you can select from which account the message should be sent in the From field. Select To and enter an e-mail address. You will be provided suggested recipients from your phonebook and email history.
-
Page 47: E-Mail Settings
English • Reply all to reply to all recipients in the address field. This also includes recipients in the Cc field. • You can also mark/unmark the star in the top right of the mes- sage to change status. Star mark your important messages to find them easier. -
Page 48: Organiser
Select Add account to add further email accounts. Note! Some e-mail accounts require you to change security settings before you are able to access the account from your new Doro phone. If you receive a message saying the “authentication failed”. To avoid problems signing in, you may need to log-into your account with a computer and enable a security setting similar to “Allow less secure apps”. -
Page 49: Calendar
English Calendar Note! Calendar reminders will not work if the phone is turned off. Add event Press Menu Organiser Calendar. Select a date and press for the following options: • View to view events for day. • New event, then enter your required information: Event name to enter a event name and other relevant text. -
Page 50: Notes
English Press to see the available options. Notes Press Menu Organiser Notes. Press Add for a new note. Enter your note using the keypad, see Enter text , p.12. Press Save to save. Tip: For more options select an existing note, and press Web browser IMPORTANT! This service requires an Internet connection. -
Page 51: Network & Internet
English Network & Internet Aeroplane mode In Aeroplane mode you can’t make or receive calls, surf the web or down- load emails, or do anything that requires an Internet connection, this is to prevent disturbance to sensitive equipment. You can still listen to music, watch videos and other content, as long as all this content is saved on your memory card or internal storage. - Page 52 English Note! If nothing is displayed although you know that there should be available networks, set the switch to off and then on again. Select your wanted network and press and enter the Password. Note! Check Show password to see it in clear text. Press Advanced options if you need specific settings.
- Page 53 English Mobile network You can see the active network operator. To change network operator, see Network operators, p.49. Data roaming Your phone automatically selects your (service providers) home network if within range. If not within range, you can use another network, provided your network operator has an agreement that allows you to do so.
- Page 54 English Press Menu Settings Network & Internet Mobile net- select SIM card (if applicable). work Set the switch Enhanced 4G LTE Mode to to activate it or deactivate. Note! Your network operator also needs to support this feature. Wi-Fi calling For improved voice communications over Wi-Fi.
- Page 55 English • Password to enter password. Server to enter password. • MMSC to enter the MMSC. • MMS proxy to enter MMS proxy address. • MMS port to enter MMS proxy port. • MCC to enter the operator MCC code. •...
- Page 56 English IMPORTANT! If you select a network manually, your phone will lose network connection when the selected network is out of reach. Remember to set Choose automatically. Data usage Data Saver You can reduce data usage by preventing some apps from sending or re- ceiving data in the background.
- Page 57 English The Mobile data usage counter gathers traffic information from all apps using mobile data like internet browser, MMS and e-mail. You can keep track of the amount of data transferred to and from your device over the mobile network since last reset. Press Menu Settings...
- Page 58 English Share your phone’s Internet connection by connecting via USB cable. You must first connect the computer to the phone. Press Menu Settings Network & Internet Hotspot & tethering. Set the USB Tethering switch to on to enable Internet sharing via the USB cable.
- Page 59 English • Always to have the Wi-Fi hotspot enabled until you manually turn it off. • Turn off when idle for 5 min to automatically turn off after 5 mi- nutes, if idle. Turn off when idle for 10 min to automatically turn off after •...
- Page 60 English • Messaging Reset Wi-Fi, mobile & Bluetooth Here you can reset all network settings, including Wi-Fi, mobile data and Bluetooth settings. Press Menu Settings Network & Internet Reset Wi-Fi, mobile & Bluetooth. Select SIM card if applicable and press Reset settings. Press Reset settings to confirm the reset.
- Page 61 English Received files You can both send and receive files via Bluetooth. Here you can see the files received via Bluetooth. Files received via Bluetooth can also be dis- played using the file manager, see File manager, p.43. Use the share func- tion to send files via Bluetooth, see Sharing content, p.11.
- Page 62 English USB storage is enabled by default and allows a computer or device con- nected using a USB-cable to access files on this phone. You can change that with the following settings. Press Menu Settings Connected devices USB. Set the wanted setting: Charge this device to only allow charging.
-
Page 63: Display
English turns off automatically when your device is charging. When activated, the status bar turns orange. Press Menu Settings Battery Battery saver. Set the switch to on to manually activate it. Turn on power saving mode automatically Set the power saving mode to automatically start functioning when the battery level reaches a certain level. -
Page 64: Sound
English • Wallpapers for predefined available wallpapers. Gallery for images available in your gallery. • Sleep Select the delay time for the display backlight. Press Menu Settings Display Sleep. Select the how long time the display lit. Press to confirm. Font size You can adjust the text size for the menu and messages. - Page 65 English Press Menu Settings Sound Audio setup: Normal for normal hearing in normal conditions. • High for moderate hearing impairment or use in a very noisy • environment. HAC mode for use with hearing aid. • Press to confirm. Note! Try different settings to find the one that suits your hearing the best. Keypad tone Select the sound you hear when you press the keys of the phone.
-
Page 66: Storage
English Press to confirm. Storage View how much space is used by each category of files. See also File man- ager, p.43. Security & location Passwords Change phone code Press Menu Settings Security & location Passwords Phone code. Enter current code and press OK. Enter new code and press OK. - Page 67 English Press Menu Settings Security & location Automatically lock. Select after what time the phone automatically locks. Press to confirm. Location Global Positioning System (GPS) and additional supplemental information such as Wi-Fi and mobile networks are used to approximate your location. Location data may be used by apps and services, such as assistance calls and weather forecasts.
-
Page 68: Start-Up Wizard
English SIM card lock Press Menu Settings Security & location SIM card lock select SIM card (if applicable). Set the switch to activate the PIN code. You need to enter the • PIN code every time the phone is started. Set the switch to deactivate the PIN code. - Page 69 English Press Menu Settings System Languages & input Languages. Select a language. Predictive text Press Menu Settings System Languages & input Predictive text. Set Predictive text on/off with Date & time Tip: The phone is set to automatically update time and date according to current time zone.
- Page 70 English have a working data connection to be able to perform the update with the firmware over-the-air (FOTA) service. See Mobile network, p.47 or Wi-Fi, p.45 on how to activate a data connection. Press Menu Settings System Software update. Press Check for updates to manually check if there’s a software up- date available.
-
Page 71: Additional Functions
English photos, videos and other user data (SIM card and memory card are not affected). Press Erase everything to confirm and continue to delete all your per- sonal information. Note! This action cannot be undone! Enter the phone code and press OK. Tip: The default phone code is 1234. -
Page 72: Display Main Symbols
English Notification (missed call, new Bluetooth connected message, etc...) Aeroplane mode activated Headset connected Display main symbols Charger connected Charger removed Query Error Warning Done (confirmed) Processing, please wait Battery level low Assistance button call Safety instructions CAUTION The unit and the accessories can contain small parts. Keep all of the equipment out of the reach of small children. -
Page 73: Areas With Explosion Risk
English manufacturer of the equipment to determine if it has adequate protection against exter- nal radio signals, or if you have any questions. If notices have been put up at health care facilities instructing you to turn off the unit while you are there, you should comply. Hospi- tals and other health care facilities sometimes use equipment that can be sensitive to ex- ternal radio signals. -
Page 74: Protect Your Hearing
English Protect your hearing This device has been tested to comply with the Sound Pressure Level requirement laid down in the applicable EN 50332-1 and/or EN 50332-2 standards. WARNING Excessive exposure to loud sounds can cause hearing damage. Exposure to loud sounds while driving may distract your attention and cause an accident. -
Page 75: Protect Your Personal Data
English It is prohibited to use the unit in flight. Turn off the unit before you board a plane. Using wireless telecom units inside a plane can pose risks to air safety and interfere with tele- communications. It may also be illegal. Protect your personal data Protect your personal data and prevent leakage or misuse of sensitive information While using your device, be sure to back up important data. -
Page 76: Warranty
English Do not use or keep the unit in dusty, dirty environments. The unit’s moving parts and • electronic components can be damaged. Do not keep the unit in warm places. High temperatures can reduce the lifespan for • electronic equipment, damage batteries and distort or melt certain plastics. •... -
Page 77: Specifications
Please note that this is a voluntary manufacturer’s warranty and provides rights in addi- tion to, and does not affect statutory rights of end-users. This guarantee does not apply if batteries other than DORO original batteries are used. Specifications Network bands (MHz) - Page 78 Doro reserves the right to revise this document or withdraw it at any time without prior notice.
-
Page 79: Hearing Aid Compatibility
Malmö, Sweden. To be valid, such a request must be made within three (3) years from the date of the distribution of this product by Doro AB, or in the case of code licensed under the GPL v3 for as long as Doro AB offers spare parts or customer support for this product model. -
Page 80: Correct Disposal Of This Product
English Head SAR: 1.102 W/kg Body SAR: 1.661 W/kg During normal use, the SAR values for this device are usually well below the values stated above. This is because, for purposes of system efficiency and to minimize interference on the network, the output power of your mobile device is automatically decreased when full power is not needed for the call. -
Page 81: Declaration Of Conformity
Declaration of Conformity Hereby, Doro declares that the radio equipment type DFB-0280 (Doro 7010) is in compli- ance with Directives: 2014/53/EU and 2011/65/EU including delegated Directive (EU) 2015/863 amending Annex II. - Page 82 DFB-0280 (Doro 7010) (1031,1041) English Version 1.0 © 2019 Doro AB. All rights reserved. www.doro.com REV 19019 — STR 20191025...
Need help?
Do you have a question about the 7010 and is the answer not in the manual?
Questions and answers