Table of Contents
Advertisement
Available languages
Available languages
Quick Links
HANDS-FREE COLOR VIDEO INTERCOM EXPANSION MONITOR STATION
POSTE DE SURVEILLANCE D'EXTENSION D'INTERPHONE VIDÉO COULEUR MAINS LIBRES
MONITOR SECUNDARIO DE INTERCOMUNICACIÓN CON VÍDEO A COLOR MANOS LIBRES
HANDENVRIJE UITBREIDINGSBEWAKINGSPOST VOOR KLEURENVIDEOFOON
POSTAZIONE MONITOR SUPPLEMENTARE VIDEOCITOFONO A COLORI CON VIVAVOCE
FREISPRECH-FARBVIDEO-ERWEITERUNGSMONITORSTELLE
INSTALLATIONS- UND BEDIENUNGSANLEITUNGHANDBUCH
Thank you for selecting Aiphone for your communication and security needs. Please read this manual carefully for proper system
operation. For future reference, keep manual in a safe place.
JO-1FD
INSTALLATION & OPERATION MANUAL
MANUEL D'INSTALLATION ET D'UTILISATION
MANUAL DE INSTALACIÓN Y OPERACIÓN
INSTALLATIE- EN BEDIENINGSHANDLEIDING
MANUALE D'INSTALLAZIONE E USO
J O - 1 F D
E X P A N S IO
N M O N IT O
R S T A T IO
N
FK1898 A P0713KD 55061
Advertisement
Table of Contents

Related Manuals for Aiphone JOS-1A2


Summary of Contents for Aiphone JOS-1A2
- Page 1 N M O N IT O R S T A T IO Thank you for selecting Aiphone for your communication and security needs. Please read this manual carefully for proper system operation. For future reference, keep manual in a safe place.
- Page 2 * If liquid crystal is ingested, immediately gargle with water and seek medical * This manual was created by Aiphone Co., Ltd., all rights reserved. Copying, in part attention. or in whole, this manual without prior permission from Aiphone Co., Ltd. is strictly forbidden.
- Page 3 FEATURE AND SYSTEM EXAMPLE Master monitor station • Responds to a call from the door station. • Monitoring the entrance. • Can be used with a call extension speaker. Call extension speaker Living room on 2nd floor Living room Entrance Call extension speaker Expansion monitor station...
-
Page 4: Package Contents
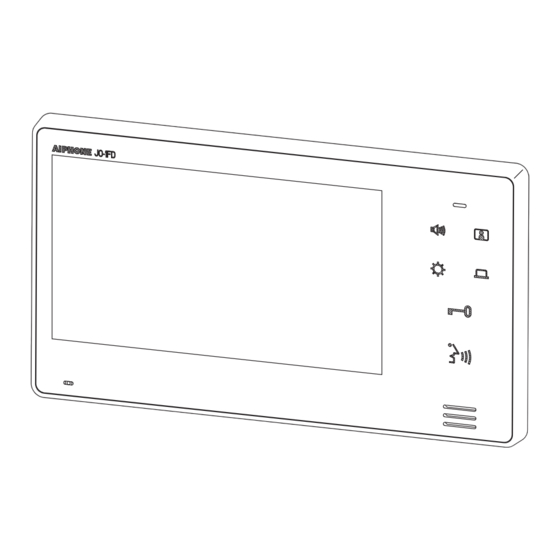
PACKAGE CONTENTS Manual JO-1FD NOTES: • Mounting and Wood mounting screws not included PART NAMES Remove protective film before use. Volume control button JO-1FD [During standby] Adjust the calling volume. Volume adjustment range: (mute), [During communication or monitoring] Color LCD screen Adjust the communication volume. -
Page 5: Installation Procedures
INSTALLING EXPANSION MONITOR STATION When installing the expansion monitor station with the master monitor station A Install and connect the expansion monitor station between the master monitor station and the door station. Door station Expansion monitor station Master monitor station →... -
Page 6: Installation
INSTALLATION Cable Use PE (polyethylene)-insulated PVC jacket cable. Never use individual conductors, twisted pair cable, or Parallel or jacketed 2-conductor, mid-capacitance, non-shielded coaxial cable. cable is recommended. Wiring method, wiring distance JO-DV JO-1FD JO-1MD JO-DA IER-2 IER-2 JO-DVF PS18 : PS-1820, PS-1820S, PS1820UL, PS-1820D Ø... - Page 7 MOUNTING jO-1FD <Back wiring> Fasten the mounting 3-gang box bracket to the wall Wires 83.5mm (3-5/16") Mounting bracket (attached to the unit with shipment) 1. Press release button to insert or remove wire. 2. Insert wire into the terminal. Mount the unit on the Mounting screw ×...
- Page 8 WIRING Insert wires securely into each terminal as shown. Video door station Expansion monitor station Master monitor station JO-DA JO-DV JO-DVF A1 A2 JO-1FD JO-1MD Electric door strike AC transformer EL-12S (To optional units) (To optional units) (AC/DC 24V, 0.5A N/O dry closure contact) (AC/DC 24V, 0.5A N/O dry closure contact) (Minimum contact: 100mV DC, 0.1mA) (Minimum contact: 100mV DC, 0.1mA)
-
Page 9: Answering A Door Call
OPERATIONS Answering a door call Push Call button. The call tone sounds, an image appears on screen. • The screen turns off after approx. 45 seconds if not answered. Push , and after the beep, communicate hands-free (hands-free mode). After finishing communication, push and communication will end after the beep. -
Page 10: Night Illumination
Activating door release Press Door release is activated and door can be opened. During release: Status LED lights. Monitoring door station Push in standby mode. The video image from the door station and the incoming audio is heard. If you do not push , the caller will not hear sounds from the inside station. -
Page 11: Adjust Screen Brightness
Adjust screen brightness Push when the screen is difficult to see. The screen brightness changes from [ 1] (the darkest) to [ 5] (the brightest) during communication or monitoring. NOTES: • The current brightness level is displayed on the screen and disappears in approx. -
Page 12: Précautions Générales
* Lorsque des appareils occasionnant des parasites se trouvent à proximité * Ce manuel a été créé par Aiphone Co., Ltd., tous droits réservés. La copie d’une (interrupteur crépusculaire, onduleur, appareils électriques). - Page 13 FONCTIONNALITÉS ET EXEMPLE DE SYSTÈME Poste de surveillance principal • Permet de répondre à un appel effectué à partir d’un poste de porte. • Permet de surveiller la porte d’entrée. • Peut être utilisé avec un haut-parleur d’extension d’appel. Haut-parleur d’extension d’appel Salon au 1er étage Salon...
-
Page 14: Contenu De L'emballage
CONTENU DE L’EMBALLAGE Manuel JO-1FD REMARQUES: • Les vis de montage et les vis de montage sur bois ne sont pas fournies. NOMENCLATURE Retirez le film protecteur avant utilisation. Bouton de contrôle du volume JO-1FD [En mode d’attente] Permet de régler le volume d’appel. Plage de réglage du volume : (muet), [Lors de la communication ou de la surveillance]... -
Page 15: Procédures D'installation
INSTALLATION DU POSTE DE SURVEILLANCE D’EXTENSION Lors de l’installation du poste de surveillance d’extension avec le poste de surveillance principal A Installez et connectez le poste de surveillance d’extension entre le poste de surveillance principal et le poste de porte. Poste de porte Poste de surveillance d’extension Poste de surveillance principal... -
Page 16: Emplacements De Montage
INSTALLATION Câble Il est recommandé d’utiliser un câble téléphonique LYT1 8/10ème. N’utilisez jamais de conducteurs individuels, de câble à Il est recommandé d’utiliser un câble à gaine PVC isolée PE paires torsadées ou de câble coaxial. (polyéthylène). Méthode de câblage, longueur de câblage JO-DV JO-1FD JO-1MD... -
Page 17: Montage
MONTAGE jO-1FD <Câblage arrière> Fixez le support de Boîtier de raccordement électrique triple montage sur le mur. Fils 83,5 mm Support de montage (fourni avec l’unité lors de l’expédition) 1. Appuyez sur le bouton de libération pour insérer ou enlever un câble. 2. - Page 18 CâBLAGE Insérez les câbles solidement dans chaque borne comme indiqué. Poste de porte vidéo Poste de surveillance d’extension Poste de surveillance principal JO-DA JO-DV JO-DVF A1 A2 JO-1FD JO-1MD Gâche électrique Transformateur CA pour gâche EL-12S (Vers les unités en option) (Vers les unités en option) (Contact sec de commande N/O 24 V CA/CC, 0,5 A) (Contact sec de commande N/O 24 V CA/CC, 0,5 A)
- Page 19 UTILISATION Répondre à un appel du poste de porte Appuyez sur le bouton d’appel. La tonalité d’appel se fait entendre et une image apparaît à l’écran. • L’écran s’éteint au bout de 45 secondes si l’appel n’est pas répondu. Appuyez sur , et après le bip communiquez en mode mains libres.
- Page 20 Activation de la gâche électrique Appuyez sur La gâche électrique est activée et la porte peut être ouverte. Pendant l’activation de la gâche électrique : La DEL d’état s’allume. Surveillance d’un poste de porte Appuyez sur en mode d’attente. Vous pouvez voir l’image vidéo et entendre le son provenant du poste de porte.
-
Page 21: Réglage De La Luminosité De L'écran
Réglage de la luminosité de l’écran Appuyez sur lorsque l’écran est difficile à voir. Vous pouvez régler la luminosité de l’écran de [ 1] (luminosité la plus sombre) à 5] (luminosité la plus claire) pendant la communication ou de la surveillance. -
Page 22: Precauciones Generales
* Este sistema no se ha diseñado para salvar vidas ni para la prevención de delitos. Se trata simplemente de un medio complementario para transmitir información. En ningún caso Aiphone se hará responsable de la pérdida de vidas o las pérdidas PRECAUCIONES GENERALES materiales que se produzcan mientras esté... - Page 23 EJEMPLO DE SISTEMA Y FUNCIONAMIENTO Monitor principal • Responde a una llamada realizada desde una placa de entrada. • Monitoreo de la entrada. • Se puede utilizar con un altavoz de llamada secundario. Altavoz de llamada secundario Sala de estar en el primer piso Sala de estar Entrada...
-
Page 24: Contenido Del Paquete
CONTENIDO DEL PAqUETE Manual JO-1FD NOTAS: • Los tornillos de montaje no están incluidos. NOMBRES DE PIEZA Quite la película protectora antes del uso. Botón del control de volumen JO-1FD [Durante el modo de espera] Ajusta el volumen de llamada. Rango de ajuste del volumen: (silencio), [Durante la comunicación o el monitoreo]... -
Page 25: Proceso De Instalación
INSTALACIÓN DEL MONITOR SECUNDARIO Al instalar el monitor secundario con el monitor principal A Instale y conecte el monitor secundario entre el monitor principal y la estación de puerta. Estación de puerta Monitor secundario Monitor principal → Véase el proceso A de más abajo. Al añadir el monitor secundario a un sistema B existente Cuando se añade el monitor secundario, retire el monitor principal e instale el secundario en su lugar. -
Page 26: Instalación
INSTALACIÓN Cable Use cable con revestimiento de PVC aislado con PE (Polietileno). Nunca use conductores individuales, cable de par Se recomienda el uso de cable sin funda, de media capacitancia, trenzado o cable coaxial. de 2 conductores paralelo o con pantalla. Método de cableado, distancia de los cables JO-DV JO-1FD... -
Page 27: Montaje
MONTAJE jO-1FD <Cableado posterior> Sujete el soporte de Caja de empotrar triple montaje en la pared. Cables 83,5 mm Soporte de montaje (pre-instalado de fábrica) 1. Pulse el botón de liberación para insertar o retirar el cable. 2. Inserte el cable en el terminal. Coloque el equipo Tornillo de montaje x 4 (vástago del tornillo: Ø... - Page 28 CABLEADO Inserte los cables firmemente en cada terminal según la siguiente figura. Estación de puerta con vídeo Monitor secundario Monitor principal JO-DA JO-DV JO-DVF A1 A2 JO-1FD JO-1MD Cerradura eléctrica Transformador de CA EL-12S (A las unidades opcionales) (A las unidades opcionales) (Contacto de cierre seco N/O, CA/CC 24 V, 0,5 A) (Contacto de cierre seco N/O, CA/CC 24 V, 0,5 A) (Contacto mínimo: 100 mV CC, 0,1mA)
- Page 29 FUNCIONES Responder a una llamada de puerta Pulse el botón de llamada. Suena el tono de llamada, aparece una imagen en la pantalla. • La pantalla se apaga tras aprox. 45 segundos si no se responde. Pulse y, tras el pitido, utilice la comunicación de manos libres (modo de manos libres).
- Page 30 Activación de la apertura de puerta Pulse La apertura de puerta se activa y se puede abrir la puerta. Durante la apertura: El LED de estado se ilumina. Monitoreo de estación de puerta Pulse en el modo de espera. Se escucha el audio entrante y se ve la imagen de vídeo de la estación de puerta.
-
Page 31: Especificaciones
Ajuste del brillo de pantalla Pulse cuando sea difícil visualizar la pantalla. El brillo de la pantalla cambia de [ 1] (nivel más oscuro) a [ 5] (nivel más claro) durante la comunicación o el monitoreo. NOTAS: • El nivel de brillo actual se muestra en la pantalla y desaparece tras aprox. - Page 32 * Dit systeem is niet bedoeld voor levensinstandhouding of inbraakpreventie. Het is * Bij contact met de ogen of de huid moet u onmiddellijk met zuiver water een aanvullend middel om informatie over te dragen. Aiphone is onder geen enkele (laten) spoelen en medische hulp zoeken.
- Page 33 FUNCTIES EN SYSTEEMVOORBEELD Hoofdbewakingspost • Oproepen van de deurpost beantwoorden. • De ingang bewaken. • Kan uitgebreid worden met een extra bel. Extra bel Woonkamer op de 1e verdieping Woonkamer Ingang Extra bel Uitbreidingsbewakingspost Deurpost • Oproepen van de deurpost beantwoorden. •...
-
Page 34: Inhoud Van De Verpakking
INHOUD VAN DE VERPAKKING Handleiding JO-1FD OPMERKINGEN: • Montage- en houtmontageschroeven zijn niet inbegrepen. NAMEN VAN ONDERDELEN Verwijder de beschermfolie vóór gebruik. Volumeknop JO-1FD [Tijdens stand-by] Het oproepvolume aanpassen. Instelbereik van het volume: (uitgeschakeld), [Tijdens communicatie of bewaking] Lcd-kleurenscherm Het communicatievolume aanpassen. Geeft het camerabeeld weer tijdens oproepen Instelbereik van het volume: van deurposten, communicatie met een... - Page 35 DE UITBREIDINGSBEWAKINGSPOST INSTALLEREN De uitbreidingsbewakingspost installeren met de hoofdbewakingspost A Installeer en sluit de uitbreidingsbewakingspost aan tussen de hoofdbewakingspost en de deurpost. Deurpost Uitbreidingsbewakingspost Hoofdbewakingspost → Zie procedure A hieronder. De uitbreidingsbewakingspost toevoegen aan een bestaand systeem B Als de uitbreidingsbewakingspost moet worden toegevoegd, verwijdert u de hoofdbewakingspost en installeert u de uitbreidingsbewakingspost op de plaats waar de hoofdbewakingspost was.
- Page 36 INSTALLATIE Kabel Gebruik kabel met massieve geleiders, voorzien van Gebruik nooit individuele geleiders of coaxkabel. polyethyleenisolatie. Bekabelingswijze, bekabelingsafstand JO-DV JO-1FD JO-1MD JO-DA IER-2 IER-2 JO-DVF PS18 : PS-1820, PS-1820S, PS1820UL, PS-1820D Ø 0,65 mm Ø 0,8-1,2 mm 50 m 100 m 10 m 50 m 150 m...
- Page 37 MONTAGE jO-1FD <Bekabeling in de muur> Zet de montagesteun 3-inbouwdoos vast op de muur. Kabels 83,5 mm Montagesteun (bij levering aan het toestel bevestigd) 1. Druk op de ontgrendelknop om een kabel in te steken of los te maken. 2. Steek de draad in de aansluitklem. Montageschroeven ×...
- Page 38 BEKABELING Steek de kabels veilig in elke aansluitklem zoals getoond. Videodeurpost Uitbreidingsbewakingspost Hoofdbewakingspost JO-DA JO-DV JO-DVF A1 A2 JO-1FD JO-1MD Elektrisch deurslot AC-transformator EL-12S (Naar optionele apparaten) (Naar optionele apparaten) (AC/DC 24 V, 0,5 A normaal open potentiaalvrij contact) (AC/DC 24 V, 0,5 A normaal open potentiaalvrij contact) (Minimumcontact: 100 mV DC, 0,1 mA) (Minimumcontact: 100 mV DC, 0,1 mA) Deurslotsturing...
- Page 39 BEDIENING Een deuroproep beantwoorden Druk op de oproepknop. Het oproepgeluid klinkt en er verschijnt beeld op het scherm. • Bij geen antwoord wordt het scherm na ongeveer 45 seconden uitgeschakeld. Druk op . Na de pieptoon kunt u handenvrij communiceren (handenvrije stand).
- Page 40 De deurontgrendeling inschakelen Druk op De deurontgrendeling wordt geactiveerd en de deur kan geopend worden. De statusled brandt tijdens het ontgrendelen. Deurpost bewaken Druk in de stand-bystand op Het videobeeld van de deurpost en het geluid worden weergegeven. Als u niet op drukt, kan de persoon aan de deur geen geluid van binnen horen.
- Page 41 De schermhelderheid aanpassen Druk op als het beeld op het scherm slecht zichtbaar is. Tijdens communicatie of bewaking kunt u de schermhelderheid instellen op een stand tussen [ 1] (donker) en [ 5] (licht). OPMERKINGEN: • Het huidige helderheidsniveau wordt op het scherm weergegeven en verdwijnt na ongeveer 5 seconden.
-
Page 42: Precauzioni Generali
* Luoghi in prossimità di dispositivi che generano disturbo, come reostati o apparecchi elettrici invertitori. * Questo manuale è stato creato da Aiphone Co. Ltd., tutti i diritti riservati. La copia parziale o totale del manuale senza previa autorizzazione da parte di Aiphone Co., 8. - Page 43 CARATTERISTICHE ED ESEMPIO DI SISTEMA Postazione monitor principale • Risponde alle chiamate dalla postazione di porta. • Monitoraggio dell’ingresso. • È possibile utilizzarlo con altoparlante supplementare. Altoparlante di estensione di chiamata Soggiorno del primo piano Soggiorno Ingresso Altoparlante di estensione di chiamata Postazione monitor Postazione di porta...
-
Page 44: Contenuto Della Confezione
CONTENUTO DELLA CONFEZIONE Manuale JO-1FD NOTE: • Le viti per l’installazione e il montaggio per legno non sono incluse. NOME PARTE Rimuovere la pellicola protettiva prima dell'uso. Pulsante di controllo del volume JO-1FD [Durante lo stato di attesa] Regola il volume di chiamata. Intervallo di regolazione del volume: (muto), Schermo LCD a colori... -
Page 45: Procedure Di Installazione
INSTALLAZIONE DELLA POSTAZIONE MONITOR SUPPLEMENTARE Installazione di una postazione monitor supplementare e di una postazione monitor principale A Installare e collegare la postazione monitor supplementare tra la postazione monitor principale e la postazione di porta. Postazione di porta Postazione monitor supplementare Postazione monitor principale →... -
Page 46: Installazione
INSTALLAZIONE Cavo Utilizzare cavi isolanti rivestiti in PVC PE (polietilene). Non utilizzare mai conduttori singoli, un cavo a doppini È consigliato l’uso di un cavo non schermato, di capacità media a intrecciati o un cavo coassiale. 2 conduttori rivestiti o in parallelo. Metodo di cablaggio, distanza di cablaggio JO-DV JO-1FD... - Page 47 MONTAGGIO jO-1FD <Cablaggio posteriore> Fissare la staffa di 3-cassetta montaggio al muro. Cavi 83,5 mm Staffa di montaggio (fornito con l’unità al momento della spedizione) 1. Premere il pulsante di sblocco per inserire o rimuovere il cavo. 2. Inserire il cavo nel terminale. Viti di montaggio ×...
- Page 48 CABLAGGIO Inserire saldamente i cavi in tutti i terminali come mostrato. Postazione videocitofonica Postazione monitor supplementare Postazione monitor principale JO-DA JO-DV JO-DVF A1 A2 JO-1FD JO-1MD Serratura elettrica Trasformatore CA EL-12S (Alle unità opzionali) (Alle unità opzionali) (Chiusura di contatto a secco N/O, CA/CC 24 V, 0,5 A) (Chiusura di contatto a secco N/O, CA/CC 24 V, 0,5 A) (Contatto minimo: 100 mV CC, 0,1 mA) (Contatto minimo: 100 mV CC, 0,1 mA)
-
Page 49: Risposta A Una Chiamata
OPERAZIONI Risposta a una chiamata Premere il pulsante di chiamata. Viene emesso un tono di chiamata e l’immagine viene visualizzata sullo schermo. • Se non c’è risposta entro 45 secondi, lo schermo si spegne. Premere e, dopo il segnale acustico, comunicare a vivavoce (modalità vivavoce). - Page 50 Attivazione del rilascio del blocco porta Premere Il rilascio del blocco porta viene attivato ed è possibile aprire la porta. Durante il rilascio: il LED di stato si illumina. Monitoraggio di una postazione di porta Push in standby mode. Viene visualizzata l’immagine video della postazione di porta ed è possibile ascoltare l’audio in arrivo.
- Page 51 Regolazione della luminosità dello schermo Premere quando la visualizzazione dello schermo non è buona. La luminosità dello schermo passa da [ 1] (luminosità minima) 5] (luminosità massima) durante la comunicazione o il monitoraggio. NOTE: • La luminosità corrente è visualizzata sullo schermo e scompare dopo circa 5 secondi.
-
Page 52: Allgemeine Vorsichtsmassnahmen
Inhalt oder Spezifikationen dieses Produktes entstehen. Geräte mit Wechselrichter in der Nähe sind. * Dieses Handbuch wurde von der Aiphone Co., Ltd., erstellt. Alle Rechte 8. Üben Sie niemals Druck auf den Bildschirm aus. Wenn dieser zerbricht, vorbehalten. - Page 53 FUNKTIONEN UND SYSTEMBEISPIEL Hauptmonitorstelle • Antworten auf einen Anruf der Türstelle • Überwachen des Eingangs • Verwendung mit einem zusätzlichen Erweiterungslautsprecher möglich Zusatz-Rufsignal- Lautsprecher Wohnzimmer in der 1. Etage Wohnzimmer Eingang Zusatz-Rufsignal- Lautsprecher Erweiterungsmonitorstelle Türstelle • Antworten auf einen Anruf der Türstelle •...
-
Page 54: Reset-Taste
VERPACKUNGSINHALT Handbuch JO-1FD HINWEISE: • Montage- und Wandmontageschrauben nicht mitgeliefert TEILBEZEICHNUNGEN Entfernen Sie vor Gebrauch die Schutzfolie. Lautstärketaste JO-1FD [Im Standby] Dient zum Anpassen der Ruftonlautstärke. Lautstärkeeinstellbereich: (Stumm), [Während der Kommunikation oder Überwachung] LCD-Farbbildschirm Dient zum Anpassen der Gesprächslautstärke. Zeigt die Bilder der Kamera während Lautstärkeeinstellbereich: eines Anrufs, der Kommunikation und Überwachung der Türstelle an. - Page 55 INSTALLIEREN DER ERWEITERUNGSMONITORSTELLE Bei der Installation der Erweiterungsmonitorstelle mit der Hauptmonitorstelle A Installieren und schließen Sie die Erweiterungsmonitorstelle zwischen der Hauptmonitorstelle und der Türstelle an. Türstelle Erweiterungsmonitorstelle Hauptmonitorstelle → Siehe Verfahren A unten. Beim Hinzufügen der Erweiterungsmonitorstelle an ein vorhandenes System B Wenn eine Erweiterungsmonitorstelle hinzugefügt wird, entfernen Sie die Hauptmonitorstelle und installieren Sie die Erweiterungsmonitorstelle an dem Ort, an dem zuvor die Hauptmonitorstelle installiert war.
- Page 56 INSTALLATION Kabel Nutzen Sie PE (Polyethylen)-isoliertes PVC-ummanteltes Kabel. Verwenden Sie niemals einzelne Leiter, verdrillte Paralleles oder ummanteltes 2-Leiter, mittlere Kabelkapazität, Kabelpaare oder Koaxialkabel. nicht abgeschirmtes Kabel wird empfohlen. Verdrahtungsmethode, Verdrahtungsentfernung JO-DV JO-1FD JO-1MD JO-DA IER-2 IER-2 JO-DVF PS18 : PS-1820, PS-1820S, PS1820UL, PS-1820D Ø...
- Page 57 MONTAGE jO-1FD <UP-Verdrahtung> Montieren Sie den Wandhalter an der 3er-UP-Dose Wand. Kabel 83,5 mm Wandhalter (bei Auslieferung am Gerät befestigt) 1. Drücken Sie auf die Entriegelungstaste, um einen Draht einzusetzen oder zu entfernen. 2. Stecken Sie den Draht in die Anschlussklemme. Montageschraube 4×...
- Page 58 VERKABELUNG Setzen Sie die Drähte wie angezeigt sicher in jede Anschlussklemme. Video-Türstelle Erweiterungsmonitorstelle Hauptmonitorstelle JO-DA JO-DV JO-DVF A1 A2 JO-1FD JO-1MD Elektrischer Türöffner TÖ-Versorgung EL-12S (freier Schaltkontakt) (freier Schaltkontakt) (Gleich-/Wechselstrom 24 V, 0,5 A potentialfreier (Gleich-/Wechselstrom 24 V, 0,5 A potentialfreier N/O-Schließkontakt) N/O-Schließkontakt) (Mindestkontakt: 100 mV Gleichstrom, 0,1 mA) Türöffner...
-
Page 59: Bedienung
BEDIENUNG Antworten eines Türanrufs Drücken Sie die Ruftaste. Der Rufton ertönt und der Bildschirm wird aktiviert. • Wenn nach ca. 45 Sekunden nicht zur Türstelle gesprochen wurde, schaltet sich der Bildschirm wieder aus. Drücken Sie die Taste und sprechen Sie nach dem Piepton, ohne die Taste gedrückt halten zu müssen (Freisprechmodus). - Page 60 Betätigen des Türöffners Drücken Sie auf Der Türöffner wird betätigt und die Tür kann geöffnet werden. Während des Betätigen des Türöffners: Die Status-LED leuchtet. Überwachung Türstelle Drücken Sie auf im Standby-Modus. Das Videobild von der Türstelle und das eingehende Audio signal werden wiedergegebenen.
-
Page 61: Anpassen Der Bildschirmhelligkeit
Anpassen der Bildschirmhelligkeit Drücken Sie auf , wenn das Bild zu dunkel ist. Die Bildschirmhelligkeit wechselt während der Kommunikation oder der Überwachung von [ 1] (am dunkelsten) zu [ 5] (am hellsten). HINWEISE: • Der derzeitige Helligkeitspegel wird auf dem Bildschirm angezeigt und nach ca. - Page 62 MEMO...
- Page 63 MEMO...
-
Page 64: Warranty
Aiphone warrants its products to be free from defects of material and workmanship under normal Aiphone garantiza que sus productos están libres de defectos de material y mano de obra, en uso y use and service for a period of two years after delivery to the ultimate user and will repair free of servicio normal, por un período de dos años después de la entrega final al último usuario y reparará...
Need help?
Do you have a question about the JOS-1A2 and is the answer not in the manual?
Questions and answers