Table of Contents
Advertisement
Advertisement
Table of Contents

Subscribe to Our Youtube Channel
Related Manuals for iConnectivity PlayAUDIO 1U


Summary of Contents for iConnectivity PlayAUDIO 1U
- Page 1 User Guide v2023-0001...
-
Page 2: Table Of Contents
Front Panel..........................................7 Rear Panel..........................................8 Getting Started..........................................9 Install iConnectivity Audio Drivers (Windows)................................9 Install iConnectivity RTP MIDI Driver for Network MIDI (Windows)..........................9 Install Auracle X and upgrade your PlayAUDIO1U Firmware..........................10 PlayAUDIO1U Failover Redundancy..................................11 How the PlayAUDIO1U's Failover System Works..............................11 How to Arm the PlayAUDIO1U for Automatic Failover............................. - Page 3 Power............................................18 Dimensions and Weights......................................18 APPENDIX A: ADVANCED WINDOWS USERS.................................19 APPENDIX B: MORE RESOURCES................................... 19 APPENDIX C: COMPLIANCE..................................... 20 User Guide v2023-001...
- Page 4 Windows is a registered trademark of Microsoft Corporation in the United States and/or other countries. Android is a trademark of Google LLC. iConnectivity and PlayAUDIO1U are trademarks of iKingdom Corp. Features of this product are protected under patent pending. For more details iConnectivity Patents.
-
Page 5: Introduction
Congratulations on the purchase of your new PlayAUDIO1U USB Audio + MIDI interface! iConnectivity makes every effort to develop simple and intuitive hardware and companion control software. However, because your PlayAUDIO1U interface includes so many advanced features, we strongly recommend that you read this manual carefully even if you are an experienced MIDI user. -
Page 6: What's In The Box
What’s in the Box? ● The PlayAUDIO1U Audio + MIDI Interface ● One IEC Power Cable - US / North American region ● One IEC Power Cable - EU region ● One IEC Power Cable - UK region ● Two USB Type C to Type C cables (black, white) ●... -
Page 7: Hardware Description
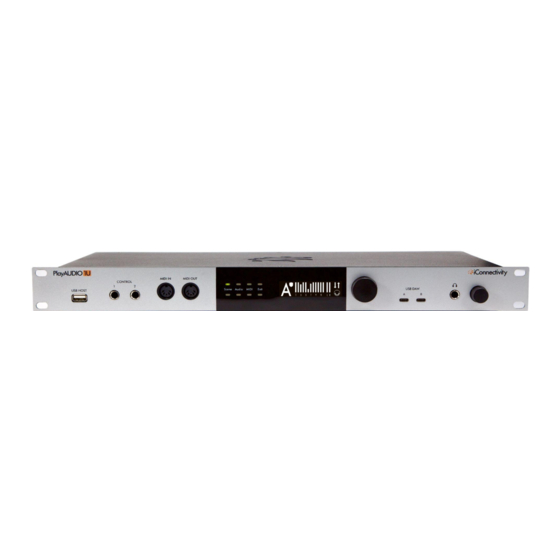
HARDWARE DESCRIPTION Front Panel ● USB HOST port. Directly plug in a class-compliant MIDI device, or plug in up to eight class-compliant MIDI devices via a powered USB hub (not included). ● CONTROL ports. Plug in up to two foot switches ●... -
Page 8: Rear Panel
Rear Panel ● AC Power inlet. Fused Input jack for included IEC C13 power supply cable. ● Power switch. Turn the PlayAUDIO1U on or off. The switch will illuminate when power is turned on. ● XLR Balanced Audio Outputs. The PlayAUDIO 's 1 analog outputs provide low noise, phantom power-resistant connections with up to 24-bit/96kHz DA conversion. -
Page 9: Getting Started
Install iConnectivity Audio Drivers (Windows) Before connecting the PlayAUDIO1U to a Windows computer, be sure to install the supplied iConnectivity audio drivers that are part of the Windows Auracle X installer. Once the driver is successfully installed, you can attach your computer to either USB DAW Port A or B using a USB cable. The interface should appear as a standard audio output device in Windows. -
Page 10: Install Auracle X And Upgrade Your Playaudio1U Firmware
Install Auracle X and upgrade your PlayAUDIO1U Firmware Before you begin using your PlayAUDIO1U, we recommend that you upgrade your unit's firmware to the latest version using iConnectivity's Auracle for X application. Follow these steps to install the Auracle X software and perform the firmware upgrade: 1. -
Page 11: Playaudio1U Failover Redundancy
A tone generator is required to arm the PlayAUDIO1U for Automatic Failover. If a tone generator isn't included with your Digital Audio Workstation, download and install iConnectivity's LifeSine test tone plugin from https://www.iconnectivity.com/downloads/. Follow the steps below to arm the PlayAUDIO1U for automatic failover and test your unit's failover capability: 1. -
Page 12: How To Test Automatic Failover
Auracle for X software and configure Failover settings in the Audio page of the PlayAUDIO1 menu. Refer to Auracle X documentation for detailed instructions at https://www.iconnectivity.com/playaudio1u. 6. Connect a MIDI external controller to the USB host port. Ensure that both DAWs are configured so that playback can be triggered on both DAWs simultaneously. -
Page 13: Controls
Controls Interactive Touch Panel Display The PlayAUDIO1U's Interactive Touch Panel Display is a capacitive touch panel that provides the following features: ● Eight touch zones for intuitive control over Scene selection, Audio or MIDI menu page selection, and Exit to main menu/Scene page. ●... -
Page 14: Using The Touch Panel And Main Rotary Encoder
Using the Touch Panel and Main Rotary Encoder The rotary encoder is continuous and can make fine or coarse adjustments depending on how quickly you rotate the dial. Fine adjustments are recommended if there is a risk of signal overload. Rotary Encoder Press functions include: Committing Settings to Memory Short press the Main Rotary Encoder twice to save settings. - Page 15 Audio: Touch to access the Audio menu page. Once the Audio page is active, use the rotary encoder to: 1. Turn to scroll through audio outputs between all, and 1-12 singularly. 2. Short press to select the highlighted audio output or all-output group. When a single output or the all-output group is selected, turn to raise or lower the output level.
-
Page 16: Using The Headphone Rotary Encoder
Use the PlayAUDIO1U CONTROL ports with compatible footswitch(es) to send CC/PC messages, arm or disarm automatic failover, load CC / PC,or Toggle scenes Complete instructions on configuring CONTROL port footswitch actions can be found in our Auracle documentation at https://www.iconnectivity.com/auracle-x-series User Guide v2023-001... -
Page 17: Specifications
SPECIFICATIONS Audio Digital Performance 24-bit resolution D-A Dynamic Range: 115dB Supported sample rates: 44.1 kHz, 48 kHz, 88.2 kHz, and 96 kHz Line Outputs Maximum Output Level: +16 dBu, 13.8 dBV, 4.9 Vrms SNR: 115 dB (1kHz, BW: 22Hz-22kHz, A-weighted) THD+N: -112 dB (1kHz, BW: 22Hz-22kHz, A-weighted) Headphones SNR: 110 dB (1kHz, BW: 22Hz-22kHz, A-weighted) -
Page 18: Usb-C Ports
USB-C Ports Connect to Windows or macOS computer(s), Android or iPadOS devices (USB only, Apple Lightning not supported). Power Input: 100V - 240V AC, 50 - 60 Hz 24W Fuse: 1A Slow-Blow Dimensions and Weights Height: 1U: 1.48” (37.5 mm) Width: 19”... -
Page 19: Appendix A: Advanced Windows Users
APPENDIX B: MORE RESOURCES The iConnectivity website and iConnectivity Knowledge Base contain a wealth of helpful written articles and tutorials, as well as instructional videos. For your convenience, selected hyperlinks into these systems are listed below: The iConnectivity Knowledge Base main page is located at: iConnectivity Support Website. -
Page 20: Appendix C: Compliance
Declaration of Conformity We, iConnectivity, declare that the PlayAUDIO1U complies with Part 15 of the FCC Rules. Operation is subject to the following two conditions: (1) this device may not cause harmful interference, and (2) this device must accept any interference received, including interference that may cause undesired operation. - Page 21 ● Connect the equipment into an outlet on a circuit different from that to which the receiver is connected. ● Consult the dealer or an experienced radio/TV technician for help. Changes or modifications not expressly approved by iConnectivity could void the user’s authority to operate the equipment. Disposal of Waste Equipment by Users in the European Union This symbol on the product or its packaging indicates that this product must not be disposed of with other waste.
Need help?
Do you have a question about the PlayAUDIO 1U and is the answer not in the manual?
Questions and answers