
Subscribe to Our Youtube Channel
Related Manuals for Krups NESCAFE Dolce Gusto neo


Summary of Contents for Krups NESCAFE Dolce Gusto neo
- Page 1 YOUR COFFEE SHOP AT HOME YOUR COFFEE SHOP AT HOME USER MANUAL SCAN ME Read the Safety Precautions before first use.
- Page 2 YOUR COFFEE SHOP AT HOME...
-
Page 3: Table Of Contents
CONTENTS MACHINE OVERVIEW CONNECT YOUR MACHINE MACHINE STATUS OVERVIEW RINSE (BEFORE FIRST USE) BEVERAGE CHOICE BEVERAGE PREPARATION BLACK COFFEE PREPARATION (POD ONLY) COFFEE SPECIALTIES PREPARATION (POD AND POUCH) OTHER DRINKS PREPARATION (POUCH ONLY) CLEAN (REGULARLY) DESCALE DESCALE THE MACHINE & THE JET NOZZLE ALERTS / TROUBLESHOOTING... -
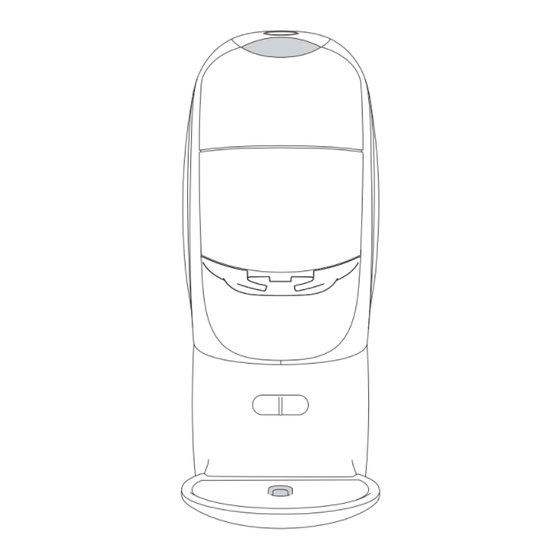
Page 4: Machine Overview
MACHINE OVERVIEW Multi Coloured Start Button Pod Inlet / Shutter Slider Bluetooth and WiFi LED ® ON/OFF Button To save energy, the machine automatically switches off after Pouch Door / Holder 1 minute. Cleaning Door Pod Bin Drip Grid Drip Tray Water Tank (1.3 L) Frequency of BLE/WiFi module... -
Page 5: Connect Your Machine
CONNECT YOUR MACHINE We recommend you connect your machine with the NESCAFÉ® Dolce Gusto® app. Cup customisation Smart re-order Reward for every cup Help and support SCAN ME How to pair your machine? 1 Have your phone near your machine 2 Enable Bluetooth®... -
Page 6: Machine Status Overview
MACHINE STATUS OVERVIEW Start Button For details, Machine Status Action needed Indication see page(s) Wait a few seconds until Heating up it turns steady green Top up time for beverage For a longer cup, press preparation the start button again FLASHING GREEN Ready for beverage Insert a pod... - Page 7 Start Button For details, Machine Status Action needed Indication see page(s) The pouch needs to A pouch is left in the be removed (open and machine close the pouch door). STEADY YELLOW The pod or the pouch Reinsert the pod or the 26 / 27 cannot be detected pouch...
-
Page 8: Rinse (Before First Use)
RINSE (BEFORE FIRST USE) 1 Remove the water tank. Push it 2 Fill the water tank with ambient temperature fresh drinking water. from the left side toward the right. Always keep the machine upright. Insert the water tank back into the machine. - Page 9 RINSE (BEFORE FIRST USE) ~5 s 5 Close the slider (without a pod) and 6 Empty the container and water tank when rinsing stops (the start button press the start button for 5 seconds. Release when the button flashes goes steady green). Refill and green twice.
-
Page 10: Beverage Choice
BEVERAGE CHOICE Your Coffee Shop at home* With a pod, a pouch or a combination of the two, prepare your favorite beverage. Indicative Indicative Type Beverage Pouch preparation cup size time – 45 ml 20 s Espresso 205 ml (50 ml espresso –... - Page 11 BEVERAGE CHOICE With your NEO machine you can prepare beverages from Roast & Ground coffee, soluble coffee, milk, cacao and plant-based beverages (oat milk, coco milk, almond milk, etc.). Indicative Indicative Type Beverage Pouch preparation cup size time 270 ml 1 min 15 s Cappuccino 300 ml...
-
Page 12: Beverage Preparation
BEVERAGE PREPARATION Before all beverage preparations During / after beverage preparation ~10 s *click* Adjust the drip tray position to the Once the extraction is finished, the selected beverage. Place the cup, start button flashes green rapidly. For a shorter cup, manually stop glass or coffee pot on the drip tray. -
Page 13: Black Coffee Preparation (Pod Only)
BLACK COFFEE PREPARATION (POD ONLY) 1 Preheating: For espresso preparation, 2 Open the slider and insert the pod in you may preheat the cup. Press the the correct direction. Close the slider. start button to start the water flow and press again to stop it. Empty the cup and place it on the drip tray again. -
Page 14: Coffee Specialties Preparation (Pod And Pouch)
COFFEE SPECIALTIES PREPARATION (POD AND POUCH) 1 Open the pouch door completely 2 Open the slider and insert the pod in and insert the pouch properly until the correct direction. Close the slider. the end. Make sure it is placed in the correct direction and position. -
Page 15: Other Drinks Preparation (Pouch Only)
OTHER DRINKS PREPARATION (POUCH ONLY) 1 Open the pouch door completely 2 Press the start button. The machine and insert the pouch properly until starts brewing, automatically the end. Make sure it is placed in recognising beverage parameters the correct direction and position. (sequence, volume, temperature). -
Page 16: Clean (Regularly)
CLEAN (REGULARLY) 1 Empty and clean the water tank using a long soft brush with a mild detergent. Rinse the water tank with WATER TANK water. 2 Fill it with fresh water and insert it The water tank is not dishwasher back into the machine. - Page 17 CLEAN (REGULARLY) 1 Open the pouch door and remove the pouch holder. 2 Clean the pouch holder with fresh water (a sponge can be used). Dry it afterwards with a soft dry cloth. POUCH HOLDER The pod bin will contain both used pods and rinsing water.
-
Page 18: Descale
DESCALE (every 6 months or at descaling alert) SCAN ME Descaling helps to Do not use vinegar! keep your machine Be careful not to spill the working and ensures descaling liquid on the great in-cup quality. machine! Do not unplug the machine during descaling! TIP: connect your machine and get an automatic notification when it is time... - Page 19 DESCALE (every 6 months or at descaling alert) 0.5 L 1 Mix 0.5 liter of fresh water with 2 Insert the water tank into the the NESCAFÉ® Dolce Gusto® liquid machine. Remove the drip tray descaler (sold on website). Pour the if needed.
- Page 20 DESCALE ~15 s 5 While pressed, the start button In case there is no water flow, turns from steady green until it the jet nozzle might be clogged. softly dims orange. Descaling starts Follow the jet nozzle cleaning and water starts to flow. The start process (see pages 21 to 23).
- Page 21 DESCALE 8 Remove the drip tray if needed. 9 Close the slider and press the start Place an empty large container button once. It starts to dim orange underneath the coffee outlet. softly. Rinsing starts. JET NOZZLE CLEANING / DESCALING 10 Empty the container and the water The jet nozzle must be maintained and tank once rinsing is finished.
-
Page 22: Descale The Machine & The Jet Nozzle
DESCALE THE MACHINE & THE JET NOZZLE ~10 s 1 If necessary, remove the pod from 2 Press the start button for 10 seconds the pod inlet and/or the pouch from until it blinks purple. The jet nozzle the pouch holder. Close the pouch will move to removal position. - Page 23 DESCALE THE MACHINE & THE JET NOZZLE ~3 s 5 After cleaning, check that there 6 Reinsert the opened jet nozzle back are no residues. Otherwise use a into the machine and follow the same brush or sponge to remove them. steps in reverse order.
-
Page 24: Alerts / Troubleshooting
ALERTS / TROUBLESHOOTING The start button turns steady blue. 1 Refill it with fresh drinking water and The beverage preparation stops part ensure it is properly back in place. way during the extraction or does not start at all. The water tank may be empty. - Page 25 ALERTS / TROUBLESHOOTING The start button flashes white rapidly: 1 Ensure the machine is switched on. is the pod blocked or the pod bin full? Empty the pod bin to reset the beverage counter. If the button flashes white but the pod bin is not full, this is due to emptying the pod bin while the machine was switched off.
- Page 26 ALERTS / TROUBLESHOOTING The start button turns steady yellow. 1 A pouch is left in the machine and needs to be removed. After the pouch is removed, the start button turns steady green. If the button remains yellow but the pouch holder is empty, this is due to removing the pouch while the machine was switched off.
- Page 27 ALERTS / TROUBLESHOOTING The machine is unable to detect the 1 Open the pouch door. Check if pouch. Either the start button is flash- the pouch is well inserted. Flip it ing yellow or hot water is extracted and reinsert it. If the pouch is well instead of a product.
- Page 28 ALERTS / TROUBLESHOOTING TIP: connect your machine and get an automatic notification when it is time to descale. The start button is steady orange 1 See the Descale section on pages when the machine is ready or 18 to 21. If the start button turns dimming orange during an extraction.
- Page 29 ALERTS / TROUBLESHOOTING SCAN ME The start button turns steady red. 1 Switch off the machine. Unplug the machine, wait for at least 10 seconds and plug it in again. If the error persists, call the NESCAFÉ® Dolce Gusto® hotline. Pouch holder For additional maintenance instructions, please scan the QR code.
- Page 30 ALERTS / TROUBLESHOOTING SCAN ME The machine cannot be switched on. 1 Check if the power plug is correctly plugged in. If the machine still cannot be switched on, call the NESCAFÉ® Dolce Gusto® hotline. 15 s In some situations, our hotline might 1 Press the ON/OFF button and the recommend resetting the machine to start button at the same time for...
- Page 32 YOUR COFFEE SHOP AT HOME HOTLINE 0800 707 6066 www.dolce-gusto.com...
Need help?
Do you have a question about the NESCAFE Dolce Gusto neo and is the answer not in the manual?
Questions and answers