Table of Contents
Advertisement
Quick Links
Advertisement
Table of Contents

Related Manuals for Zotac ZBOX PICO


Summary of Contents for Zotac ZBOX PICO
- Page 2 ZOTAC ZBOX pico User’s Manual No part of this manual, including the products and software described in it, may be reproduced, transmitted, transcribed, stored in a retrieval system, or translated into any language in any form or by any means, except by the purchaser for backup purposes, without the express written permission of ZOTAC.
-
Page 3: Table Of Contents
Rear view-------------------------------------------------------------------------------------------- 7 Customizing the ZOTAC ZBOX pico ---------------------------------------------------------- 8 Installing M.2 PCIe x4 / SATA SSD module ------------------------------------------------ 9 Mounting the ZOTAC ZBOX pico to an LCD monitor----------------------------------- 10 Using your ZOTAC ZBOX pico ------------------------------------------------------------------12 Configuring a wireless connection -----------------------------------------------------------12... -
Page 4: Product Specifications
• M.2 NVMe PCIe 3.0 x4 / SATA slot (2230, 2242, 2280) • Micro SDHC/SDXC card reader Networking • 10/100/1000 Mbps Ethernet Wireless networking • Intel WiFi 6 • Bluetooth 5.2 Power • 5V/5A Power Supply Operating System • Windows 11 ready ZOTAC ZBOX pico... -
Page 5: Safety Information
Safety information Your ZOTAC ZBOX pico is designed and tested to meet the latest standards of safety for information technology equipment. However, to ensure your safety, it is important that you read the following safety instructions. Setting up your system Read and follow all instructions in the documentation before you operate your system. -
Page 6: Welcome
Welcome Congratulations on your purchase of the ZOTAC ZBOX pico. The following illustration displays the package contents of your new ZOTAC ZBOX pico. Please contact your retailer if any of the below items are damaged or missed. Package contents • 1 x ZOTAC ZBOX pico •... -
Page 7: Getting To Know Your Zotac Zbox Pico
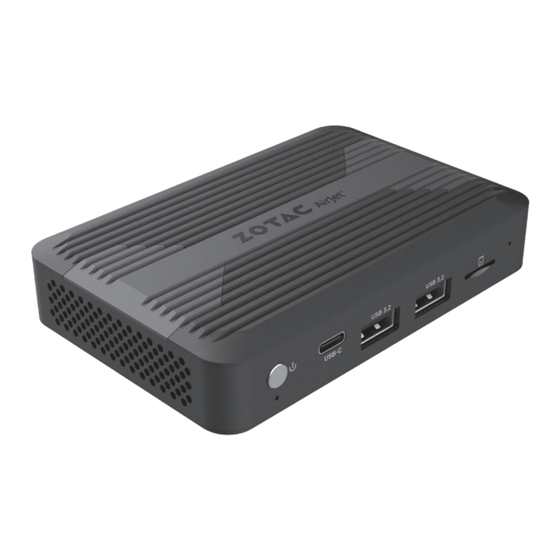
Getting to know your ZOTAC ZBOX pico Front view Refer to the diagram below to identify the components on the front of the ZBOX pico 1. Power button The power button turns the system ON and OFF. 2. USB 3.2 Type-C port The USB 3.2 type-C port supports the SuperSpeed USB 3.2 devices. -
Page 8: Rear View
Note 1: The power adapter may get warm or hot when in use. Do not cover the adapter and keep it away from your body. Note 2: Due to the unique design, some connectors are placed upside down. ZOTAC ZBOX pico... -
Page 9: Customizing The Zotac Zbox Pico
Customizing the ZOTAC ZBOX pico Before installing hardware, please follow the instructions below to remove the cover of your ZOTAC ZBOX pico. 1. Loosen the 4 screws securing the bottom cover. 2. Remove the bottom cover. ZOTAC ZBOX pico... -
Page 10: Installing M.2 Pcie X4 / Sata Ssd Module
1. Locate the M.2 SSD slot and remove the screw. 2. Insert an M.2 SSD module into the slot at a 45 degree angle. 3. Attach the screw to the M.2 SSD module as shown below. Note: PLUS / Windows models include SSD pre-installed. ZOTAC ZBOX pico... -
Page 11: Mounting The Zotac Zbox Pico To An Lcd Monitor
Mounting the ZOTAC ZBOX pico to an LCD monitor You can attach the ZOTAC ZBOX pico to the back of a VESA75/100 compliant display. Secure the mounting bracket to the LCD monitor using 2 screws. Disclaimer: ZOTAC is not liable for damages resulting from an improper installation. - Page 12 Connect the ZOTAC ZBOX pico to the LCD monitor with an HDMI cable. Note: You can also mount the ZOTAC ZBOX pico vertically as shown in the picture below. ZOTAC ZBOX pico...
-
Page 13: Using Your Zotac Zbox Pico
Using your ZOTAC ZBOX pico Installing drivers and software The ZOTAC ZBOX barebone version does not ship with an operating system preinstalled and driver. The user should download the devices driver from ZOTAC website. Configuring a wireless connection Please follow the instructions below to connect to a wireless... -
Page 14: Configuring Audio Output Via An Hdmi Device
Configuring audio output via an HDMI device Follow the steps below to enable audio output via HDMI when connecting the ZOTAC ZBOX pico to a TV or receiver via HDMI. Access the Sound settings via the system Control Panel. Under Playback devices, click the display... -
Page 15: Fcc Compliance Statement
● Consult the dealer or an experienced radio/TV technician for help. ZOTAC is not responsible for any radio or television interference caused by unauthorized modifications of this equipment or the substitution or attachment of connecting cables and equipment other than those specified by ZOTAC. The correction of interferences caused by such unauthorized modification, substitution or attachment will be the responsibility of the user. - Page 16 Users are not authorized to modify this product. Any modifications invalidate the warranty. This equipment may not be modified, altered, or changed in any way without signed written permission from ZOTAC. Unauthorized modification will void the equipment authorization from the FCC and Industry Canada and the warranty.
Need help?
Do you have a question about the ZBOX PICO and is the answer not in the manual?
Questions and answers