Advertisement
Quick Links
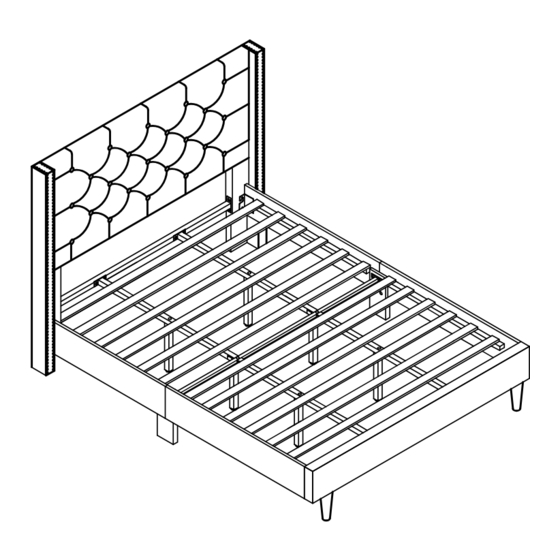
ASSEMBLY INSTRUCTIONS
ITEM NO: BED1007 KING
REMINDER DO NOT OVER TIGHTEN ALL BOLTS UNTIL THE BED IS FULLY SET-UP
1
2
3
Headboard
Footboard
HB Leg
1pc
1pc
2pcs
7
8
9
Side Rail Feet
Support Rail
Support Leg
2pcs
4pcs
4pcs
13
Wingback
2pcs
A
B
C
Bolt
Bolt
Bolt
5/16"×1-1/4"
5/16"×1"
5/16"×2"
8PCS
20PCS
16PCS
H
G
Box Wrench
Allen Key
5/16"
5/16"
1PC
1PC
4
5
6
Headboard Crossband
Headboard Crossband
FB Feet
Side Rail
1pc
1pc
2pcs
4pcs
10
11
12
Center Crossband
Slats
Center Support Leg
1pc
2pcs
12pcs
D
E
F
Flat washer
Bolt
Nut
5/16"*19MM
5/16"
5/16"×5"
50PCS
2PCS
4PCS
STEP 1:
STEP 1:
At the back of headboard ( Part 1 ) install the HB leg ( Part 2 ) by using hard ware
provided .
Use allen key (Part G ) to screw in bolt (Part B ) and washer ( Part F ) on each
side ( 2 Bolts & 2 Washers on each side ) . Do not forget about the washer as
this will keep your bed sturdy !
F
B
G
2
B
4PCS
F
1
2
F
4PCS
B
G
Advertisement

Related Manuals for Husky BED1007 KING


Summary of Contents for Husky BED1007 KING
- Page 1 ASSEMBLY INSTRUCTIONS At the back of headboard ( Part 1 ) install the HB leg ( Part 2 ) by using hard ware ITEM NO: BED1007 KING provided . Use allen key (Part G ) to screw in bolt (Part B ) and washer ( Part F ) on each side ( 2 Bolts &...
- Page 2 STEP 2 : STEP 2 : On the headboard (Part 1), install the HB crossband (Part 5) by STEP 3 : Turn the footboard (Part 3) over and screw in using hardware provided. Use the Allen Key (Part G) to screw in the bolt the footboard legs (Parts 4) (Part C) and the washer (Part F) on each side (2 Bolts &...
- Page 3 STEP 5: First, lock in your side rail and the footboard in (Look at STEP 5: First, lock in your side rail and the footboard in (Look at STEP 4 : Now its time to connect the side rails (Part 6), you must line STEP 4 : Now its time to connect the side rails (Part 6), you must line photo).You will now take one side of the completed Side Rail and photo).You will now take one side of the completed Side Rail and...
- Page 4 STEP 6: You will be doing the same thing for Step 6 that you STEP 7: This step requires to properly bolt on the Center Support Rail (Part 8). step 5 (Only difference is your now connecting the right side rail), On each side of the center support rail, you will install 2 support legs (Part 9) please refer to step 5 if you are lost.
- Page 5 STEP 8: Take the center support rail from Step 7 and lay it in the middle of the STEP 9: Similar to Step 8, you will use the 4 bolts (Part C) and 4 washers bed from headboard to footboard. You will need 4 Part B 8 Part F and 4 Part (Part F) and screw in the bolts to the footboard from the center support rail.
- Page 6 STEP 11: This one is easy ! Simply take one bolt (Part B) and one washer (Part F) STEP 10: Take Part 11 (Center Crossband) and install that in the middle (As shown and bolt that into center where the center support rail and cross band lay on top of in the photo) by simply using Part A (Bolts) and Part F (Washers) and bolt them into each other as shown in photo.
- Page 7 STEP 12: Take Part 13 ( Wingback ) and install that on the both side of STEP 13 : Simply take 2 bolts ( Part D ) and 2 washer ( Part F ) and bolt that in headboard ( As shown in the photo ) by using Part B ( Bolts ) and Part F to the bottom holes on HB leg and wingback than you guy can tighten up all the bolts used on step12 and step 13 ( Washers ) and bolt them into the holes, make sure the holes are lined up...
- Page 8 STEP 14: STEP 14: Put the back fabric down to bottom,than smooth it by velcro STEP 15: You're almost therel Simply lay the Slats on the sides of stick right . the side ralls (On the Inside) you can roll them out and the velcro stick right on (Part 12)
- Page 9 STEP 16: Congratulations, you made it to the end! Time to sleep like a baby and forget to leave us a positive review when you wake up =)
Need help?
Do you have a question about the BED1007 KING and is the answer not in the manual?
Questions and answers