Advertisement
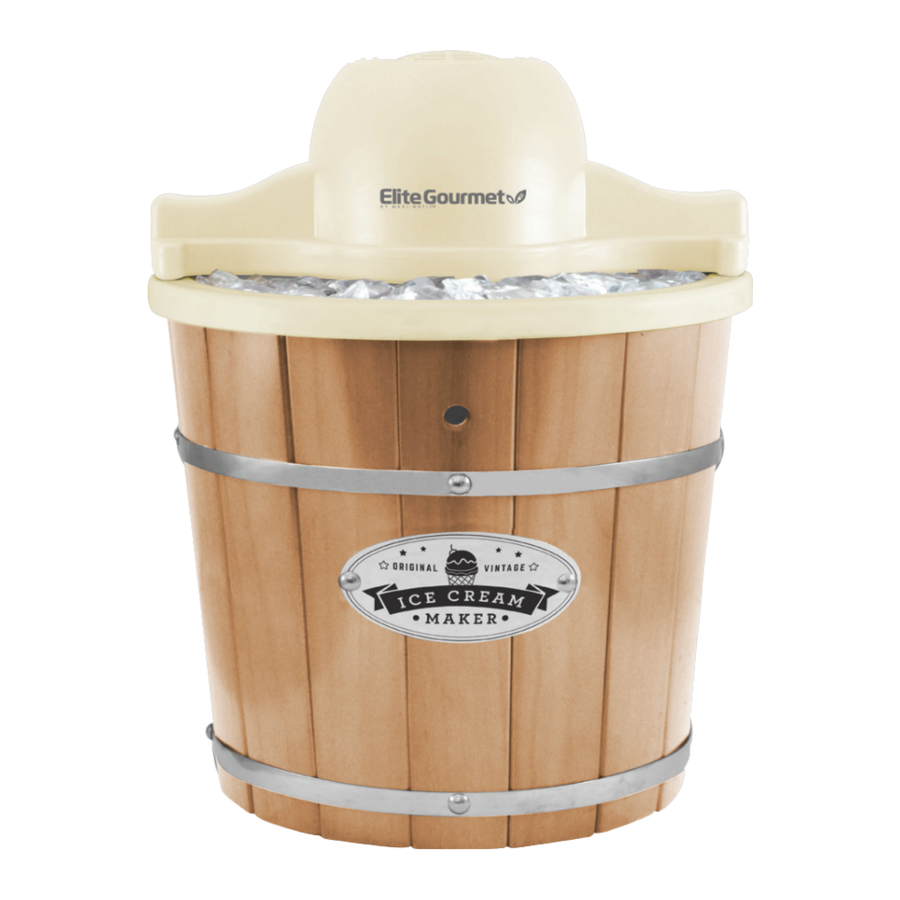
PARTS IDENTIFICATION

- Electric Motor
- Power Cord
- Plastic Liner
- Drainage Hole
- Outer Wooden Bucket
- Canister Lid Cap
- Canister Lid
- Freezing Canister
- Dasher
NOTE: The indentation located on the top lip of the freezing canister is intentional and designed to assist in the churning of the paddle when all parts are assembled with the lid and motor.

BEFORE FIRST USE
- Always read all instructions and safeguards before operation.
- Remove all packaging materials and make sure that all parts are present and in good condition before discarding packaging materials.
- Wash the lid, canister, and other plastic accessories in warm soapy water.
- Rinse and dry thoroughly.
- Use a damp cloth to wipe clean the electric motor and wooden bucket.

DO NOT USE ABRASIVE CLEANERS OR SCOURING PADS. DO NOT IMMERSE ANY ELECTRICAL COMPONENT OR POWER CORD IN WATER OR ANY OTHER LIQUIDS AT ANY TIME.
HOW TO USE
PREP – Chill the ice cream canister in the freezer for 2-3 hours prior to use. Do not leave the canister inside the freezer for more than 6-hours.
- Using your favorite recipe, prepare the necessary ingredients per the recipe instructions.
- Pour the prepared and chilled ice cream mixture into the chilled ice cream canister. Do not fill more than 2/3 full.
- Insert the Blending Spatula and make sure the bottom of the spatula is fixed in the center of the bottom of the canister.
![]()
- Place the lid on the canister.
![]()
- Place the canister into the plastic liner and make sure it engages the cone in the center of the liner.
![]()
- Line up the rectangular end of the electric motor to the rectangular hole on the rim of the liner. The opposite end of the motor will drop into the corresponding rectangular hole. Carefully, slightly rotate the motor counter-clockwise to secure the motor to the liner.

- Now prepare the plastic liner by filling it with ice to the top of the canister.
- Add 1-2 cups of rock salt to the top of the ice inside the liner.
- Plug the power cord into an electrical outlet.
NOTE: While using the motor during the churning process, the canister should be turning which will be churning the ice cream ingredients. The Blending Spatula will remain stationary. If the canister is not spinning, the assembly is not set up properly and will need to be re-adjusted. - Run the cranking system for approximately 5 minutes so that the canister chills evenly.
- As the ice begins to melt down by 2-3 inches, add more ice and more cups of rock salt into the liner.
- Allow the machine to churn for 45 minutes. (If the motor has stopped prematurely, unplug the power cord, break up any ice blockages with a stirrer and start it up again).
- Once the churning is complete, unplug and remove the motor. Clear the ice and salt away from the lid of the canister to prevent it from falling into the canister of ice cream.
- Remove the cover and carefully lift out the blending spatula and scrape off any excess ice cream.
- The ice cream consistency is very fresh so it will be more of a soft-serve texture.
- If a harder consistency is desired, transfer the contents to a freezable container and freeze for 3-4 hours.


TIPS & NOTES:
- Use ice that is crushed inside the liner. Ice should be small, coarse pieces.
- As the canister is turning, make sure to periodically mix salt and ice together by using a stirrer every 10-15 minutes while the machine is in use.
- It is recommended to store the ice cream inside the freezing canister.
- If the ice cream consistency is too soft, put the contents into a freezable container and freeze for 3-4 hours.
- For recipes that require pre-cooking, it is recommended that ingredients be prepped several hours ahead. The mixtures will need to be allowed time to chill and expand.

- Do not plug up the drainage hole on the side of the bucket. This is for draining excess salt water and should be kept open at all time.
- If the electric motor stops churning before the 45-minutes is complete, check to make sure there is no blockage of ice jamming against the canister. If there is ice blocking the canister, unplug power cord and remove the jammed ice.
CLEANING & MAINTENANCE
ALWAYS UNPLUG MACHINE AND ALLOW TO COMPLETELY COOL BEFORE CLEANING OR STORING.
- Clean the electric motor with a damp cloth to remove any debris. NEVER IMMERSE THE MOTOR IN WATER.
- Clean the plastic liner and wooden bucket with a warm soapy sponge to remove the salt-water residue. Rinse and dry thoroughly.
- Wash the plastic canister lid, blending spatula and other plastic parts in warm soapy water and dry thoroughly.
- Wash the freezing canister in warm soapy water and dry thoroughly. Never freeze the canister while it is still wet.
- DO NOT USE ABRASIVE CLEANERS. DO NOT WASH ACCESSORIES IN DISHWASHER.
RECIPES
Ice Creams
*NOTE: Not all recipes will yield 4qts (128oz.). You may need to double or divide recipe in half to yield desired amount.
FRENCH VANILLA ICE CREAM
2 ½ cup half-and half
5 ¼ cup heavy cream
2 ½ cup sugar
5 ¼ tsp vanilla bean scrapings (or 5 ½ vanilla extract)
- Combine all ingredients in a mixing bowl.
- Transfer ingredients carefully into the canister.
- Follow the operational instructions for serving and cleaning of the ice cream maker.
CHOCOLATE ICE CREAM
2 ½ cup half-and-half
5 ¼ tbsp unsweetened cocoa
5 ¼ cup heavy cream
2 ½ mini chocolate chips (optional)
2 ½ cup sugar
- Combine all ingredients in a mixing bowl, except for the chocolate chips.
- Transfer ingredients carefully into the canister.
- Follow the operational instructions of the ice cream maker. Add chocolate chips to mixture after 30-45 minute to prevent ingredients from settling to the bottom or jamming the spatula.
COOKIES & CREAM ICE CREAM
2 ½ cup half-and-half
5 ¼ cup heavy cream
2 ½ cup sugar
10 ½ tsp vanilla extract
1 ¼ cup oreo cookies; crushed
- Combine all ingredients in a mixing bowl, except for the crushed cookies.
- Transfer ingredients carefully into the canister.
- Follow the operational instructions of the ice cream maker. Add crushed cookies to mixture after 30-45 minute to prevent ingredients from settling to the bottom or jamming the spatula.
MINT CHOCOLATE CHIP ICE CREAM
2 ½ cup half-and-half
5 ¼ cup heavy cream
2 ½ cup sugar
5 tsp mint extract
2 ½ cup chocolate chips; coarsely chopped
- Combine all ingredients in a mixing bowl, except for the chocolate chips.
- Transfer ingredients carefully into the canister.
- Follow the operational instructions of the ice cream maker. Add chocolate chips to mixture after 30-45 minute to prevent ingredients from settling to the bottom or jamming the spatula.
STRAWBERRY ICE CREAM
2 ½ cup sugar
2 ½ cup fresh strawberries, mashed
2 ½ cup half-and-half
5 ¼ cup heavy cream
5 ¼ vanilla extract
10 drops red food coloring
- Combine the sugar and mashed strawberries and mix well.
- Mix the strawberries with the rest of the ingredients in a mixing bowl.
- Transfer ingredients carefully into the canister.
- Follow the operational instructions for serving and cleaning of the ice cream maker.
GINGERBREAD ICE CREAM
2 ½ cup half-and-half
5 ¼ cup heavy cream
2 ½ cup sugar
1 ½ cup gingerbread cookies; crushed
- Combine all ingredients in a mixing bowl, except for the gingerbread cookies.
- Transfer ingredients carefully into the canister.
- Follow the operational instructions of the ice cream maker. Add gingerbread cookies to mixture after 30-45 minute to prevent ingredients from settling to the bottom or jamming the spatula.
PUMPKIN PIE ICE CREAM
4 cup heavy cream
2 ½ cup pumpkin puree
5 ¼ tsp pumpkin pie spice
2 ½ tsp vanilla extract
- Combine all ingredients in a mixing bowl.
- Transfer ingredients carefully into the canister.
- Follow the operational instructions for serving and cleaning of the ice cream maker.
COOKIE DOUGH ICE CREAM
2 ½ cup half-and-half
5 ¼ cup heavy cream
5 ¼ tsp vanilla extract
2 ½ cup sugar
2 ½ cup instant chocolate chip cookie dough;
separated into small ½ inch clumps/balls
- Combine all ingredients in a mixing bowl, except for the cookie dough clumps.
- Transfer ingredients carefully into the canister.
- Follow the operational instructions of the ice cream maker. Add cookie dough clumps to mixture after 30-45 minute to prevent ingredients from settling to the bottom or jamming the spatula.
PEACH ICE CREAM
2 ½ cup sweetened condensed milk
5 ¼ cup heavy cream
2 ½ cup fresh peaches; chopped
5 ¼ tbsp lemon juice
- Combine all ingredients in a mixing bowl, except for the peaches.
- Transfer ingredients carefully into the canister.
- Follow the operational instructions of the ice cream maker. Add peaches to mixture after 30-45 minute to prevent ingredients from settling to the bottom or jamming the spatula.
BLUEBERRY CHEESECAKE ICE CREAM
2 ½ cup sugar
1 ¼ cup fresh blueberries; mashed
16oz. cream cheese; softened
1 ¼ cup graham crackers; crushed
2 ½ cup half-and-half
5 ¼ cup heavy cream
- Combine the sugar with the mashed blueberries and mix well. Fold in the cream cheese. Sprinkle with the graham crackers.
- Mix the rest of the ingredients in a mixing bowl.
- Combine the blueberry cream cheese mixture with the cream mixture.
- Transfer ingredients carefully into the canister.
- Follow the operational instructions for serving and cleaning of the ice cream maker.
APPLE PIE ICE CREAM
2 ½ cup sweetened condensed milk
5 ¼ cup heavy cream
2 ½ cup apple pie filling
10 ½ tbsp caramel topping/sauce
- Combine all ingredients in a mixing bowl, except for the apple pie filling and caramel.
- Transfer ingredients carefully into the canister.
- Follow the operational instructions of the ice cream maker. Add apple pie filling to mixture after 30-45 minute to prevent ingredients from settling to the bottom or jamming the spatula.
- When ice cream is finish, gently fold in the caramel or serve on top of ice cream.
ROCKY ROAD iCE CREAM
2 ½ cup half-and-half
5 ¼ cup heavy cream
2 ½ cup sugar
2 ½ cup mini marshmallows
10 ½ tbsp walnuts or almonds; chopped
10 ½ tbsp unsweetened cocoa
- Combine all ingredients in a mixing bowl, except for marshmallows and chopped nuts.
- Transfer ingredients carefully into the canister.
- Follow the operational instructions of the ice cream maker. Add marshmallows and chopped nuts to mixture after 30-45 minute to prevent ingredients from settling to the bottom or jamming the spatula.
COFFEE ICE CREAM
2 ½ cup half-and-half
5 ¼ cup heavy cream
2 ½ ground coffee
2 ½ cup sugar
5 ¼ tsp vanilla extract
- In a saucepan over low heat, combine the heavy cream, half-and-half, and coffee grounds.
- Heat on low for 20-30 minutes, stirring occasionally, careful not to burn.
- Strain the coffee grounds out of the cream using a strainer.
- Combine with the rest of the ingredients in a mixing bowl.
- Set aside to cool in the refrigerator for an hour or more.
- Transfer ingredients carefully into the canister.
- Follow the operational instructions for serving and cleaning of the ice cream maker.
Sorbets
CHERRY COLA SORBET
5 ¼ cup frozen pitted dark cherries, slightly thawed
4 cup cola
5 ¼ tbsp lemon juice
10 ½ tbsp sugar
- Puree the slightly thawed cherries until smooth.
- Mix in the remaining ingredients.
- Transfer ingredients carefully into the canister.
- Follow the operational instructions of the ice cream maker.
LEMON RASPBERRY SORBET
5 ¼ cup frozen raspberries
2 ½ cup sugar
2 ½ cup water
1 ¼ cup lemon juice
- Puree all ingredients together until smooth.
- Transfer ingredients carefully into the canister.
- Follow the operational instructions of the ice cream maker.
PINEAPPLE MANGO SORBET
4 cup frozen pineapples; mashed
2 ½ cup frozen mangos; mashed
2 ½ cup sugar
2 ½ cup water
1 ¼ cup lemon juice
- Puree all ingredients together until smooth.
- Transfer ingredients carefully into the canister.
- Follow the operational instructions of the ice cream maker.
PINK LEMONADE SORBET
1 ¼ cup sugar
2 ½ cup water
5 ¼ cup fresh lemon juice
1 ¼ cup pink lemonade powder mix
10 ½ tbsp fresh lemon zest
- In a saucepan over low heat, dissolve the sugar in the water. Add the lemon juice, powder mix and zest. Set aside to cool in the refrigerator for 1 hour.
- Transfer ingredients carefully into the canister.
- Follow the operational instructions of the ice cream maker.
PEAR SORBET
4 cans of pears in syrup (16oz size)
1 cup fresh lemon juice
2 cups sugar
4 cups water
- In a saucepan mix together the sugar and water. Heat gently, stirring constantly until the sugar has dissolved. Bring to a boil for approx. 5 to 8 minutes - until you have syrup and remove from heat and let cool completely, about 3 to 5 hours.
- Drain pears from syrup in the tins and purée them in a blender or food processor. Put into a mixing bowl and stir in the lemon juice and sugar/water mix. Transfer the complete mixture into ice cream maker and freeze according to the instructions.
COCONUT LIME SORBET
5 ¼ cup canned coconut cream
2 ½ cup sugar
1 ¼ cup coconut water
1 ¼ cup lime juice
- Mix all ingredients together until smooth.
- Transfer ingredients carefully into the canister.
- Follow the operational instructions of the ice cream maker.
HONEYDEW SORBET
5 ¼ cup frozen chopped honeydew; slightly thawed
1 ¼ cup sugar
5 ¼ tbsp lemon juice
10 ½ tbsp honey
2 ½ cup water
- Puree all ingredients together until smooth.
- Transfer ingredients carefully into the canister.
- Follow the operational instructions of the ice cream maker.
PEACH SORBET
5 ¼ cup fresh peaches; chopped
2 ½ cup almond milk
5 ¼ tbsp lemon zest
10 ½ tbsp honey
- Puree all ingredients together until smooth, except for the peaches.
- Transfer ingredients carefully into the canister.
- Follow the operational instructions of the ice cream maker. Add peaches to mixture after 30-45 minute to prevent ingredients from settling to the bottom or jamming the spatula.
Frozen Yogurts
FROZEN YOGURT
5 ¼ cup plain or vanilla greek yogurt
1 ¼ cup milk
2 ½ cup sugar
2 ½ cup fresh fruit of your choice; mashed
- Combine the sugar with the mashed fruit and mix well.
- Mix the rest of the ingredients in a separate mixing bowl.
- Combine the sugar and fruit mixture with the cream mixture.
- Transfer ingredients carefully into the canister.
- Follow the operational instructions of the ice cream maker.
STRAWBERRY CHEESECAKE FROZEN YOGURT
2 ½ cup sugar
2 ½ cup fresh strawberries; mashed
16oz. cream cheese; softened
1 ¼ cup graham crackers; crushed
5 ¼ cup plain or vanilla greek yogurt
1 ¼ cup milk
- Combine the sugar with the mashed strawberries and mix well. Fold in the cream cheese. Sprinkle with the graham crackers.
- Mix the rest of the ingredients in a mixing bowl.
- Combine the strawberry cream cheese mixture with the cream mixture.
- Transfer ingredients carefully into the canister.
- Follow the operational instructions of the ice cream maker.
PEANUT BUTTER FROZEN YOGURT
5 ¼ cup plain or vanilla yogurt
1 ¼ cup milk
1 ¼ cup smooth peanut butter
2 ½ cup frozen chopped banana; slightly thawed
1 ¼ cup mini chocolate chips
5 ¼ tbsp sugar
- Puree all the ingredients, except the chocolate chips, until smooth.
- Transfer ingredients carefully into the canister.
- Follow the operational instructions of the ice cream maker. Add chocolate chips to mixture after 30-45 minute to prevent ingredients from settling to the bottom or jamming the spatula.
Gelatos
PEACH GELATO
4 lbs fresh peaches (peeled and pitted)
1 ½ cups of mascarpone cheese or plain yogurt (unflavored)
4 cans of pears in syrup (16oz size)
1 cup fresh lemon juice
1 ½ cups of sugar
- Cut the peaches into very small pieces. The smaller you cut them, the faster they will freeze and the finer the final texture will be. Arrange the peach pieces in a single layer on a rimmed cookie sheet and freeze solid, about 2 hours.
- Put the frozen peach pieces in a food processor or blender with the sugar and blend briefly. Add the mascarpone and pulse until the mixture is smooth.
- Transfer into ice cream maker and freeze according to the instructions.
STRAWBERRY GELATO
3 lbs of fresh strawberries (hulled)
3 cups of sugar
5 cups whole milk
3 cups of heavy cream
4 tsp fresh lemon juice
- In a food processor or blender combine the strawberries, sugar and whole milk and puree until smooth.
- Add in the heavy cream and mix just enough to combine (you do not want to whip the cream). Add in the lemon juice.
- Refrigerate mixture for at least 4 hours. Refrigerate overnight if possible.
- Transfer the mixture into ice cream machine and freeze according to the instructions.
CITRUS GELATO
1 ½ cups sugar
½ tsp fine salt
12 large egg yolks
3 cups heavy cream
1 cups whole milk
½ cup buttermilk
zest of 2 oranges
zest of 2 lemons
zest of 2 limes
optional: 2tablespoon white rum or vodka
- Whisk the sugar, salt and yolks in a heavy medium saucepan. Gradually whisk in the cream. Then whisk in the milk, buttermilk and citrus zests. Using a wooden spoon, stir the custard constantly over medium heat until it thickens enough to coat the back of the spoon.
- Immediately scrape the custard into a 4-cup measuring cup; (mix in the rum if using). Refrigerate uncovered until cold, about 3 hours, stirring occasionally to prevent a skin from forming. Cover until ready to freeze.
- Transfer into ice cream maker and freeze according to the instructions.
IMPORTANT SAFEGUARDS
The Elite Brand takes consumer safety very seriously. Products are designed and manufactured with our valued consumers' safety in mind. Additionally, we ask that you exercise a level of caution when using any electrical appliance by following all instructions and important safeguards.
READ ALL INSTRUCTIONS BEFORE USE AND SAVE FOR FUTURE REFERENCE
When using electrical appliances, basic safety precautions should always be followed as below:
- Do not use the product for anything other than the intended use.
- Keep the product out of the reach of children and pets. This product is not intended for use by unsupervised children.
- Close supervision is necessary when this product is used near children.
- Do not leave the product unattended while it is in use. Always unplug the product from the electrical outlet when it is not in use.
- Place the product on a flat, steady, stable, scratch-resistant surface.
- Use the product in a well-ventilated area.
- Do not place the product on or near gas or electric burners. Do not place the product inside or on top of a heated conventional oven, microwave oven, or other heat source.
- Keep the Power Cord and product away from heated surfaces.
- Do not submerse or expose the electrical components of this product in water or any other liquids.
![burn hazard]()
![shock hazard]()
Do not use attachments not recommended or sold by the product manufacturer, as a risk of fire, electrical shock, or serious personal injury may result.- Avoid contact with moving parts. Keep fingers, hair and clothing away during operation.
- Never operate the ice cream maker dry. Always have ice cream mixture in the container when plugged in.
- Do not use hot oil or liquids in the ice cream maker.
- Plug the product into a standard 120V AC electrical outlet.
- Do not plug or unplug the product from the electrical outlet with a wet hand.
- Never operate the product while you are standing/sitting in a damp or wet area.
- To avoid a circuit overload, do not operate another electrical product on the same electrical circuit as this product.
- Do not allow the Power Cord to hang (i.e., over the edge of a table or counter) where it may be tripped over or pulled.
- Disconnect the plug (do not pull on Power Cord) from the electrical outlet. Do not put any stress on the Power Cord where it connects to the product, as the Power Cord could fray and break.
- Never operate this product if it has a damaged Power Cord or plug, is not working properly, has been dropped or damaged, or the Power Cord or Handle exposed to water or other liquids. Do not attempt to examine or repair this product yourself. Return the product to a service center for examination and repair.
- This product is intended for indoor, non-commercial, non-industrial, household use only. Do NOT use outdoors.

SHORT CORD PURPOSE
Note: A short power cord is provided to reduce the risk of personal injury resulting from becoming entangled in or tripping over a long cord.
Longer power-supply cords or extension cords are available and may be used if care is exercised in their use.
If an extension cord is used:
- the marked electrical rating of the extension cord should be at least as great as the electrical rating of the product;
- the extension cord should be arranged so that it will not drape over the counter top or tabletop where it can unintentionally be pulled on or tripped over by children or pets.
POLARIZED PLUG
If this appliance is equipped with a polarized plug (one blade is wider than the other), please follow the below instructions:
 To reduce the risk of electrical shock, this plug is intended to fit into a polarized outlet only one way. If you are unable to fit the plug into the electrical outlet, try reversing the plug.
If the plug still does not fit, contact a qualified electrician. Never use the plug with an extension cord unless the plug can be fully inserted into the extension cord. Do not alter the plug of the product or any extension cord being used with this product. Do not attempt to defeat the safety purpose of the polarized plug.
SAVE THESE INSTRUCTIONS.
THIS PRODUCT IS FOR HOUSEHOLD USE ONLY.
LIMITED WARRANTY
MAXI-MATIC, USA
18401 E. Arenth Ave. City of Industry, CA 91748
Customer Support Hours of Operation MON-FRI 8:30 AM - 5:00 PM PST
(800) 365-6133 Ext: 120/107/105; (626) 912-9877 Ext: 120/107/105
Visit: www.maxi-matic.com for Live Chat Support and Contact Us Form
Mail: Maxi-Matic, USA
18401 E. Arenth Ave
City of Industry, CA
91748-1227
Phone: 800-365-6133 ext. 120/105
Website: www.maxi-matic.com Visit our website for Live Chat Support & Contact Us Form Register your product online

elitebymaximatic

@elite_by_maximatic
Questions? Elite's customer service team is ready to help.
Call us toll-free at 800-365-6133 ext. 120/105.
For more Elite products, visit us at www.maxi-matic.com.
Recipes are included in this manual.

Documents / Resources
References

Download manual
Here you can download full pdf version of manual, it may contain additional safety instructions, warranty information, FCC rules, etc.
Advertisement


Need help?
Do you have a question about the EIM-924L and is the answer not in the manual?
Questions and answers