Table of Contents
Advertisement
Quick Links
Advertisement
Table of Contents

Related Manuals for Nicols C 512 J


Summary of Contents for Nicols C 512 J
- Page 1 USER MANUAL C 512 J Distributeur : Page 1...
-
Page 2: Table Of Contents
CONTENTS 1.Features……………………………………………………………………………………..Page 2 2. General Instructions……………………………………………………………..... Page 3 3. Overview……………………………………………….……………………………………..Page 4 3-1. Front View……………………………………………………………….………………..Page 4 3-2. Rear View…………………………………………………………………………………..Page 7 4. Operation Guide……………………………………………………………………………..Page 8 4-1 Program Enable……………………………………………………………….…………..Page 8 4-2 Programming Scenes..……………………………………………………….…………..Page 9 4-2.1Scene Editing……………………………………………………………………………..Page 11 4-2.2 Scanner Copy………………………………………………………………………….. -
Page 3: Features
1. Features 192 DMX channels. 12 scanners of 16 DMX channels. 30 banks of 8 programmable scenes. 6 chases of 240 programmed scenes from 30 banks 8 faders for manual control All data can be sent or received between two units G. -
Page 4: Overview
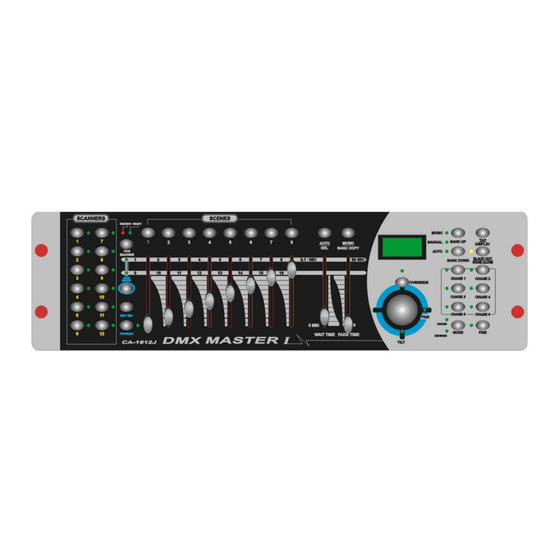
3. Overview 3-1. Front View CA-1612J 1. Scanner Buttons(1-12) 12 scanners of 16 DMX channels & fader control Scanners DMX channels Fader control 1-16 17-32 33-48 49-64 65-80 81-96 97-112 113-128 129-144 145-160 161-176 177-192 Scanners DMX channels Fader control 1-16 17-32 33-48... -
Page 5: Rear View
5. Fog Machine Button Activates Fog Machine . 6. WAIT Tine Slider Used to adjust the chase wait time within the range of 0.1 second to 5 minutes. 7. Fade Time Slider Used to adjust the fade time. Fade time is the amount of time it takes for a scanner(or scanner) to move from one position to another, for the dimmer to fade in or fade out. -
Page 6: Operation Guide
4. Operation Guide General This unit allows you to program 12 scanners of 16 DMX channels, 30 banks of 8 programmable scenes, 6 chases of 240 programmed scenes using 8 faders and other function buttons. With the use of two jog wheels, you may easily control the Pan or Tilt of the scanners. -
Page 7: 4-2.1Scene Editing
6. Tap the Bank Up/Down button to select the bank you want to store your scene into. There are total 30 banks you can select, you may store up to 8 scenes into each bank. 7. Tap the Scene button to store your scene, all LEDs and the Segment Display will flash three times briefly indicating this operation, then the LCD will show the bank and the scene 8. -
Page 8: 4-2.2 Scanner Copy
3. Select the scene you want to edit by tapping its Scene button. 4. Use the Faders or jog wheels to make your desired adjustments. 5. Once you've made your changes, tap the MIDI/Rec button 6. Tap the Scene button that corresponds to the scene you're editing. This will overwrite the exited scene NOTE: Be sure to select the same scene in steps 3 and 6, otherwise you may accidentally record over... -
Page 9: 4-2.3 Scene Copy
4-2.3 Scene Copy 1.Program enable. 2. Tap the Bank Up/Down button to select the bank that contains the scene you wish to copy. 3. Select the scene you want to copy by tapping its Scene button 4. Tap the Bank Up/Down button to select the bank you wish to copy the scene to. -
Page 10: 4-2.5 Delete All Scenes
4-2.5 Delete all Scenes This function will reset all DMX channel to 0 output. 1. With the power off, press and hold down the Program and Bank Down buttons at a time. 2. Apply power again, all scenes should be cleared. 4-2.6 Bank Copy 1. -
Page 11: 4-3.1 Program A Bank Of Scenes Into A Chase
4. Tap the MIDI/Rec button. 5. Repeat steps 3-4 until you've reached your desired effect. You may record up to 240 scenes into a chase. 4-3.1 Program a bank of scenes into a Chase 1. Program enable. 2. Select the chase using Chase buttons 1-6. 3. -
Page 12: 4-3.3 Delete A Step
Hints: You may tap the Tap Sync/Display button to change the display mode between step and the bank. 7. Tap the MIDI/Rec button again , all LEDs will flash three times briefly indicating the new step has been inserted into this chase. 4-3.3 Delete a Step 1. -
Page 13: 4-3.5 Delete All Chases
4-3.5 Delete all Chases 1. With the power off, press and hold down the Auto/Del and Bank Down buttons at the same time. 2. Apply the power again. 4-4 Assign/Reverse DMX channel 4-4.1 Assign DMX channel 1. Program enable. 2. Press the Fine and Mode buttons at a time,the Assign LED lights up indicating Assign mode is active. -
Page 14: 4-4.2 Reverse Dmx Channel
7. While pressing the Mode button, tap the Scene button, all LEDs should flash briefly indicating the DMX channel is assigned.( Scene button 1 stands for DMX channel 1, Scene button 2 stands for DMX channel 2, and so on.) 8. -
Page 15: 4-4.3 Fade Time/Assign Fade Time
7. While pressing the Mode button, tap the Scene button, all LEDs should flash briefly indicating the DMX channel is reversed.( Scene button 1 stands for DMX channel 1, Scene button 2 stands for DMX channel 2, and so on.) 8. -
Page 16: 4-4.5 Clear All Dmx Channels
4-4.5 Clear all DMX channels 1. Turn the power off. 2. Press the Mode and Auto/Del buttons at a time. 3.While pressing the two buttons, apply the power again, all LEDs should flash briefly,indicating all assigned or reversed DMX channel are cleared. 4-4.6 Display DMX channel 1. -
Page 17: 4-4.8 Auto Address
4. Tap the Bank Up/Down button to scroll to the characters you want. Continue steps 3-4. You may enter a maximum of 16 characters in two rows. Press the Scanner 6 and 12 buttons at a time to store the new characters into memory, all LEDs should flash briefly indicating this oper-ation. -
Page 18: Running Scenes
SCANNER No. DMX channel For Press Scanner 1~12 button DMX channel For Hold down the Page button and the Press Scanenr 1~12 button 4-5 Running Scenes 4-5.1 Manual Mode 1. When the power is turned on, this unit enters Manual mode automatically.This function allows you to run a bank of programmed scenes in a sequential loop. -
Page 19: 4-5.3 Music Mode
3. After selecting the bank of scenes you wish to run, you can u se the Wait Time slider(or Tap Sync/Display button) and Fade Time slider to adjust the scenes to your desired effect. Hints: The Tap Sync button is used to set the speed by tapping the button several times, the last two taps will define the speed with a maximum of 5 minutes. -
Page 20: 4-6.2 Auto Mode
4. Use the Bank Up/Down button to run the chase step by step. 4-6.2 Auto Mode 1. Tap the Auto/Del button to activate Auto mode.The Auto LED lights indicating Auto mode is active. 2. Select your desired chase by tapping one of the six Chase buttons. A second tap of this button will deactivate this function. -
Page 21: 4-7.2 Implementation
1. Press and hold down the MIDI/Rec button for three seconds, the LCD show the MIDI channel of last time. 2. Use the Bank Up/Down button to select the DMX channel 01-16 to assign to MIDI channel. 3. Press and hold down the MIDI/Rec button for three seconds to store your setting and to deactivate MIDI setting. -
Page 22: Receive File Dump
3. Press the Scene buttons 7 and 8 at a time to send the file dump. 4-9 Receive File Dump 1. With the power off, press and hold down the Scanner buttons 8, 9 and Scene button 2 at a time. 2.
Need help?
Do you have a question about the C 512 J and is the answer not in the manual?
Questions and answers