Table of Contents
Advertisement
Quick Links
Advertisement
Table of Contents

Related Manuals for Victrola WOODLAND VH-25


Summary of Contents for Victrola WOODLAND VH-25
- Page 1 Model: VH-25 WOODLAND BLUETOOTH SPEAKER CREDENZA...
-
Page 2: Table Of Contents
CONTENTS IMPORTANT SAFETY INSTRUCTIONS..................2 ACCESSORIES INCLUDED......................4 ASSEMBLING YOUR FURNITURE .................... 5 INSTALLING THE TIPPING RESTRAINT ................... 7 POWERING THE UNIT........................ 8 PRODUCT OVERVIEW ....................... 9 LED STATUS ..........................10 REMOTE CONTROL ......................... 11 GENERAL OPERATIONS......................12 USB OPERATION........................13 BLUETOOTH OPERATION ....................... -
Page 3: Important Safety Instructions
IMPORTANT SAFETY INSTRUCTIONS Read these instructions - All the safety and operating instructions should be read before this product is operated. Keep these instructions - The safety and operating instructions should be retained for future reference. Heed all warnings - All warnings on the appliance and in the operating instructions should be adhered to. - Page 4 16. The mains plug is used as disconnect device, the disconnect device shall remain readily operable. 17. CAUTION: To reduce the risk of re or electric shock, do not expose this apparatus to rain or moisture. The apparatus shall not be exposed to dripping or splashing and that no objects lled with liquids, such as vases, shall not be placed on apparatus.
-
Page 5: Accessories Included
ACCESSORIES INCLUDED Unpack the box and verify that the following items are included: Main Unit Screws Handles Touch-up Pen Unit Legs Small Screwdriver Power Cords Tipping Restraint Pack RCA Cable * One set includes 1 safety strap, 2 buckles, 2 rubber stoppers and 4 screws. Remote Control Batteries User Manual... -
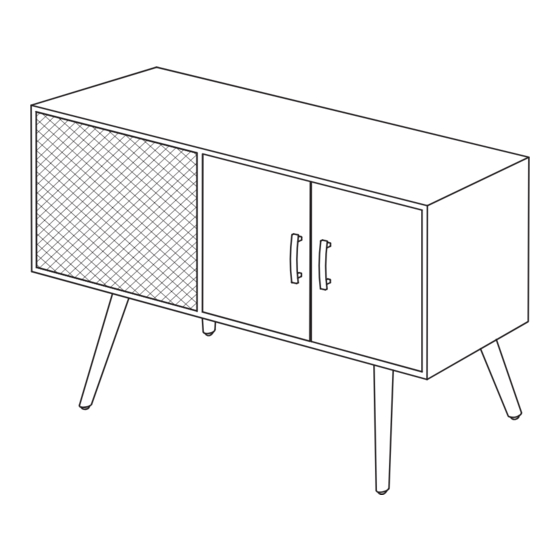
Page 6: Assembling Your Furniture
ASSEMBLING YOUR FURNITURE IMPORTANT NOTE: Please make sure you have all parts before beginning assembly. Please wait until all steps are completed before tightening bolts. Two people are recommended for assembly. Step 1: Installing the Handles Using the included handles, attach the handles into the doors’ holes as shown. Tighten two screws (included) from the inside of the doors into the handles’... - Page 7 Repositioning the Shelf Take out the shelf by removing the screws. Adjust the shelf supports to your preferred position. Put the shelf on the shelf supports and tighten the screws to secure the shelf in place. Note: Make sure to adjust all 4 of the included shelf supports/screws. Bottom view Shelf support Screw...
-
Page 8: Installing The Tipping Restraint
INSTALLING THE TIPPING RESTRAINT Installing the Tipping Restraint helps to prevent the unit from tipping over. * One tipping restraint package includes 1 safety strap, 2 brackets, 2 anchors and 4 screws. Safety Strap X 1 Anchors X 2 Brackets X 2 Screws X 4 Installing the Tipping Restraint Pack 1. -
Page 9: Powering The Unit
POWERING THE UNIT CAUTION: Only use the AC Power Cords supplied with this device. Do not use a power supply from another device or manufacturer. Using any other power cords or power supply may cause damage to the device and void your warranty. -
Page 10: Product Overview
PRODUCT OVERVIEW Control Panel 2 3 4 5 10 11 12 1. NEXT 6. AUX-IN JACK (R) / 7. AUX IN JACK (L) • Press to go to the next track. • Use to connect devices with an RCA Note: Function only supports Bluetooth and cable (included). -
Page 11: Led Status
LED STATUS Status LED Indicators (Hidden behind speaker grill) LED Indicator-1 LED Indicator-2 Standard LED Status Device Operation Mode LED Indicator-1 Action LED Indicator-2 Action Standby Mode RED (solid) – Searching/Pairing: BLUE (blinks slowly) – Bluetooth Mode Connected: BLUE (solid) –... -
Page 12: Remote Control
REMOTE CONTROL Button Function 1. STANDBY/ON-OFF • Turn ON the unit or switch the unit to Standby mode. • Hold the button for 3-5 seconds to set as the Primary unit. (Bluetooth Multi-Pair mode only) 2. MUTE • Press Once to cut the playing volume in half. •... -
Page 13: General Operations
GENERAL OPERATIONS POWER ON THE DEVICE Select an appropriate power cord (included) and plug it into the AC INLET (AC IN). Switch the POWER SWITCH to ON. It is strongly recommended that this product should be operated only from the type of power source marked on the rating label. -
Page 14: Usb Operation
USB OPERATION USB Playback: Press the MODE button on the panel or remote control to enter USB mode. Once entered, the LED Indicator-1 will be lit up in solid Blue and the LED Indicator-2 will be lit up in solid Orange at the same time. -
Page 15: Hdmi Operation
HDMI OPERATION HDMI (ARC) The ARC (Audio Return Channel) function allows you to send audio from your ARC-compliant TV to your unit through a single HDMI connection. To use the ARC function, please ensure your TV is ARC compliant and set up accordingly. The setting method of ARC may differ depending on your TV model. For details regarding the ARC function, please refer to your TV owner’s manual. -
Page 16: Connecting Other Devices
CONNECTING OTHER DEVICES Connecting an audio playback device Connect to COAXIAL-IN, OPTICAL-IN or AUX-IN input to an audio playback device (CD player, portable music player, etc.) using the appropriate cables. AUDIO COAXIAL OPTICAL OUTPUT OUTPUT OUTPUT Audio Device AUX-IN OPERATION 1. -
Page 17: Bluetooth Multi-Pair Feature
BLUETOOTH MULTI-PAIR FEATURE This unit can pair with over 8 Victrola furniture pieces simultaneously for total surround sound. How to Set Up Two Or More Units with the Bluetooth Multi-Pair Feature: 1. Power on only one unit (The unit you want to set as your primary). - Page 18 Operation Mode While Using Bluetooth Multi-Pair: (Make sure to set your primary and secondary units FIRST! See page 16) IMPORTANT: • The mode can only be switched on the primary unit. If you change the mode on the addtional unit, the Bluetooth Multi-Pair connection on the additional unit will be disconnected automatically.
- Page 19 *Follow the above steps 1-6 on each piece of furniture that was not connecting properly. Note: If you have multiple units (multiple remotes) - one remote can be used to control all Victrola Furniture pieces. Just point directly at the preferred unit to adjust settings.
-
Page 20: Specifications
SPECIFICATIONS GENERAL Power Requirements................AC 100-240V~50/60Hz Power Consumption ................80W Unit Dimensions ................. 47.25W x 15.7D x 30.6H (inches) ......................1,200W x 399D x 777H (mm) Unit Weight ..................90.39 lbs (41 kg) (Max. supported weight: 200 lbs) AMPLIFIER Output Power..................2 x 20W + 40W Frequency Response Subwoofer............ -
Page 21: Troubleshooting Guide
Bluetooth Mode. For future assistance with your product, call Victrola at TOLL FREE# 1-877-ITECH-97 (1-877-483-2497). Please note: As a result of continual improvements, the design and speci cations of this product are subject to change without notice. - Page 22 FCC Statement Warning: Changes or modi cations to this unit not expressly approved by the party responsible for compliance could void the user authority to operate the equipment. NOTE: This equipment has been tested and found to comply with the limits for Class B digital device, pursuant to part 15 of the FCC Rules.
- Page 23 To obtain service, the purchaser MUST present an original sales receipt / proof of purchase. Please contact us at www.victrola.com to request an RMA (Return Material Authorization) number to return products for service or replacement. Returns without an RMA number on the package will be refused and returned to sender.
Need help?
Do you have a question about the WOODLAND VH-25 and is the answer not in the manual?
Questions and answers