Advertisement
Quick Links
Advertisement

Related Manuals for National Instruments FOUNDATION PCMCIA-FBUS-2


Summary of Contents for National Instruments FOUNDATION PCMCIA-FBUS-2
- Page 1 PCMCIA-FBUS-2...
-
Page 2: Table Of Contents
INSTALLATION GUIDE Fieldbus Hardware and ™ OUNDATION NI-FBUS Software for Windows ™ This guide contains installation and configuration instructions for the PCI-FBUS, PCMCIA-FBUS, USB-8486, and the FBUS-HSE/H1 linking device on Windows. Notes Install the NI-FBUS software before you install the hardware. Contents Installing the Software ................ -
Page 3: Installing The Hardware
The interactive setup program guides you through the necessary steps to install the NI-FBUS software. You may go back and change values where appropriate by clicking Back. You can exit the setup where appropriate by clicking Cancel. Power down your computer when the setup is complete. Continue to the Installing the Hardware section to configure and install your hardware. -
Page 4: Install Your Pcmcia-Fbus Card
Insert the card into a free PCMCIA (or Cardbus) socket. The card has no jumpers or switches to set. Figure 2 shows how to insert the PCMCIA-FBUS and how to connect the PCMCIA-FBUS cable and connector to the PCMCIA-FBUS card. However, the © National Instruments Corporation NI-FBUS Installation Guide for Windows... - Page 5 PCMCIA-FBUS/2 cable has two connectors. Refer to Chapter 3, Connector and Cabling, of the NI-FBUS Hardware and Software User Manual, for more information about these two connectors. 1 Portable Computer 2 PCMCIA Socket 3 PCMCIA-FBUS Cable Figure 2. Inserting the PCMCIA-FBUS Card Connect the PCMCIA-FBUS to the Fieldbus network.
-
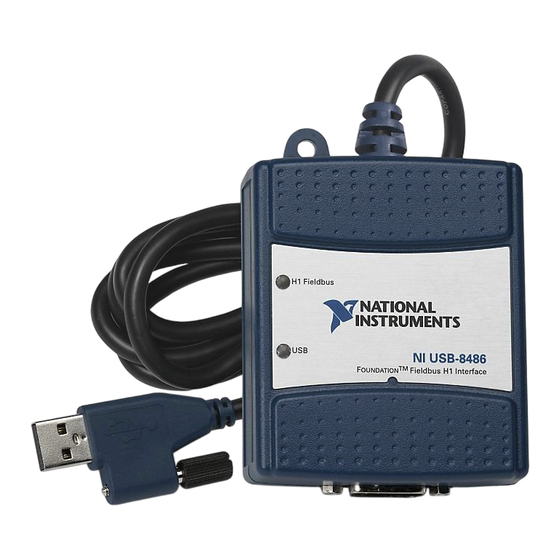
Page 6: Install Your Usb-8486
Operate the USB-8486 only as described in the operating instructions. Do not unplug the USB-8486 when the NI-FBUS software is running. 1 Desktop PC 2 USB-8486 3 DB-9 Connector Figure 3. Connecting the USB-8486 to a Desktop PC © National Instruments Corporation NI-FBUS Installation Guide for Windows... - Page 7 1 Portable Computer 2 USB Port 3 USB-8486 4 DB-9 Connector Figure 4. Inserting the USB-8486 To install the USB-8486, complete the following steps. Power on the computer and allow the operating system to boot. Insert the USB-8486 into a free USB port, as shown in Figure 3 and Figure 4.
-
Page 8: Install Your Fbus-Hse/H1 Ld
35 mm DIN rail and press the FBUS-HSE/H1 LD down onto the DIN rail, as shown in Figure 6. 1 Cover 2 Lip 3 35 mm DIN Rail 4 Press on to Rail Figure 6. Mounting the FBUS-HSE/H1 LD on a DIN Rail © National Instruments Corporation NI-FBUS Installation Guide for Windows... - Page 9 Note Do not use a cable longer than 100 m. If you are using a 10 Mbps Ethernet, National Instruments recommends using a Category 5 shielded twisted-pair Ethernet cable. Figure 7 shows the power, H1, and Ethernet connectors on the FBUS-HSE/H1 LD.
- Page 10 Troubleshooting and Common Questions, of the NI-FBUS Hardware and Software User Manual. Note If you are using the third-party HSE/H1 linking device, refer to the related user manual or reference materials to install the hardware. © National Instruments Corporation NI-FBUS Installation Guide for Windows...
- Page 11 For patents covering National Instruments products/technology, refer to the appropriate location: Help»Patents in your software, the patents.txt file on your media, or the National Instruments Patent Notice at ni.com/patents.
Need help?
Do you have a question about the FOUNDATION PCMCIA-FBUS-2 and is the answer not in the manual?
Questions and answers