Ascensia Diabetes Care Contour next GEN - Blood Glucose Monitoring System Quick Reference Guide
- User manual (68 pages) ,
- User manual (67 pages)
Advertisement
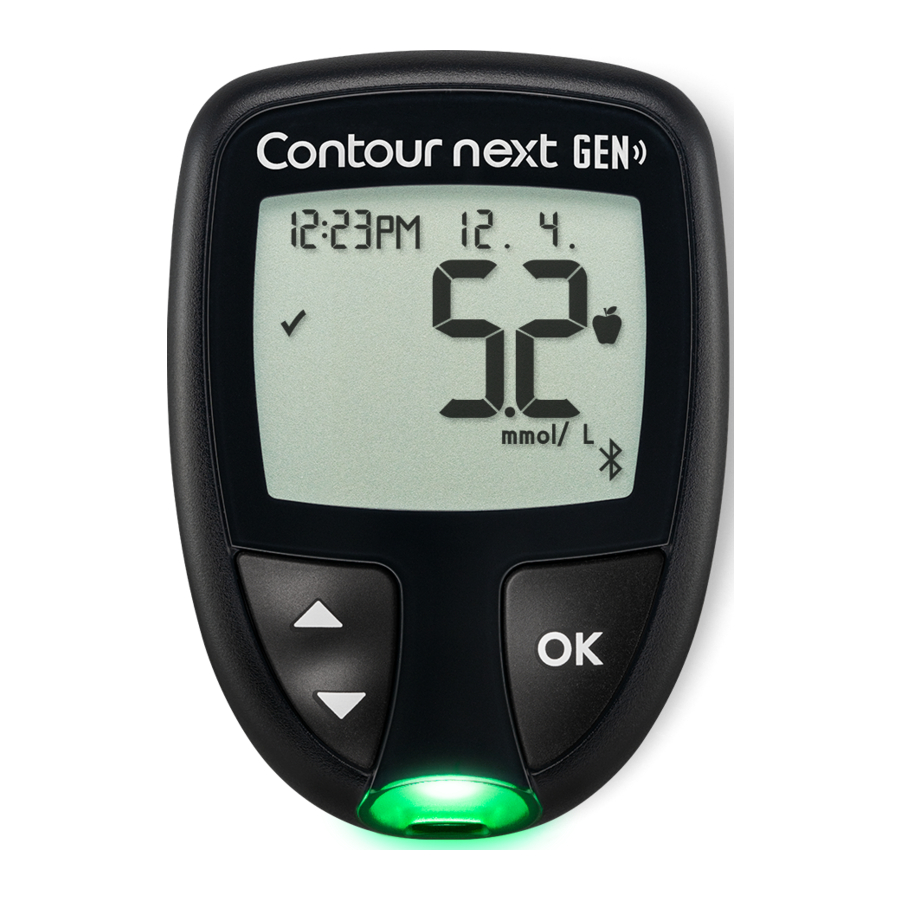
Your Contour®next Gen meter

NOTE: Your meter comes with a pre-set time, date, and target range. You can change these features in Settings.

Your Contour next GEN meter works only with Contour next test strips and Contour®next control solution.
 Read your Contour next GEN user guide for the Intended Use of the meter and a list of Important Safety Information, Warnings, Limitations and Precautions.
Turn the Meter On and Off
- Press and hold the OK button for about 3 seconds until your meter turns On or Off.
- Inserting a test strip into the meter will also turn the meter On.
- Press OK twice when the meter is Off to turn On the white test strip port light.
Home Screen
The Home screen has 2 options: Logbook and Settings.

- Press the
![]() button until the option you want is blinking.
button until the option you want is blinking. - To see your past readings and Averages, press the OK button while Logbook is blinking. See Logbook and View Averages.
- To change your Settings, press the OK button when Settings is blinking. See Settings.
 button until the option you want is blinking.
For a table of symbols, see Your Meter Display on the second side.
NOTE: When a symbol is blinking, you can select it.
Fingertip Testing
Refer to your lancing device insert for detailed instructions on preparing the lancing device.

Potential Biohazard
- Always wash your hands with antibacterial soap and water and dry them well before and after testing or handling the meter, lancing device, or test strips.
- All parts of this kit are considered biohazardous and can potentially transmit infectious diseases.
For more information, refer to the Contour next GEN user guide.
The lancing device provided with your kit is intended for use by a single patient.
- Prepare the lancing device. Refer to your lancing device insert for detailed instructions.
- Insert the grey square end of a new test strip firmly into the test strip port until the meter beeps.

The meter turns On and displays the Apply Blood screen. The meter is now ready to test a blood drop.
![]()
- Use your lancing device to get a drop of blood from your fingertip.
- Stroke your hand and finger toward the puncture site to form a drop of blood.
- Immediately touch the tip of the test strip to the drop of blood.


For instructions on removing the lancet from your lancing device, see the lancing device insert.
Second-Chance® sampling
If the meter beeps twice and the screen displays a blinking blood drop with a plus sign, the test strip does not have enough blood.
Do not remove the strip. You have 60 seconds to apply more blood to the same test strip.

Meal Markers
When Meal Markers are On, you can mark readings as Fasting  , Before Meal
  , or After Meal
  .
.
See Turn Meal Markers On.
smartLIGHTTM target range indicator
The meter displays your result with the units, time, date, and target indicator:
 Above Target Range
 In Target Range
 Below Target Range
The test strip port light displays a colour that indicates if your reading is above, in, or below your personal Target Range.
Logbook
- To turn on your meter, press and hold the OK button for 3 seconds. The Logbook
![]() is blinking.
is blinking.

- To view your Logbook entries, press the OK button to enter the Logbook.
- To scroll through the Logbook, press the
![]() or
or ![]() button. To scroll quickly through entries, press and hold the
button. To scroll quickly through entries, press and hold the ![]() or
or ![]() button.
button. - To exit the Logbook and return to the Home screen at any time, press the OK button.
 is blinking.
 or
or  button. To scroll quickly through entries, press and hold the
 View Averages
- To enter the Logbook from the Home screen, press the OK button while the Logbook
![]() is blinking.
is blinking. - To view your Averages, press the
![]() button from the first Logbook screen.
button from the first Logbook screen. - To scroll through your 7-, 14-, 30-, and 90-day Averages, press the
![]() button.
button.

- To return to your readings, press the
![]() button on the 7 d Avg (7-day Average).
button on the 7 d Avg (7-day Average). - To exit Averages and return to the Home screen at any time, press the OK button.

Settings
You can change the settings for:
- Date: Change format and date.
- Time: Change format and time.
- Meal Markers
![]() : Turn Meal Markers On or Off.
: Turn Meal Markers On or Off. - Bluetooth® wireless technology
![]() : Turn Bluetooth wireless functionality On or Off.
: Turn Bluetooth wireless functionality On or Off. - smartLIGHT feature
![]() : Turn smartLIGHT feature On or Off.
: Turn smartLIGHT feature On or Off.
See smartLIGHT target range indicator. - Target Ranges
![]() : View and change Target Ranges.
: View and change Target Ranges. - Sound
![]() : Turn Sound On or Off.
: Turn Sound On or Off. - Reminder
![]() : Turn the Reminder feature On or Off.
: Turn the Reminder feature On or Off.

 : Turn Bluetooth wireless functionality On or Off.


NOTE: To change the meter time and date, see the user guide.
To change meter settings:
- To highlight the Settings symbol
![]() the Home screen, press the
the Home screen, press the ![]() button.
button. - When the Settings symbol is blinking, press the OK button to enter Settings.

 the Home screen, press the
Need Help?
For more information, go to www.diabetes.ascensia.com
Your meter is preset and locked to display results in mmol/L. If your result is in mg/dL, contact Customer Service at 1-800-268-7200.
Warranty information and online meter registration available at www.diabetes.ascensia.com/warranty or call our Customer Service.
Manufactured for:
Ascensia Diabetes Care Holdings AG
Peter Merian-Strasse 90
4052 Basel, Switzerland
Customer Service: 1-800-268-7200

Documents / Resources
References
Ascensia Diabetes Care | Glucose Meters, Test Strips & CGM
Warranty Information / Information sur la garantie de nos produits
Download manual
Here you can download full pdf version of manual, it may contain additional safety instructions, warranty information, FCC rules, etc.
Advertisement


Need help?
Do you have a question about the Contour next GEN and is the answer not in the manual?
Questions and answers