Table of Contents
Advertisement
Quick Links
Outdoor Gas-Wood Pizza Oven User
Manual
Model #: TPO028LP / HPO03SH
IMPORTANT:
"This instruction manual contains important information necessary for the proper assembly
andsafe use of the appliance.
"Read and follow all warnings and instructions before assembling and using the appliance"
"Follow all warnings and instructions when using the appliance."
"Keep this manual for future reference"
Advertisement
Table of Contents

Related Manuals for Crown TPO028LP


Summary of Contents for Crown TPO028LP
- Page 1 Outdoor Gas-Wood Pizza Oven User Manual Model #: TPO028LP / HPO03SH IMPORTANT: "This instruction manual contains important information necessary for the proper assembly andsafe use of the appliance. "Read and follow all warnings and instructions before assembling and using the appliance"...
-
Page 2: Table Of Contents
Content OUTDOOR GRILL SAFETY ..............Precautions ..................... Parts Explosive Pictures ..............Installation ....................LEAK TESTING ..................25 Gas Use Caution ..................26 Tips for wood use ..................27 Gas cooking ..................... Wood Use Caution ................31 Wood Cooking ..................33 TROUBLESHOOTING MAINTENANCE............. -
Page 3: Outdoor Grill Safety
OUTDOOR GRILL SAFETY Your safety and the safety of others are ve叩important. We have provided many impo叫ant safety messages in this manual and on your appliance. Always read and obey all safety messages This is the safety alert symbol. This symbol alerts you to potential hazards that can kill or hurt you and others. “... -
Page 4: Precautions
Precautions 1.for all appliances (1)a statement that the installation must conform with local codes or, in the absence of local codes, with the National Fuel Gas Code, ANSI 2223. 1/NFPA 54, Storage and Handling of Liquefied Petroleum Gases, ANSI/NFPA 58; or Natura Gas and Propane Installation Code, CSA B149. - Page 5 Precautions (12) This appliance will be hot during and after use. Use insulated oven mitts or gloves for protection from hot surfaces or splatter from cooking liquids. (13) When cooking with oil or grease, the thermometer provided MUST be used. Follow instructions in this manual for proper installation and use of the thermometer.
-
Page 6: Parts Explosive Pictures
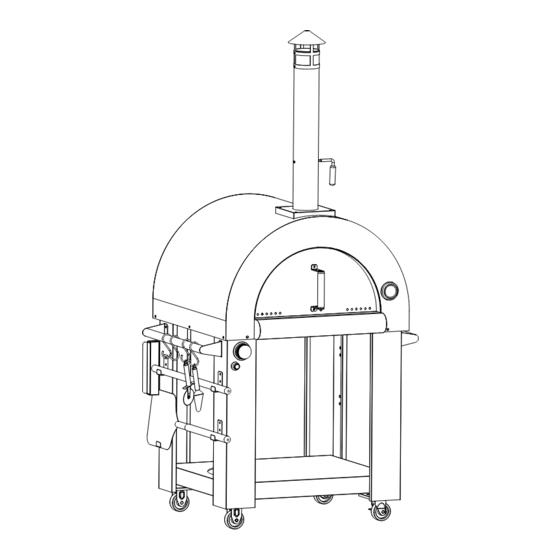
Parts Explosive Pictures... - Page 7 Parts Explosive Pictures Explosive# Parts name in EN Left legs Right legs Oven Ash pan Ash support 1 Ash support 2 Chimney Chimney top chimney handle chimney Decorative plates strength bottom Door handle Installation piece door handle Insulation Mat 1 Insulation Mat 2 side handle thermometer support...
- Page 8 Parts Explosive Pictures Explosive# Parts name in EN pizza stone 3 1/4" flat washer 1/4" spring washer 1/4" bolts 1/4"*15mm screw 1/4"*35mm screw 5/32"*10mm screw Movable nozzle connector Back burner bellows Ignition wire main value igniter gas hose Combination of regulator and gas hose Electrode T shape burner Knob base...
- Page 9 Product Information...
-
Page 10: Installation
Installation Step 1 1.Use 1/4"*14 screw 16pcs To install the support leg and Strengthen bottom plate. - Page 11 Installation Step 2 1. Installation of cylinder fixing rod and reinforced bottom plate...
- Page 12 Installation Step 3 1.Use 5/32"*10 screw 1 pcs To install the Electrode and T shape burner. 2.Use 1/4"*14 screw 2pcs To install the T shape burner and oven. Picture 1 Picture 3 Picture 2 Picture 4...
- Page 13 Installation Step 4 1.Use 1/4"*14 screw 4pcs and 5/32"*10 screw 2 pcs To instll the Oil collecting box. a. The front of the oil collecting box is facing up, and the end with the card slot is insert- ed into the oil collecting box bracket in parallel; b.
- Page 14 Installation Step 5 1.Install the Chimney top and chimney 2.Use 5/32"*10 screw 4 pcs/each 1/4"*14 screw 4pcs chimneyInstall the chimney 5/32"*10 screw 4 pcs/each chimney 1/4"*14 screw 4pcs...
- Page 15 Installation Step 6 1.Install the Support leg and oven. 1/4"*14 screw 12pcs/each support 3 pcs...
- Page 16 Installation Step 7 1.left and right handle. 2.Install the hook1 and hook 2. 1/4"*14 screw 8pcs 1/4"*14 screw 8pcs...
- Page 17 Installation Step 8 1.Install the Main value、 igniter and left front support. Picture 1 Picture 2 Picture 3...
- Page 18 Installation Step 9 1. Put the gas system pre-installed assembly as shown in the line drawing, pass 40"46" through 51", as shown in Figure 1, place it at 45", Use cable ties to bind; 2 Manually align 39" to 47" and tighten clockwise as shown in Figure 3 and Figure 4.
- Page 19 Installation Step 10 1.Door handle mounting...
- Page 20 Installation Step 11 1. When working with gas burning, please take out 52", when working with wood burning, please put in 52", completely cover the burner, pay attention to the direction of placement.
-
Page 21: Leak Testing
LEAK TESTING Only those parts recommended by the GENERAL manufacturer should be used on the grill. Substitution will void the warranty. Do not use the grill until all connections have been checked and do not leak. GAS FLOW CHECK Each grill burner is tested and adjusted at the factory prior to shipment;... -
Page 22: Gas Use Caution
Gas Use Caution THE GAS ESCAPE COULD CAUSE FIRE OR EXPLOSIONS CAUSING SERIOUS INJURIES OR DAMAGES TO OBJECTS. IN CASE OF A GAS LEAK, DO NOT LIGHT THE OVEN AND DETERMINE THE REASON FOR MAL- FUNCTION IN ORDER TO PREVENT FIRE AND/OR EXPLOSION. - Page 23 Tips for gas use The oven you have purchased may have some or all the feature listed below. The locations and appearances of the features shown here may not match what you are having on your model. Control panel LIGHTING Check all gas connections for gas leak before starting your oven.
- Page 24 Tips for gas use TO LIGHT THE GRILL WITH MATCH If a burner will not light after several attempts using the control knobs, the burners may be lit with a Match If you have already attempted to light the main burner with the igniter, allow 5 minutes for any accumulated gas to dissipate.
- Page 25 Tips for gas use A statement: 1)Do not store a spare LP gas cylinder under or near this appliance 2) never fill the cylinder beyond 80 percent full; and 3) if the instructions in are not followed exactly, a fire causing death or serious injury may occur.
-
Page 26: Gas Cooking
Gas cooking... -
Page 27: Wood Use Caution
Wood Use Caution Getting started Carefully unpack your Wood-fired Pizza Oven, it’s not too heavy, but use two people to lift it out of the box. Be sure to place the Outdoor Oven on the matched cabinet.. Remove all the protective film and discard. Assemble the cap/chimney by sliding the ring hardware around the bottom of the cap, fit the chimney and cap together –... - Page 28 Wood Use Caution Choosing your wood Use only dry hardwood such as oak and hickory. Avoid resinous wood such as pine or spruce. Never use treated lumber.Below is some information on different hardwoods most common in outdoor cooking. Hint: if the wood produces a lot of black smoke, it is generally an indication you are using the wrong type of wood.
-
Page 29: Wood Cooking
Wood Cooking Firing up your oven Your Outdoor Oven will bring years of enjoyment and countless delicious dishes once you have mastered the art of building and maintaining a fire that creates an evenly distributed, high-temperature Cooking Stone. Hint: Invest in a laser thermometer to show you the exact temp inside your Oven. -
Page 30: Troubleshooting Maintenance
TROUBLESHOOTING MAINTENANCE Burner will not light Excessive flare-ups Is the 10 kg gas fuel tank valve turned off? Is there excessive fat in the food being grilled? Turn the 10 kg gas fuel tank on. Keep flame on low or tum one burner off Is the Burner properly connected to the gas supply? Keep the hood up when grilling to avoid excessive flare-ups Contact a trained repair specialist or see Installation Instructions... -
Page 31: Cleaning The Oven
Cleaning the oven Thermometer - Clean with warm water, soap and a soft cloth. COLD SEASON We suggest to store the oven during the cold season in an enclosed dry area to protect it from weathering. Before storage, lightly lubricate the metal parts with Vaseline oil in order to avoid corrosion.
Need help?
Do you have a question about the TPO028LP and is the answer not in the manual?
Questions and answers