Advertisement
Quick Links
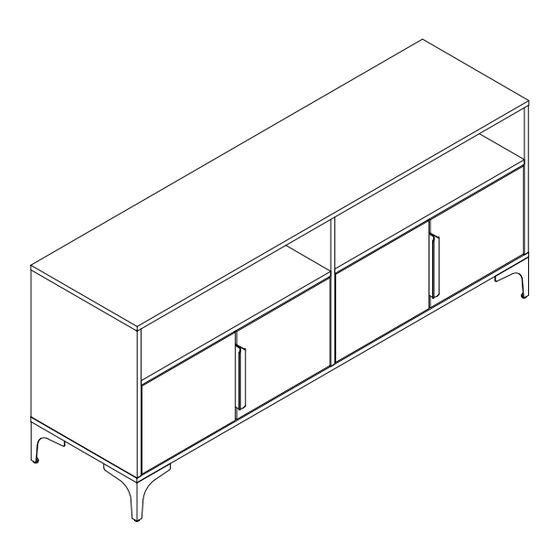
Sideboard
Assembly Instructions / Montageanleitungen
WF307277 / WF307278
Dimensions
Width - 58inch
Depth - 15.7inch
Height - 25.2inch
Important – Please read these instructions fully before starting assembly
Wichtig – Bitte lesen Sie diese Anleitung vollständig durch, bevor Sie mit der Montage beginnen
Größe
Breite - 147.3cm
Tiefe - 40cm
Höhe - 64cm
Issue 1 - 05/31/23
Advertisement

Related Manuals for Otto WF307277


Summary of Contents for Otto WF307277
- Page 1 Sideboard Assembly Instructions / Montageanleitungen WF307277 / WF307278 Größe Dimensions Breite - 147.3cm Width - 58inch Tiefe - 40cm Depth - 15.7inch Height - 25.2inch Höhe - 64cm Important – Please read these instructions fully before starting assembly Wichtig – Bitte lesen Sie diese Anleitung vollständig durch, bevor Sie mit der Montage beginnen...
- Page 2 Safety and Care Advice Important – Please read these instructions fully before starting assembly • Check you have all the • During assembly do not stand • To reduce components and tools listed on or put weight on the product, the likelihood of the following pages.
- Page 4 Components - Fittings / Komponenten - Beschläge Please check you have all the panels listed below Bitte überprüfen Sie, ob Sie alle unten aufgfüehrten Panels haben Note: The quantitie below are the correcet amount to complete the assembly. In some cases more fittings may be supplied than are required.
- Page 5 Using Camlocks Step 2 Step 1 DO NOT OVER TIGHTEN. Connect the male Push the male camlock NE PAS SERRER EXCESSIVEMENT. camlock as diected in into the entry hole. the assembly instructions using a scewdriver . Step 3 Step 4 Insert the female Turn the female camlock camlock as shown in the...
- Page 6 Assembly Instructions / Montageanleitungen...
- Page 7 Part List / Komponenten - Paneele WF307277 1 PC 2 PCS 1 PC Part List / Komponenten - Paneele WF307278 1 PC 2 PCS 1 PC 1 PC 2 PCS Hardware die fünf Metalle 2 PCS 1 PC...
- Page 8 Assembly Instructions / Montageanleitungen Step 1 A x 6 Step 2 A x 6 C x 12...
- Page 9 Assembly Instructions / Montageanleitungen Step 3 C x 6 I x 8 J x 4 K x 4 Place K into holes Step 4 B x 2...
- Page 10 Assembly Instructions / Montageanleitungen Step 5 B x 2 Step 6 A x 2...
- Page 11 Assembly Instructions / Montageanleitungen Step 7 B x 2 Step 8 B x 2...
- Page 12 Assembly Instructions / Montageanleitungen Step 9 Step 10 B x 6...
- Page 13 Assembly Instructions / Montageanleitungen Step 11 K x 4 Place K into holes Steck K in die öffnung Step 12 E x 6 F x 1...
- Page 14 Assembly Instructions / Montageanleitungen Step 13 F x 1 O x 4 Q x 8 Step 14 D x 16 G x 4 P x 1...
- Page 15 Assembly Instructions / Montageanleitungen Step 15 H x 2 J x 2 D x 8 M x 2 R x 4 Step 16 J x 2 H x 2 D x 8 L x 2 R x 4...
- Page 16 Assembly Instructions / Montageanleitungen Türangel (L) in plastikklauen (K) auf.Türangel (M) in kunststoff einfügen Step 17 In einem schraubenschlüssel (3) werden die angeln in den angeln geschraubt (8).Verriegelt das tor. Die scharniere (L) und der bolzen (D) unter gleichstarker belastung. D x 4 L x 2 Place bottom hinge (L) into plastic pivot (K) on part (7).
- Page 17 Assembly Instructions / Montageanleitungen Step 19 I x 8 N x 8 Step 20 In die kralle Steh auf, aber es istHey, großvaterDie kriege. S x 2 1 . nd bringt die ausrüstung an bordWollt ihr in position? 2.Male die wände an Der rechte abschreiber Der sitz steht fest.
- Page 18 Assembly Instructions / Montageanleitungen Step 21 In die kralle Steh auf, aber es istHey, großvaterDie kriege. S x 2 1 . nd bringt die ausrüstung an bordWollt ihr in Wall position? 2.Male die wände an Der rechte abschreiber Der sitz steht fest. Löcher.
Need help?
Do you have a question about the WF307277 and is the answer not in the manual?
Questions and answers