Advertisement
Quick Links
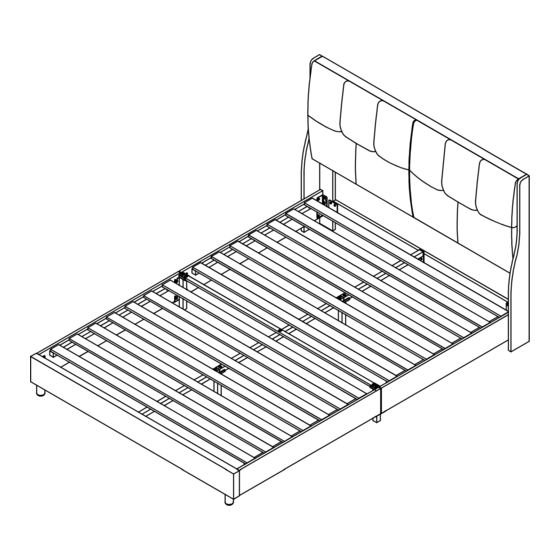
ASSEMBLY INSTRUCTION
WF300710/WF300711
4
3R
10
2
4
3L
9
6
7
5
8
10
TIPS
1. Please read the instructions fully before
assembly. These instructions include
important information which could ensure
correct assembly. We have been working
on providing high quality products for you.
However, in the rare instance that your
product is defective, missing parts or there
are some issues, please don't hesitate to
contact our customer service to submit
parts requirements, assembly suggestion,
or warranty claims, and we will give the
best solution as soon as possible. If
necessary, we need you to provide some
more clear pictures of the issue.
2. Insert the screws in holes and tighten
the screws, but not too tight, 70%~80% is
ok, finally tighten all the screws. If some
issues happened that some screws can
not target to the hole or some parts are
difficult to install, please adjust the
tightness of the screws.
3. 2 people are recommended to finish
14
12L
13L
11
5
7
9
3L
Slats ( 4 ) Double ended
tube ( 5 ) Central tube ( 6 ) Transverse
tube ( 8 ) Wrapped in Headboard within
(Lamellen(4)Doppelt ended
tube(5)Mittelrohr(6)Querrohr(8)
Wrapped in Headboard innerhalb.
1
12R
13R
14
3R
1
4
.
Page 1 of 6
)
Advertisement

Related Manuals for Otto WF300710


Summary of Contents for Otto WF300710
- Page 1 ASSEMBLY INSTRUCTION WF300710/WF300711 TIPS 1. Please read the instructions fully before assembly. These instructions include important information which could ensure correct assembly. We have been working on providing high quality products for you. However, in the rare instance that your...
-
Page 2: Part List
Part List WF300710AAA ×14 Slats ×1 Headboard ×1 Central tube ×2 Double ended tube Head board leg ×1 Transverse tube ×1 Connecting plate Part List WF300711AAA Side Rails -(LH) Connected ×1 ×2 ×2 Side Rails -(LH) support leg Footboard ×2 Side Rails -(RH) Side Rails ×2... - Page 3 Step 1 ×4 ×4 ×1 Headboard legs direction. (Richtung der Kopfbeine.) Fix the Headboard legs(13L) / (13R) To the headboard(1) With Bolts (B) and Flat Washer (E) by using Allen key (F). (Verwenden Sie einen Inbusschlüssel (F) und Schrauben (B) und flache Unterlegscheiben (E), um die Kopfbeine (13L)/(13R) am Kopfteil (1) zu befestigen.) Step 2...
- Page 4 Step 4 ×8 ×1 Fix the side rail support leg (9) to the side rails (3L) & (3R) with bolts (A) using Allen wrench (F). (Fixieren Sie das Seitenschienenstützbein (9) an den Seitenschienen (3L) & (3R) mit Schrauben (A) mit Inbusschlüssel (F).) Step 5 ×4 ×4...
- Page 5 Step 7 ×4 ×1 Use the hexagonal wrench (F) and bolt (A) to fix the central support rod (5) to the head board leg Connecting plate (11) and pedal (2). (Verwenden Sie den Sechskantschlüssel (F) und den Bolzen (A), um die zentrale Stützstange (5) am Kopfbrettbein zu befestigen Anschlussplatte (11) und Pedal (2).) Step 8...
- Page 6 Step 9 Paste slats (4) onto side rails . (Lamellen (4) auf Seitenschienen kleben.) Step 10 Fix the wing plates (12L) and (12R) to the headboard (1) with an Allen wrench (F), bolts (B) and flat washers (E). ×4 ( Befestige den Flügel (12L)&(12R) mit ×8 einem Inbusschlüssel (F) und Schrauben (B)&Flachscheiben (E) am Kopfteil (1).
Need help?
Do you have a question about the WF300710 and is the answer not in the manual?
Questions and answers