Advertisement
Available languages
Available languages
Quick Links
EN
ATTENTION:
1.
Find a location for the electric heater that is protected from direct sunlight.
2.
Do not plug the electric heater into the power outlet before you read all instructions.
Fast Menu for Heating: Press
OPERATING INSTRUCTIONS
Once the electric heater has been properly installed and connected to a ground electrical outlet, it is ready to operate.
Note: Ensure the circuit breakers for the power supply are turned on.
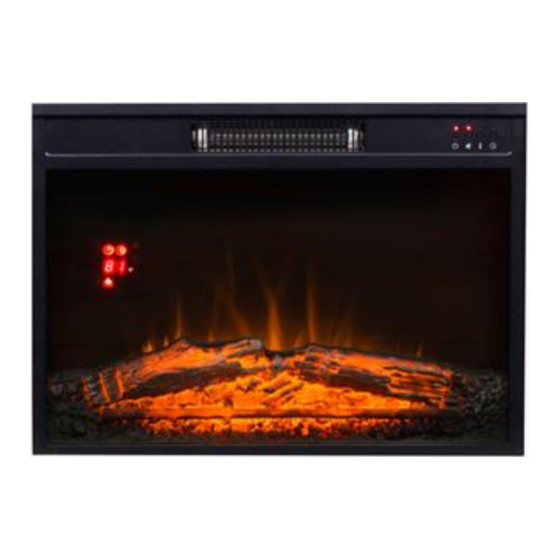
The I/O switch is on the left of the outlet. And the other controls are located right of the heater outlet.
0/1
Press this switch, the unit power-on. When the O/I switch is turned off, all other functions will stop even though the
0/1
buttons may be in the ON position
Press this button, the unit will enter standby mode. The unit will beep and the indicator light will be on. Then you can
select the following functions as desired. Press again to turn off the heater.
The OK key switches (changes) between the + and – keys for setting the temperature and the up/down arrow for
OK
setting the sound.
To adjust the volume of the fire SOUND: press OK and up arrow to increase sound volume, press OK and down arrow
to decrease the sound volume
For heat function - Press this button to turn on the heat function. Press again to turn off
For flame function - Press this button to turn on the flame. Press again to turn off.
For flame effect function - Press this button to change flame effect. Press again to decrease the flame intensity. There
are 4 light intensities for your selection. The flame optics will go lower under the sequence of 4,3,2 and 1. Pressing
the button again will go higher under the sequence of 1,2,3 and 4.
For Window detection function - Press this button to turn on the window detection function. During the heating
process, if the room temperature drops obviously caused by the outdoor cold air blowing, such like open windows or
open the door. In order to save energy, the heater will automatically stop heating. The corresponding icon on the
screen will twinkle. Press again to turn off the window detection function to normally heating
For modification time function - Press this button, the 'SUN' on the LED screen starts to twinkle. Press up
button to the desired date, and press
button switch to the 'hour' position. Press
'minute' position. Press
NOTE: The date will be reset after power interrupt.
For automatic working time setting function - There are 10 time periods you can set to make the unit work
automatically. Press this button, time serial number starts to twinkle. The 'ON' on the LED screen lights up. Press
button to the desired serial number. Press
or down
button to the desired date, and press
desired date, press
ELECTRIC FIREPLACES ELECTRICSUN®
INSTALLATION AND USE MANUAL
, press
, then press
Control panel
or
button to the desired minute. Press
button switch to the 'hour' position. Press
Page 1
to increase temperature degree.
LED screen
button to select, press
button to cancel. After set the desired date, press
or
button to the desired hour. Press
button again, the 'SUN' on the LED screen starts to twinkle. Press up
button to select, press
or
Remote control
button switch to the
or
button to complet date setting
button to cancel. After set the
button to the desired hour. Press
or down
or
Advertisement

Related Manuals for ELECTRICSUN ESfocar23C


Summary of Contents for ELECTRICSUN ESfocar23C
- Page 1 Page 1 ELECTRIC FIREPLACES ELECTRICSUN® INSTALLATION AND USE MANUAL ATTENTION: Find a location for the electric heater that is protected from direct sunlight. Do not plug the electric heater into the power outlet before you read all instructions. Fast Menu for Heating: Press...
- Page 2 button switch to the ‘minute’ position. Press button to the desired minute. At this time you have completed the boot time setting. Press button again, the ‘ON’ extinguished and the ‘OFF’ lights up. Complete the shutdown time in the same way. Finally, you need to set a temperature which stop heating. Press button to the desired temperature.
- Page 3 DEEE along with the unsorted municipal waste. After deterioration, do not throw away but will lead to specially equipped centers for recycling DEEE. Imported by ELECTRICSUN SRL, ElectricSun® Adress 310212 Arad, Gorunului Street No.12, Arad, Romania Tel: 004 0257 457 395; E-mail: office@electricsun.de...
- Page 4 Seite 1 ELEKTROKAMINE ELECTRICSUN® INSTALLATIONS-UND BENUTZERHANDBUCH ACHTUNG: Finden sie einen Platz für die elektrische Heizung, der direkt von den Sonnenstrahlen geschützt ist. Setzen Sie das Heizgerät nicht in die Steckdose ein, bevor Sie alle Anweisungen gelesen haben. Schnellmenü für die Heizung: Drücken Sie , Drücken Sie...
- Page 5 Hinweis: Die Arbeitszeit der Zeitstufen ist diesselbe wie vor der Timer-Startfunktion. Passen Sie also den gewünschten Arbeitsstatus an und aktivieren Sie die Timer-Funktion. Anschließend arbeitet das Gerät entsprechend ihrem Arbeitsstatus über die Zeit. Wenn diese Timer-Funktion aktiviert ist wechselt die Heizung in den Stanby-Modus. Und wenn der Kamin das Programm beendet hat, müssen Sie die Timer-Funktion ausschalten und dann das Heizgerät benutzen Für die Reset –...
- Page 6 Importeur ELECTRICSUN SRL, ElectricSun® Adresse: 310212 Arad, Gorunului Straße. Nr. 12, Arad, Rumänien Tel: 004 0257 457 395; E-mail: office@electricsun.de Das Produkt erfüllt folgende Normen Das Produkt gemäß HG 457/2003 und HG 497/2003 darf mit der vom Hersteller verwendeten CE- Kennzeichnung vermarktet werden.
- Page 7 Page 1 CHEMINÉES ÉLECTRIQUES ELECTRICSUN® MANUEL D'INSTALLATION ET D'UTILISATION ATTENTION: Trouvez un emplacement pour le radiateur électrique protégé des rayons directs du soleil. Ne branchez pas le radiateur électrique sur la prise de courant avant d'avoir lu toutes les instructions.
- Page 8 REMARQUE : La date sera réinitialisée après une coupure de courant Pour la fonction de réglage automatique du temps de travail - Vous pouvez définir 10 périodes horaires pour que l'unité fonctionne automatiquement. Appuyez sur ce bouton, le numéro de série commence à scintiller. Le « ON » sur l'écran LED s'allume.
- Page 9 Après détérioration, ne pas jeter mais orienter vers des centres spécialement équipés pour le recyclage du DEEE. Imported by ELECTRICSUN SRL, ElectricSun® Adress 310212 Arad, Gorunului Street No.12, Arad, Romania Tel: 004 0257 457 395; E-mail: office@electricsun.de...
- Page 10 1. Oldal ELECTRICSUN® ELEKTROMOS KANDALLÓ TELEPÍTÉSI ÉS HASZNÁLATI KÉZIKÖNYV FIGYELEM: Az elektromos kandalló legyen védve a napsugaraktól. Ne csatlakoztassa az elektromos kandallót az áramkörbe, amíg el nem olvasta az összes utasítást. Fűtés gyorsmenü: Nyomja meg , nyomja meg , majd nyomja a jelet a hőmérséklet emelésére.
- Page 11 Működési idő automatikus beállítása funkció – Az automatikus működési funkció 10 periódusra állítható be. Nyomja meg ezt a gombot és a sorozatszám villogni kezd. A LED kijelzőn kigyúl az “ON”. Nyomja a vagy a gombot a kívánt sorozatszám elérése érdekében. Nyomja meg megint a gombot, a „LED”...
- Page 12 és elektronikus berendezésekben található veszélyes anyagok miatt; d) az X-szel áthúzott hulladéktároló azt a hulladéktárolót jeöli, amelyben tilos az az elektromos és elektronikus berendezések hulladékait szét nem válogatott hulladékkal tárolni. Importőr ELECTRICSUN SRL, ElectricSun® Cím: 310212 Arad, Gorunului Utca 12, Arad, Románia Tel: 004 0257 457 395; E-mail: office@electricsun.de...
- Page 13 Pagina 1 SEMINEE ELECTRICE ELECTRICSUN® MANUAL DE INSTALARE SI UTILIZARE ATENȚIE: Găsiți o locație protejată de razele directe ale soarelui pentru focarul electric. Nu introduceti incalzitorul electric in priza inainte de a citi toate instructiunile. Meniu rapid pentru incalzitor: Apasati...
- Page 14 încălzirea. Apăsați butonul pentru a atinge temperatura dorită. Când se atinge temperatura ambiantă dorită, încălzitorul se va opri automat la încălzire Pentru funcția temporizator - Apăsați acest buton pentru a activa funcția temporizatorului. Apăsați din nou pentru a opri. Notă: starea de lucru a perioadei de timp este aceeași cu cea dinaintea funcției de pornire a cronometrului. Adică, ajustați starea de lucru pe care o doriți și activați funcția temporizatorului, apoi aparatul va funcționa în funcție de starea dvs.
- Page 15 X de interzicerea depozitării DEEE împreună cu deşeurile municipale nesortate. Importator ELECTRICSUN SRL, ElectricSun® Adresă: 310212 Arad, Str. Gorunului, Nr. 12, Arad, România Tel: 004 0257 457 395; E-mail: office@electricsun.de...
Need help?
Do you have a question about the ESfocar23C and is the answer not in the manual?
Questions and answers