Table of Contents
Advertisement
Available languages
Available languages
Quick Links
MURPHY EXTERIOR GAS FIRE PIT
Item# 52296
Model# BH65003-9
WARNING: If the information in this
manual is not followed exactly, a fire or
explosion may result causing property
damage, personal injury, or loss of life.
WARNING
Improper installation, adjustment, alteration, service or maintenance can cause property
damage, personal injury or loss of life. Refer to the owner's information manual provided
with this appliance. Installation and service must be performed by a qualified installer,
service agency, or the gas supplier.
INSTALLER: Leave this
manual with the appliance.
CONSUMER: Retain this
manual for future reference.
DANGER
FIRE OR EXPLOSION HAZARD
If you smell gas:
Shut off gas to the appliance.
•
Extinguish any open flame.
•
If odor continues, leave the area immediately.
•
After leaving the area, call your gas supplier
•
or fire department.
Failure to follow these instructions could
result in fire or explosion, which could cause
property damage, personal injury, or death.
WARNING
Do not store or use gasoline or other flammable
vapors and liquids in the vicinity of this or any
other appliance. An LP-cylinder not connected
for use shall not be stored in the vicinity of
this or any other appliance.
WARNING: For Outdoor Use Only.
Installation and service must be performed
by a qualified installer, service agency,
or the gas supplier.
DANGER
This appliance can produce carbon
monoxide which has no odor.
Using it in an enclosed space can kill you.
Never use this appliance in an enclosed
space such as a camper, tent, car or
home.
User Guide
CARBON MONOXIDE HAZARD
Advertisement
Table of Contents

Subscribe to Our Youtube Channel
Related Manuals for Bond BH65003-9


Summary of Contents for Bond BH65003-9
- Page 1 MURPHY EXTERIOR GAS FIRE PIT Item# 52296 DANGER Model# BH65003-9 FIRE OR EXPLOSION HAZARD If you smell gas: Shut off gas to the appliance. • Extinguish any open flame. • If odor continues, leave the area immediately. • After leaving the area, call your gas supplier •...
-
Page 2: Safety Information
SAFETY INFORMATION Before you assemble or operate this unit, please carefully read this entire manual. Failure to do so may r WARNING • The installation of this unit must adhere to local codes or Propane Storage and Handling Code, CSA B149.2. •... - Page 3 • Combustible material should not be within 60 in (1.52 m) of the top of the unit, or within 48 in (1.21 m) around the entire unit. • Keep the appliance area clear and free fr vapors and liquids. • •...
- Page 4 SAFETY INFORMATION Only use the regulator and hose assembly provided with this unit. Replacement parts must be supplied directly by manufacturer. Inspect the burner before use of this unit. If the burner shows any kind of damage, do not operate the appliance.
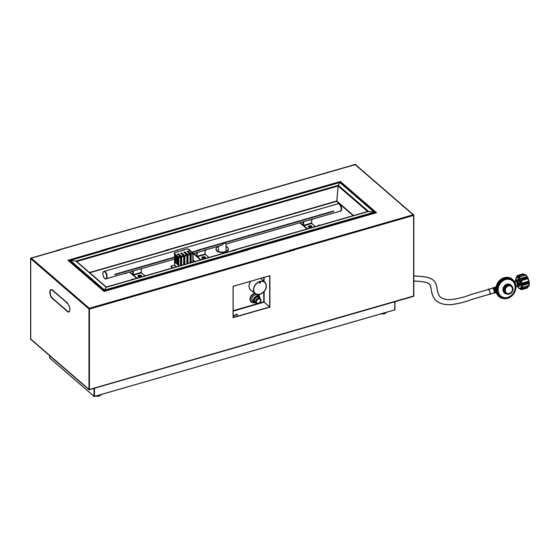
- Page 5 CONTENTS Item Description Lava Rocks 2 boxes Battery (AAA) Body Tank Holder Protective Cover Control Knob (preassembled) Electronic Igniter (preassembled) Burner (preassembled) Guard (preassembled) Feet (pressambled) Page 5...
- Page 6 ASSEMBLY INSTRUCTIONS 1. Check that the control knob (F) for the gas supply system is turned to the “OFF” position before starting any assembly. 2. Put the 20 lb propane gas tank (not included) into the tank holder (D). Turn the wing screw on the outside of the tank holder (D) clockwise to tighten the tank into the tank holder.
- Page 7 4. Remove the rubber cap on the electronic igniter (G) by unscrewing and slide battery (B) into the battery slot. Make sure the positive side of the battery faces outwards. Screw the electronic igniter cap (G) over the battery tightly. body (C).
-
Page 8: Operation
OPERATION Before performing a leak test, be sure that no sparks can occur and you are in a spacious outdoor area. Connect the propane tank to the regulator and turn the valve on the unit to the "OFF" position. Brush a soap and water mixture on all connections. Turn the gas supply on. If bubbles occur on any connection there may be a leak. -
Page 9: Maintenance
MAINTENANCE • Before performing any maintenance, always disconnect propane tank. Store your appliance indoors during winter months. Avoiding extreme cold temperatures will • prevent from damage. • Keep the heating unit free and clear from combustible materials. • Visually inspect burner for obstructions and keep tank enclosure free and clear from debris. •... -
Page 10: Troubleshooting
TROUBLESHOOTING Problem Cause Solution Igniter pin and burner are wet Dry off with a soft cloth Igniter battery is incorrectly inserted Check in which direction the battery is inserted Igniter pin is broken Contact the manufacturer for a Heating unit won’t light replacement part Electrode wire is loose or disconnected Reconnect wire to the igniter box located... -
Page 11: Warranty
WARRANTY This product has a one-year warranty against manufacturing defects in workmanship or materials. The manufacturer warranty will be voided by, and manufacturer disclaims any responsibility for, the following actions: • • Use of any component part not manufactured or approved by the Manufacturer. - Page 12 Page 12...
- Page 13 FOYER EXTÉRIEUR AU PROPANE MURPHY No de produit 52296 DANGER No de modèle BH65003-9 RISQUE D'INCENDIE OU D’EXPLOSION Si vous sentez le gaz : Fermez le gaz de l’appareil. • Éteignez toute flamme nue. • Si l’odeur persiste, quittez immédiatement la zone.
-
Page 14: Renseignements Sur La Sécurité
RENSEIGNEMENTS SUR LA SÉCURITÉ Avant d’assembler ou d’utiliser cette unité, veuillez lire ce guide attentivement. L’omission de ce processus peut entraîner un incendie, une explosion, une blessure corporelle ou la mort. AVERTISSEMENT • L’installation de cette unité doit être conforme aux codes locaux ou Code de manutention et d’entreposage du gaz, CSA B149.2. - Page 15 • Gardez tout cordon électrique et le tuyau d’alimentation en gaz loin des surfaces chauffées. • Le couvercle doit être enlevé si le brûleur fonctionne. • Ne tenez aucune matière combustible à une distance de moins de 60 po (1,52 m) du haut de l’unité, ou à...
- Page 16 RENSEIGNEMENTS SUR LA SÉCURITÉ • Remplacez tout revêtement de protection ou autre dispositif de sécurité enlevé pour l’entretien de l’appareil avant de faire fonctionner l’appareil. • L'installation et la réparation doivent se faire par un technicien d'entretien qualifié. L'appareil doit être inspecté par un technicien d'entretien qualifié avant I'usage et au moins une fois par an.
- Page 17 CONTENU Article Description Article Description Qté Pierres de lave 2 boîtes Pile (AAA) Cuve Support Housse protectrice Bouton de commande (préassemblé) Allumeur électronique (préassemblé) Brûleur (préassemblé) Dispositif de protection (préassemblé) Pattes (préassemblé) Page 17...
-
Page 18: Instructions D'assemblage
INSTRUCTIONS D’ASSEMBLAGE pour le système d’alimentation en gaz est mis sur la position « OFF » avant de commencer tout assemblage. Placez la bonbonne de gaz de 20 lb (9 kg) (non comprise) dans le support (D). Tournez la vis à oreilles à l’extérieur du support (D) dans le sens horaire pour bien fixer la bouteille dans le support. - Page 19 4. Retirez le capuchon en caoutchouc de l’allumeur électronique (G) en le dévissant et glissez la pile (B) dans le compartiment à pile. Assurez-vous que le côté positif de la pile est orienté vers l’extérieur. Vissez bien le capuchon de l’allumeur électronique (G) sur la pile. Versez la boîte de pierres de lave (A) dans la cuve (C) du foyer.
- Page 20 FONCTIONNEMENT Avant de faire un test d’étanchéité, assurez-vous qu’aucune étincelle ne peut se produire et que vous êtes dans un grand espace extérieur. Raccordez la bonbonne de gaz propane au régulateur et tournez le robinet de l’unité à la position «...
-
Page 21: Entretien
ENTRETIEN Avant d’effectuer des travaux d’entretien, détachez toujours la bonbonne de gaz propane. Rangez votre produit à l’intérieur pendant les mois d’hiver. Éviter les températures • extrêmement froides empêchera les dommages dus à l’exposition. Gardez l’appareil dégagé de matériaux combustibles. Inspectez visuellement le brûleur pour des obstructions, et gardez l’enceinte de la bouteille dégagée de débris. -
Page 22: Guide De Dépannage
GUIDE DE DÉPANNAGE Problème Cause Solution La tige d’allumage et le brûleur sont Essuyez avec un chiffon doux humides La pile de l’allumeur est incorrectement Vérifiez l’orientation dans laquelle la pile insérée est insérée La tige d’allumage est cassée Appelez le fabricant pour obtenir une L’appareil de pièce de rechange chauffage ne s’allume... -
Page 23: Garantie
GARANTIE Ce produit est accompagné d’une garantie d’un an contre tout défaut de matériaux ou de fabrication. La garantie du fabricant sera annulée par le fabricant et le fabricant décline toute responsabilité pour les actions suivantes : • Emploi d’un composant non fabriqué ou appr ouvé... - Page 24 Page 24...
Need help?
Do you have a question about the BH65003-9 and is the answer not in the manual?
Questions and answers