Table of Contents
Advertisement
Quick Links
Advertisement
Table of Contents

Related Manuals for Zotac ECM74060C


Summary of Contents for Zotac ECM74060C
- Page 2 ZOTAC. Products and corporate names mentioned in this manual may be registered trademarks or copyrights of their respective companies, and are used for identification purposes only.
-
Page 3: Table Of Contents
Safety information ----------------------------------------------------------------------------------------------4 Setting up your system -------------------------------------------------------------------------------------4 Care during use ----------------------------------------------------------------------------------------------4 Welcome -----------------------------------------------------------------------------------------------------------5 Package contents -------------------------------------------------------------------------------------------5 Getting to know your ZOTAC ZBOX ----------------------------------------------------------------------6 Front view -----------------------------------------------------------------------------------------------------6 Rear view ------------------------------------------------------------------------------------------------------7 Installing Hardware ---------------------------------------------------------------------------------------------8 Installing a graphics card ----------------------------------------------------------------------------------10 Installing a memory module -------------------------------------------------------------------------------12 Installing M.2 SSD and Optane memory modules --------------------------------------------------14... -
Page 4: Product Specifications
NVIDIA GeForce RTX 3070 w/ 8GB GDDR6, 256bit for ZBOX ECM73070C v NVIDIA GeForce RTX 3070 LHR w/ 8GB GDDR6, 256bit for ZBOX ECM7307LH v NVIDIA GeForce RTX 4060 w/ 8GB GDDR6, 128bit for ZBOX ECM74060C v NVIDIA GeForce RTX 3060 w/ 12GB GDDR6, 192bit for ZBOX ECM53060C ... -
Page 5: Safety Information
265.5mm x 126mm x 249mm Safety information Your ZOTAC ZBOX is designed and tested to meet the latest standards of safety for information technology equipment. However, to ensure your safety, it is important that you read the following safety instructions. -
Page 6: Welcome
ZOTAC ZBOX Welcome Congratulations on your purchase of the ZOTAC ZBOX. The following illustration displays the package contents of your new ZOTAC ZBOX. If any of the below items are damaged or missing, contact your retailer. Package contents • 1 x ZOTAC ZBOX •... -
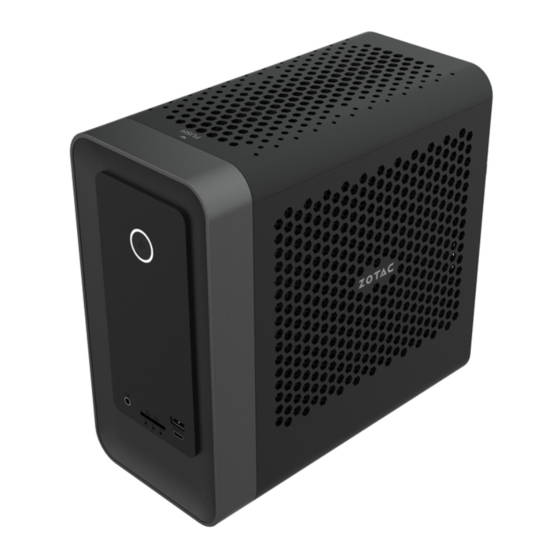
Page 7: Getting To Know Your Zotac Zbox
ZOTAC ZBOX Getting to know your ZOTAC ZBOX Front view Refer to the diagram below to identify the components on this side of the system 1. Power switch The power switch allows powering ON and OFF the system. 2. Combo Headphone/Microphone jack (3.5mm) The combo headphone/microphone jack (3.5mm) is used to... -
Page 8: Rear View
ZOTAC ZBOX Rear view Refer to the diagram below to identify the components on this side of the system. 1. WiFi antenna connectors The WiFi antenna connector supports WiFi antenna module. 2. LAN ports The eight-pin RJ-45 LAN ports support standard Ethernet cables for connection to a local network. -
Page 9: Installing Hardware
Before installing hardware, please follow the instructions below to remove the cover of your ZOTAC ZBOX. 1. Place the ZOTAC ZBOX upright on a flat surface. 2. Locate the two thumb screws and remove. 3. Press down on the arrow of the top cover and slide and remove the top cover off the... - Page 10 ZOTAC ZBOX 4. Lift and remove the two side covers.
-
Page 11: Installing A Graphics Card
ZOTAC ZBOX Installing a graphics card (optional) 1. Remove the screw from the PCB bracket. (tool required, not included) 2. Connect the power cables to the graphics card. *Graphics card compatibility - Power: up to 220W, Width: dual-slot, Length: 230mm / 9.06in... - Page 12 ZOTAC ZBOX 3. Insert the graphics card into the available PCIE slot. 4. Bind the cables to the small bracket with a nylon cable tie. (optional) 5. Install the screw to secure the graphics card.
-
Page 13: Installing A Memory Module
ZOTAC ZBOX Installing a memory module 1. Lay the ZOTAC ZBOX on a flat surface with the right side upwards. 2. Gently push down on the memory retainer clips to the open position. - Page 14 4. Gently push the SO-DIMM memory module down into the slot until the retainer clips lock into place. Note: This ZOTAC ZBOX accomodates two DDR4 SO-DIMM memory modules. You must install at least one module for the system to function.
-
Page 15: Installing M.2 Ssd And Optane Memory Modules
ZOTAC ZBOX Installing M.2 SSD and Optane memory modules There are two M.2 slots to support PCIe X4, SATA III SSD and Optance memory accordingly. M.2 PCIe x4 SSD / M.2 PCIe x4 / Optane memory slot SATAIII SSD slot... - Page 16 ZOTAC ZBOX 2. Remove the hard disk bracket. 3. Locate the M.2 PCIe x4 / SATA SSD slot and remove the screw from the screw bolt. (tool required, not included)
- Page 17 ZOTAC ZBOX 4. Attach the screw to the M.2 PCIe x4 / SATA SSD module. 5. Insert the M.2 PCIe x4 / SATA SSD module into the slot at a 45 degree angle. 6. Gently press down on the M.2 PCIe x4 / SATA SSD module, and install the screw.
-
Page 18: Installing A Hard Disk / Ssd
ZOTAC ZBOX Installing a hard disk / SSD 1. Locate the 2.5-inch SATA hard disk / SSD and the hard disk bracket. 2. Install the hard disk / SSD to the hard disk bracket. - Page 19 ZOTAC ZBOX 3. Insert the hard disk bracket into the SATA slot. 4. Reinstall the thumb screw.
-
Page 20: Setting Up Your Zotac Zbox
ZOTAC ZBOX Setting up your ZOTAC ZBOX You need to connect peripherals before using your ZOTAC ZBOX. 1. Connecting a WiFi antenna module Connect a BT/WiFi antenna module to the BT/WiFi antenna connector. 2. Connecting to a network device Connect one end of a network cable to the LAN port on the system rear panel and the other End to a hub or switch. - Page 21 ZOTAC ZBOX 4. Connecting to USB 3.0 devices Connect USB 3.0 devices such as external hard drives, SSDs and flash drives to the USB 3.0 port on the system rear panel. 5. Connecting to HDMI displays Connect one end of an HDMI cable to the HDMI port on the system rear panel and the other end to a HDMI-compatible display such as an HDTV or monitor.
-
Page 22: Installing Drivers And Software
Install system drivers to gain full functionality of the ZOTAC ZBOX hardware and features. Installing system drivers Before you can use the full features of the ZOTAC ZBOX, the system drivers must be installed. The following types of operating systems are supported by the ZOTAC ZBOX driver USB flash drive: •... - Page 23 • Intel Management Engine • CardReader Driver Each driver must be installed individually to ensure proper operation of the ZOTAC ZBOX. Select the driver you want to install. The driver installer should launch. Follow the onscreen instructions to install the drivers.
-
Page 24: Installing The Killer Control Center
ZOTAC ZBOX Installing the Killer Control Center Before you can use the full feature of Killer LAN, please follow the instructions below to install the Killer Control Center. Run Killer Wireless Network Driver, click “Next” when the following dialog box displays. - Page 25 ZOTAC ZBOX Click “Install” to begin the installation. (Please make sure that the network is connected before the installation) Check √ before “Download Killer Control Center”, and click “Finish”.
- Page 26 ZOTAC ZBOX Click “Get” to download the Killer Control Center. When the installation is complete, click “Launch” to run the Killer Control Center.
- Page 27 ZOTAC ZBOX Killer Control Center displays as below.
-
Page 28: Using Your Zotac Zbox
Note 2: Enter the network security key if necessary. Configuring audio output Follow the steps below to enable audio output when connecting the ZOTAC ZBOX to a TV or receiver via DP/HDMI adapter. Access the Sound settings via the system Control Panel. -
Page 29: Intel ® Optane Tm Technology
ZOTAC ZBOX Intel Optane technology ® Intel Optane is a new ultra-high-speed memory technology with 3D XPoint memory media, compatible with NVMe storage protocol. The program SetupOptaneMemory.exe is included in the driver DVD and USB flash drive (X:\ OptaneMemory\SetupOptaneMemory.exe). Enabling Intel Optane memory Please follow the recommended procedure to enable Optane memory, as listed below. - Page 30 ZOTAC ZBOX...
- Page 31 ZOTAC ZBOX...
- Page 32 ZOTAC ZBOX...
- Page 33 ZOTAC ZBOX Restart the system, the following dialog box will display. Click “Yes”. When the Intel Optane Memory interface displays, click “Enable”.
- Page 34 ZOTAC ZBOX...
- Page 35 ZOTAC ZBOX Click “Restart” to complete enabling the Optane Memory. When the Optane Memory is successfully enabled, the created Intel Optane information will show in Device Manager > Disk drives.
-
Page 36: Disabling Intel Optane Memory
ZOTAC ZBOX Disabling Intel Optane memory Double-click the Intel icon in the lower right corner of the desktop. When the Intel Optane Memory interface displays, click “Disable”. - Page 37 ZOTAC ZBOX Click “Restart” to complete disabling the Optane Memory. When the Optane Memory is successfully disabled, the disabled Intel Optane information will show in Device Manager > Disk drives. 209-MB440-02...
Need help?
Do you have a question about the ECM74060C and is the answer not in the manual?
Questions and answers