Advertisement
PREPARATION
Precautions
Note:
All contents in this chapter are related to safety, users must comply with it.
All contents in this chapter are only for the correct use of this product.
 Prohibition | ||
 Avoid installing under direct sunlight and outdoor places |  Do not expose to an environment below 0 ºC |  Do not store flammable items near the machine |
 | ||
 When the machine breaks down, please cut off the water and power supply quickly |  Keep out of reach of children Please do not let children operate the machine | |
 Attention Attention | ||
 Do not disassemble the machine by yourself as to prevent water leakage and damage to the machine |  Please make sure the temperature of water source is 5-38 ºC | |
 If the machine will be inactive for more than 24 hours, please pour out the left water and turn off its power supply |  In order to run the machine smoothly, please use accessories and filter cartridges from Bluevua | |
Before Installation
Open the packaging and take out the entire machine, as well as all the accessories. Confirm them in accordance with the list to ensure that nothing is missing or damaged during the shipping. If there is any part broken or cracked, please stop the installation and contact Bluevua Support Team instead. To ensure a smooth installation, please watch the installation video from our website: www.bluevua.com
Tel: 1-888-637-0009 24/7 Customer Service
Email: support@bluevua.com
Required Tools
- Variable speed drill
- Drill bit: 1/4" (for the drainpipe), 1/4" (for faucet hole)
- Adjustable wrench, pliers
- Screwdriver
- Utility knife or scissors
- Flashlight
- Towel
Specifications
| Product Model | RO100DS-Bluevua |
| Product Size (L'W*H) | L370*W202*H443mm |
| Feed Water Pressure | 0.15~0.4 MPa |
| Feed Water Temperature | 41~100°F / 5~38°C |
| Feed Water Requirement | Tap Water |
| Pure Water Rate | 100 Gallon Per Day |
| Power Specifications | Input 100~240V |
| Output DC24V; 1.5A |
Note: The water flow rate is affected by water pressure and water temperature. The water flow is measured under 0.2 MPa water pressure and 25°C water temperature. When water pressure and water temperature fluctuate, the water flow also fluctuates.
Product & Accessories List

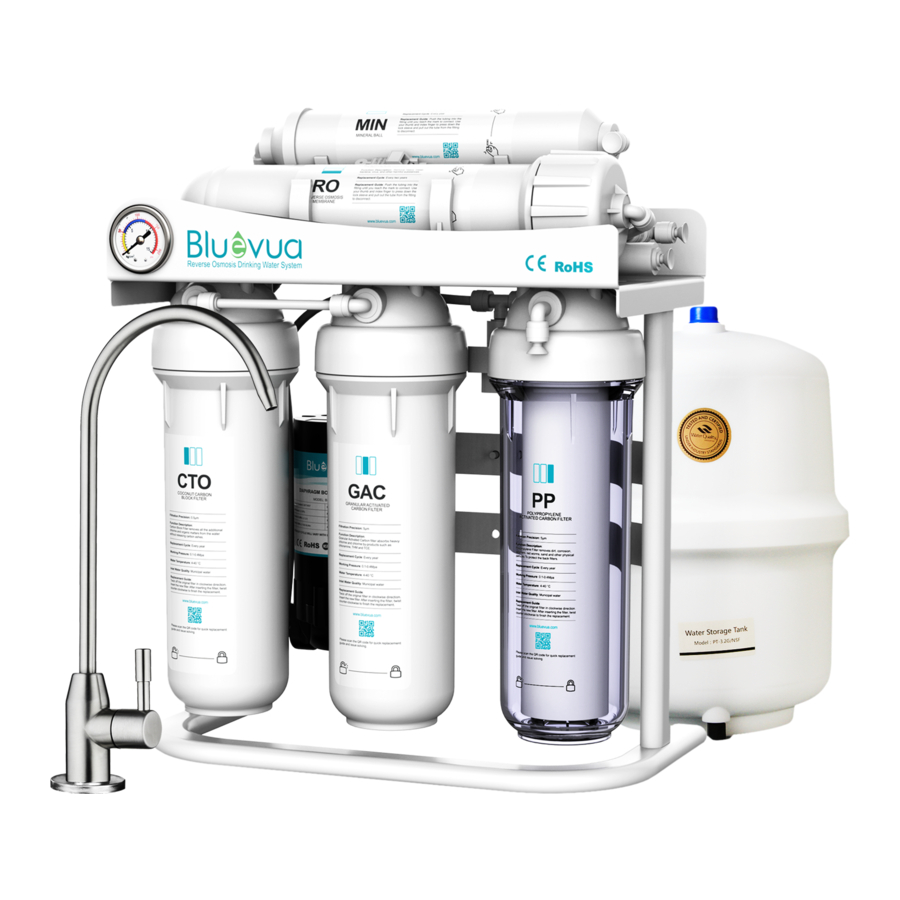
Product Overview
The accessories are installed and connected as shown below. For a more efficient installation, please check and be familiar with the corresponding location, and remember to remove the trumpet-shaped cap from the port before the installation.


| LEGEND | ||
| Step1: | A to B | RO Feed Water Adapter to Water Leakage Protector (IN) |
| C to D | Water Leakage Protector (OUT) to Input Water Port | |
| Step2: | E to F | Waste Water Port to Drain Pipe |
| Step3: | G to H | Pure Water Port to RO Faucet |
| Step4: | I to J | RO Water Storage Tank to Post Carbon Filter Connector |
| Step5: | K to L | Power Outlet to Power Adaptor |
INSTALLATION
Install The Feed Water Tubing

- Close the cold water supply valve. Turn on the kitchen faucet to release the water pressure. Please make sure the kitchen faucet has remained open without any water coming out, then proceed to the next step.
- Unscrew the cold water pipe from the cold water supply valve.
- Unscrew the nut on the side with a pull buckle on the RO feed water adapter.
- Insert one end of the white 1/4" PE tube into the same side, then screw the nut (through the PE tube) back to tighten the connection. Please make sure the tube is fully inserted and locked.
- Screw the cold water pipe onto the RO feed water adapter with the original washer in between. Then tighten the pipe firmly with an adjustable wrench.
- Screw your RO feed water adapter onto the cold water supply valve with washer in between. Then tighten the adapter firmly with an adjustable wrench.
Note 1: For 4 and 5, if the cold water pipe is 3/8" instead of 1/2", please use the attached 3/8" converter.

- Measure the needed length of the white 1/4" PE tube to reach the water leakage protector. Then use the utility knife or scissors to cut the tube.
- Connect the cut PE tube to the IN port of the water leakage protector.

- Open the cover of water leakage protector.
![]()
- Insert a cotton and close the cover.
![]()
- Tear off the double-sided tape attached with the water leakage protector, then stick the water leakage protector near the machine.


Note 2: The cotton swells after soaking up water, blocking the tubing to prevent further leaking. Please clean any water stain near the machine before installing. If the protector is accidently triggered by water stain, please replace with a new cotton.

- Insert the other section of white 1/4" PE tube into the OUT port of the water leakage protector.

- Connect the white 1/4" PE tube to the feed water port on the machine.


Note 3: DO NOT turn on the cold water supply valve and the RO feed water adapter before starting up the system.
Install The Pure Water Tubing

- Place upper-cap and mounting-washer on the faucet rod.
- Insert the RO faucet into the hole on the countertop. If there is no existing hole, please refer to the later Note.
- Under the sink, place the bottom-cap and the nut on the faucet rod. Tighten them up until the faucet stands firmly on the counter.
- Place the Quick-Connect Fitting to the bottom of faucet rod. Pull it few times to make sure it is connected firmly.
- Push the blue 1/4" PE tube into the other end of the Quick-Connect Fitting.
- Measure the needed length of blue 1/4" PE tube to reach the machine. Then use the utility knife or scissors to cut the tube.
- Connect the blue 1/4" PE tube to the pure water port on the machine.


Note: If there is no existing hole on the countertop, please refer to the following procedures to drill a hole. When drilling the hole, please remember to wear safety goggles to protect your eyes.
- Choose matching drill bits for the material of the counter: use diamond core for granite, and use a carbide drill bit for stainless steel. Avoiding using a hammer drill on natural stone, glass or ceramic.
- Stick the bottom of the faucet rod on the sink or countertop. Start drilling at the lowest speed, and hold the drill straight with firm pressure to prevent the bit from slipping.
- Drill a suitable hole according to the size (1 3/8") of the faucet rod.
- Once the drill bit breaks through the surface, slightly swirl the drill to apply pressure in a circle evenly.
Install The Waste Water Tubing

- Choose a preferred location on the drainpipe to install the drain saddle. We highly suggest to install the drain saddle on the vertical-directed drainpipe.
- Drill a 1/4" hole on the side of the drainpipe. Be careful not to penetrate the other side of the drainpipe.
- Place the front plate on the end of the remaining black 1/4" PE tube, and insert the tube into the drilled hole for about 1" deep.

- Place the back plate on the other side of the drainpipe to combine to the front plate. Use the adjustable wrench to tighten the plates with screws and nuts evenly.
- Connect the black 1/4" PE tube to the waste water port on the machine.


Install The RO Water Storage Tank
- Take off the blue top cap of the RO water storage tank, then screw the storage tank valve onto the tank. Keep the valve sealed by turning the blue handle 90 degree in clockwise direction.
- Insert the white 1/4" PE tube into the storage tank valve, then connect the other end of the tube to the post carbon filter connector on the machine.


Plug In The Power and Start Up System
- Make sure the storage tank valve has been turned off so the flushing water does not flow into the storage tank.
- Use the filter adjustable wrench to twist off the RO filter housing in counterclock direction. Insert the reverse osmosis membrane into the filter housing. After inserting the filter, twist the filter housing back in counter-clockwise direction.
- Turn on the cold water supply valve and the RO feed water adapter.
- Plug in the power adapter and turn on the RO faucet to flush the filters. Let the faucet runs for 15 minutes to release water, which could be black due to carbon particles being flushed out. Please wait for 5 more minutes until the water turns clean, then turn off the RO faucet. Be aware that the water is NOT drinkable during the flushing.
- Turn on the storage tank valve to fill the RO water storage tank, which will take 60 minutes to be filled up. Make sure the RO faucet is turned off during the process.
- After filling the RO water storage tank, turn on the RO faucet to let the water in the storage tank flow out. The flushing is finished when the storage tank is drained.
Note: We highly recommend you to operate 5 and 6 for twice before using any water. During the flushing process, please double check and make sure all tubing is installed correctly and there is no leakage at any joint, fitting, valve, or PE tube connection. - Turn off the RO faucet and let the storage tank to be filled up for daily drinking.
Congratulations! You have finished the Installation!
MAINTENANCE
Filter Replacement Cycle
| Pre-filters | PP Polypropylene Sediment Filter | 12 Months. |
| GAC Granular Activated Carbon Filter | 12 Months | |
| CTO Coconut Carbon Block Filter | 12 Months | |
| RO Filter | RO Reverse Osmosis Membrane Filter | 24 Months |
| Post-filters | PCF Post Carbon Fiber Filter | 12 Months |
| MIN Mineral Ball | 12 Months |
Note:
- Actual lifetime of the filters varies from different regions, water quality, season and usage. Please replace the filters according to the water pressure meter.
- If the filters expire, please purchase and replace the filters as soon as possible. Otherwise, the filtration efficiency will be greatly reduced.
Water Pressure Gauge

 | 0~3.5 kg/cm3 | When one or more of the front three pre-fiers (PP, GAC and CTO) are blocked, or the feed water pressure is too low, the pressure gauge points at yellow section. Please purchase and replace the blocked filters. |
| 0~50 psi | ||
 | 3.5~8.5 kg/cm3 | When the machine works at standard status, the water pressure gauge points at blue section. |
| 0~120 psi | ||
 | 8.5~15 kg/cm3 | When the RO membrane is blocked, the water pressure gauge points at red section. Please purchase and replace the blocked membrane. |
| 120~200 psi |
Pre-filters Replacement Steps
- Before replacing the filter, please turn off the feed water adapter and the storage tank valve, then tum on the RO faucet to drain out water in the machine.
- Twist the filter housing clockwise to detach it from the machine. The filter housing wrench should come in handy: simply hoop the filter housing with the filter housing wrench for easier twisting.
![]()
- Remove the old filter cartridge inside and replace it with the new one. Make sure the filter cartridge aligns with the top of housing.
- Locate the white spiked-ring and place it on top of the cartridge; this prevents the cartridge from shaking during operation. Meanwhile, make sure the black rubber ring outside the housing is tightened, or the water may leak when passing through.
- Use the filter housing wrench to install the housing back by hooping and twisting it in a counter-clockwise direction. Check and make sure the filter housing is firmly screwed to finish filter replacement.
![]()


RO Filter Replacement Steps
- Before replacing the filter, please turn off the feed water adapter and the storage tank valve, then turn on the RO faucet to drain out water in the machine.
- Locate and detach the tubes from both sides of the RO filter housing by pressing the circle unlocking ring and pulling the tube simultaneously (Figure 20).

- Detach the RO filter from the frame, then twist off the filter housing cap in a clockwise direction. The small housing wrench can be used to hoop the filter housing cap for easier turning.
![]()
- Remove the old RO membrane and replace it with the new one. The O-ring of the new RO membrane should be placed on the end of the RO filter housing as shown.
![]()
- After replacing, twist the filter housing cap back in a counter-clockwise direction. Check and make sure the filter housing cap is firmly screwed to prevent leaking.
![]()
- Put the filter back on the frame. Remember that the printed arrow on the sticker of the RO filter housing should aligns with the flow direction (Figure 19).
![]()
- Insert both sides of the tubes back to finish the RO filter replacement. Check and make sure the tubes are fully inserted and locked before restart the system.


Post-filters Replacement Steps
- Before replacing the filter, please turn off the feed water adapter and the storage tank valve, then turn on the RO faucet to drain out water in the machine.
- Locate and detach the tubes from both sides of the post filter by pressing the unlocking ring and pulling the tube simultaneously (Figure 20).
- Remove and replace the old filter. Remember that the printed arrow on the filter sticker should aligns with the flow direction (Figure 19).
- After replacing, insert the detached tubes back to finish post-filter replacement. Make sure the tubes are fully inserted and locked before restart the system.
Tube Detachment
To detach the PE tube from the machine, use the adjustable wrench to press the circle unlocking ring of the quick-connect fitting then pull out the tube (Figure 20).
FAQ
Why the system does not function | |
| |
| Why there is no water dispensing from the RO faucet or the water output becomes weaker? | |
| |
Why the pure water looks dirty | |
| |
Why the pure water smells abnormal | |
| |
Why the filters are clogged shortly after filter replacement | |
| |
Why the machine makes loud noise during operation | |
|
WARRANTY
Please visit website https://www.bluevua.com/warranty for 1 year manufacturer warranty registration. Please also feel free to reach out to us if you have any questions or concerns about your RO drinking water system. Your health iis our priority! We sincerely hope our product will bring health to you and your family!
 1-888-637-0009 (24/7 Customer Service)
 support@bluevua.com
 https://www.facebook.com/Bluevua
 https://www.bluevua.com
 https://twitter.com/Bluevua
 https://www.instagram.com/bluevua/

Documents / Resources
References
![www.bluevua.com]() home - Bluevua Reverse Osmosis Water System
home - Bluevua Reverse Osmosis Water System![www.bluevua.com]() warranty - Bluevua Reverse Osmosis Water System
warranty - Bluevua Reverse Osmosis Water SystemFacebook
![www.bluevua.com]() home - Bluevua Reverse Osmosis Water System
home - Bluevua Reverse Osmosis Water System![twitter.com]() https://twitter.com/Bluevua
https://twitter.com/Bluevua![www.instagram.com]() Instagram
Instagram
Download manual
Here you can download full pdf version of manual, it may contain additional safety instructions, warranty information, FCC rules, etc.
Download Bluevua RO100DS - Under Sink Water Filter System Manual
Advertisement


Need help?
Do you have a question about the RO100DS and is the answer not in the manual?
Questions and answers