Cambridge Audio DacMagic 200M - MQA HiFi DAC and Headphone Amplifier with Bluetooth Manual
- Manual (12 pages) ,
- Quick start (4 pages) ,
- Manual (28 pages)
Advertisement
- 1 Introduction
- 2 What's included with the DacMagic 200M?
- 3 Front panel controls
- 4 Rear panel connections
- 5 Getting connected
- 6 Master Quality Authenticated (MQA)
- 7 Filters
- 8 Advanced settings
- 9 Auto Power Down (APD)
- 10 TV mode
- 11 Frequently asked questions
- 12 Technical specifications
- 13 Documents / Resources
Introduction
This guide is designed to make installing and using this product as easy as possible. Information in this document has been carefully checked for accuracy at the time of printing; however, Cambridge Audio's policy is one of continuous improvement, therefore design and specifications are subject to change without prior notice.
This document contains proprietary information protected by copyright. All rights are reserved. No part of this manual may be reproduced by any mechanical, electronic or other means, in any form, without prior written permission of the manufacturer. All trademarks and registered trademarks are the property of their respective owners.
The Bluetooth® word mark and logos are registered trademarks owned by the Bluetooth SIG, Inc. and any use of such marks by Audio Partnership Plc is under license. Other trademarks and trade names are those of their respective owners.
MQA and the Sound Wave Device are registered trademarks of MQA Limited © 2016.
What's included with the DacMagic 200M?
Inside the box of your DacMagic 200M you will receive:

- DacMagic 200M Digital to Analogue Converter
- 12V Power Supply
- Bluetooth antenna
- Quick Start Guide
- Safety Instructions
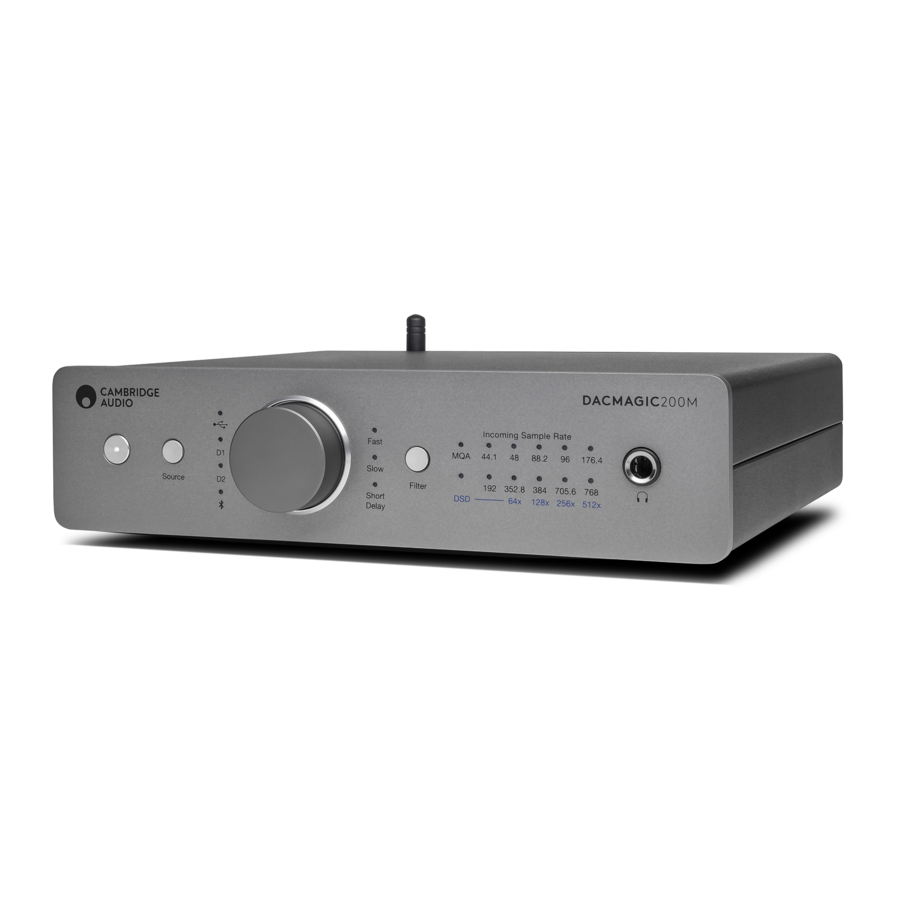
Front panel controls

- Standby/On – Switches the unit between on and low power standby.
- Source – Select incoming audio source. Toggle between USB, Digital Inputs 1, and 2, and Bluetooth. The selected input will be indicated by the corresponding LED.
- Digital volume control – Adjust the volume when Digital Preamp (variable) mode is enabled. Pressing this knob will result in a mute toggle.
- Filter – Press to select between three different filter modes: Fast, Slow, and Short Delay. This selected filter mode will be indicated by the corresponding LED.
- Incoming sample rate – When the DacMagic 200M is receiving an incoming digital stream, the relevant LED will light up to indicate the incoming digital sampling frequency. For MQA the LED will light up green for MQA, or blue for MQA Studio. If the LED is magenta, then the unit is rendering an MQA stream or file, completing the processing, and allowing playback at the highest possible audio quality. DSD will light up when native DSD or DoP streams are detected.
Note: The sample rate LEDs reflects the incoming sample rate, and not that of the original source. - Headphone connection – Allows the connection of headphones for a direct listening experience.
Rear panel connections

- Unbalanced audio outputs – Outputs for use with unbalanced RCA cables.
- Balanced audio outputs – Outputs for use with balanced XLR cables. Suitable for when a longer connection is needed between the DacMagic 200M, and an amplifier.
- Digital inputs 1 and 2 – The DacMagic 200M offers two digital inputs allowing a wide range of sources to be connected via the use of S/P DIF co-axial, or TOSLINK optical.
- USB audio in – For connecting to PC/Mac computers for USB Class 2.0 Audio playback. Please note that for Windows devices the Cambridge Audio USB Audio driver must be installed.
- Ground/Lift switch – When connected to a PC via USB, and with the switch set to 'ground', the DacMagic 200M will ground itself via the USB connection. Setting the switch to 'lift' will ground the device via an internal network to reduce hum in case of ground loops.
- Bluetooth antenna – Used for the wireless streaming of Bluetooth audio from most phones, tablets, and laptops.
- DC 12V 2.0A power adaptor socket
Note: Only use the power supply included with the DacMagic 200M.
Getting connected
Initial setup
- Connect your chosen digital audio source(s) to the input(s) on the DacMagic 200M via:
TOSLINK optical - which offers high quality transfer over shorter distances
OR
S/P DIF coaxial - which can be used for longer connections
OR
USB audio to connect to a PC, or Mac. - Connect the audio outputs to the line-input of your amplifier using the unbalanced RCA connections for shorter distances, or the balanced XLR connections for longer distances.
- Using the appropriate plug for your region, connect the supplied power adaptor to the DacMagic 200M.
- Power on the unit and select the input source that you wish to listen to using the source button located on the front panel.
Note: For Bluetooth connections, please follow the instructions from the Bluetooth section of the manual.
If there is no power to the unit, please see the following steps
- Check that the supplied 12V PSU is securely connected to the power adaptor socket on the rear of the DacMagic 200M.
- Confirm that the PSU is securely connected to the mains socket, and that the socket is switched on.
If a hum or buzzing sound can be heard after setup, please see the following steps
- Check that all connections between Source(s) > DacMagic 200M > Amplifier are secure.
- Move the unit away from any nearby lighting, or mains cables that could cause interference.
- If connected to a PC or Mac via USB, switch 'Ground Lift' switch to 'lift'.
Audio output connections
Balanced connection to a CXA81

Unbalanced connection to a CXA81

Note: Do not turn the unit on until all necessary connections have been made.
The DacMagic 200M offers both balanced (XLR), and unbalanced (RCA) audio output connections.
In the case of longer connections between the DacMagic 200M and your amplifier we would recommend the use of a balanced connection via XLR as this can help to reject noise, and interference in the cable.
It is possible to use both balanced, and unbalanced connections at the same time, for example: when connecting to multiple amplifiers, or a multiroom setup.
Digital audio input connections
Connection to a CXC using S/P DIF coaxial

Connection to a Smart TV using TOSLINK optical


Only connect one co-axial OR optical cable to each digital input. The unit will not operate properly if both connections are made (even if only one is active).
This unit only accepts two-channel LPCM/Stereo PCM digital audio, and cannot be used with Dolby Digital 5.1, or DTS signal. If connecting a DVD/BD player, a smart TV or similar device please ensure that the output is set to two-channel PCM.
If there is no sound output once the input, and output connections have been made, please follow the steps below:
- Check that the interconnects between the DacMagic 200M, and the amplifier are securely connected.
- Confirm that the correct incoming source is selected via the corresponding LEDs on the front panel of the DacMagic 200M.
USB audio connection

The DacMagic 200M only supports USB audio playback using USB Class 2.0 Audio. For this it is required that the DacMagic 200M is connected to a USB 2.0 port using a suitable USB cable, and we would recommend any USB certified high-speed USB 2.0 'A–B' cable.
Use with Windows PCs
For use with Windows PCs, you will need to install the Cambridge Audio USB Driver to be able to play audio via USB Audio Class 2.0. More information regarding the download, and installation of the driver can be found here:
https://techsupport.cambridgeaudio.com/hc/en-us/articles/207434895-Windows-Audio-USB-Class-2-Driver-
Use with Mac
DacMagic 200M is compatible with Macs without the need for extra drivers.
Use with Linux
Due to the many configuration options and target hardware, we cannot say that Linux is officially supported by the DacMagic 200M.
However, most recent Linux distros are supporting USB Audio Class 2.0 natively, so the DacMagic 200M should work without any specific action required.
Ground/Lift switch
The DacMagic 200M includes a 'ground/lift' switch on the rear panel. When connected via USB, and with the switch set to 'ground', the DacMagic 200M will ground itself via the USB connection. Setting the switch to 'lift' will ground the device via an internal network to reduce any potential hum in case of ground loops.
The switch should be left in the "ground" position unless a hum or noise is heard from the system.
In some instances, the use of audio grade USB cables can cause compatibility issues, and the introduction of glitches. This is because the cable may not fully adhere to USB standards. If you are experiencing noise, hum, or glitches whilst connected via USB it may be necessary for you to set the switch to 'lift', which will disconnect the ground from the computer connection.
Use with the Apple camera adapter
The DacMagic 200M is not designed for use with mobile devices via wired connection such as an iPhone using the Apple Camera Adapter, or an Android phone using a USB OTG adapter. Therefore, it is not possible for us to guarantee compatibility for a setup of this nature.
In most cases when attempting to use the DacMagic 200M with a mobile device, and an Apple Camera Adapter, the user will receive the following alert: 'Cannot Use Accessory'.
Bluetooth
Selecting Bluetooth with the source button located on the front panel allows the DacMagic 200M to receive wireless Bluetooth audio from most smartphones, tablets, and laptops.

Pairing
The following procedure will allow you to pair a new Bluetooth enabled device with the DacMagic 200M.
- Make sure that any previously paired Bluetooth devices are turned off (the DacMagic 200M will auto-connect to the last paired device).
- Turn on the DacMagic 200M and select Bluetooth as the source (denoted by the Bluetooth symbol).
- Activate Bluetooth on the desired source device.
- Scan for available devices on the source device and select 'DacMagic 200M'.
Unpairing
To unpair a device you can select 'unpair' in the source unit's device list. Alternatively, you can perform a factory reset on the DacMagic 200M which will delete all previously paired devices.
Note: Your device can only be paired and connected to the DacMagic 200M whilst the Bluetooth source is selected.
Paired LED status
Once your device is paired, the Bluetooth Source LED will change to denote the type of codec that is being received.
SBC Codec is represented by a solid light.
aptX Codec is represented with a 2-second solid light followed by a very short light off interval.
Headphone
The DacMagic 200M integrates a dedicated headphone amplifier stage for a personal listening experience.
The volume can be adjusted with the front knob, and the volume level will be saved separately from the main output volume (if digital preamp mode is enabled).
Whilst headphones are connected the line out is disabled.
Master Quality Authenticated (MQA)
")
Master Quality Authenticated is an audio codec using a sophisticated compression algorithm, and a form of file authentication intended for highquality audio streaming and file download. This allows the listener to receive digital audio at the original studio quality.
Using a unique 'origami' folding technique, the information is packaged efficiently to retain all the detail from the studio recording. Hardware or software with MQA decoding capability can 'unfold' the MQA file and reveal the original master resolution.
The file is also 'authenticated' to guarantee that it is the definitive master recording from the studio, artist or record label.
MQA tracks are delivered to the listener with all the required data for full studio quality hidden, or 'folded' within the file itself. This means with each unfold, more data is revealed for higher quality playback.
There are essentially four versions of MQA playback. And depending on how your system is configured, each will perform different unfolds to reveal more of the dormant information hidden within the file.
No unfold
This is the raw folded MQA file that can be played back through any device as no decoding is required. This is typically better than CD quality at 44.1 or 48 kHz.
MQA core decode
This is the point at which the first unfold takes place. The MQA Core Decoder authenticates, decodes full dynamic range, and matches to the current playback settings. This can be performed either within software (TIDAL, Audirvana, Roon) or hardware that contains a MQA Core Decoder, and at this point the file is upscaled to 88.2 or 96 kHz.
MQA core decode with hardware rendering
In this method of playback, a combination of software and hardware is used to further unfold the file. As with MQA Core Decoding, the software decodes the MQA 24 bit / 44.1kHz file and unpacks it to 24 bit / 88.2 kHz. This file is then output to the hardware renderer where it is expanded up to 24 bit / 352.8 kHz.
Full decode and MQA renderer
Full Decoding and MQA Rendering is only possible using hardware with MQA certification and is the optimum playback method of MQA files. This will require all stages of the unfold or processing to take place within the hardware, which is fed the untouched MQA file before performing the various decodes and rendering. This is typically the highest possible quality and files can be upscaled to a maximum resolution of 768 kHz.
The DacMagic 200M includes MQA technology and can perform full MQA decoding from all inputs except Bluetooth, enabling you to playback MQA audio files and streams delivering the same quality as the original master recording.
Filters
The DacMagic 200M has three different digital filter functions: Fast, Slow and Short Delay. All three filters are highly sophisticated audiophile topologies, optimised specifically for audio playback. In our opinion, these filters offer excellent sound quality but differ subtly in optimisation, hence we've made all three available to you.
Note: For clarity, all diagrams show the theoretical response of the digital filter itself, excluding any analogue filtering at the DAC output or the antialiasing filter applied during recording and/or mastering of the digital source.
Fast filter

The Fast (Linear Phase) filter is a highly regarded audio filter offering low ripple in both the pass and stop bands, and what is known as constant group delay. Constant group delay means that audio signals of all frequencies are always delayed by the same amount when passing through the filter. All audio is therefore fully time-coherent at the output.
The trade-off with this type of filter is that its impulse response will exhibit some pre-ringing. In other words, when excited with a theoretical impulse, the output has both a small amount of pre- and post-spike amplitude ringing (albeit well damped).

Slow filter

Our Slow filter has a linear phase and is a compromise between some very high frequency roll off and the minimized level of pre/post impulse ringing. Stop band attenuation is less than other filter types, but there's no phase shift and the impulse response is the cleanest.

Short delay filter

The Short Delay (minimum phase) filter is another highly regarded audio filter that offers even lower ripple in the pass and stop bands. Unlike the Linear Phase filter, group delay is not constant; however, phase shift is low and the particular benefit with this filter is that the impulse response exhibits no pre-ringing.

We encourage you to experiment with the filters to determine which sound best to your ears and using your source equipment/programme material. The DacMagic 200M remembers and recalls the selected filter type at power up.
Note: when reproducing MQA contents, the filters selection is disabled.
Advanced settings
Note: Prior to performing any of the following procedures, please ensure that the DacMagic 200M is in standby, which is indicated by only the standby LED being lit.
To perform a factory reset

- Briefly press both the Source and Filter buttons simultaneously.
- All LEDs will light in sequence, one by one.
Upon performing a factory reset all user-stored settings (input, volume and output mode) will be erased, and replaced by the unit's default settings after a factory reset.
Toggle between fixed, and variable output modes
The DacMagic 200M can be switched between a fixed output mode which disables the front panel volume control, and variable mode which enables the front panel volume control, allowing volume adjustment on the unit.

- Briefly press the volume knob, and filter button simultaneously.
- Two LEDs will light up to indicate the output mode.
RCA/XLR output set to fixed mode with volume knob disabled: MQA/DSD light up for 5s.
RCA/XLR output set to variable mode (default) with volume knob enabled: 176.4/768 LEDs light up for 5s.
Note: Headphone output is always variable.
Auto Power Down (APD)
The DacMagic 200M arrives with APD enabled, and this will automatically switch the unit to standby after 20 minutes of inactivity.
To disable, or re-enable this function then please see the below instructions.
Note: The DacMagic 200M must be in standby which is indicated by only the standby LED being lit prior to completing the following procedure.
")
APD Off
- Press and hold down the Volume knob for 5 seconds.
- Wait for the Input LEDs to blink 2 times.
APD On (default)
- Press and hold down the Volume knob for 10 seconds.
- Wait for the Input LEDs to blink 5 times.
TV mode
On later units, a switchable TV mode was introduced that improves the performance of the DacMagic 200M whilst using a TV as a source. This configures the DacMagic 200M with a higher bandwidth to reduce glitches and interruptions when connected to a TV.

TV mode is only effective on the D2 input and can be enabled and disabled by following the instructions below.
- With the DacMagic 200M in standby mode, long press the source button.
- Two LEDs will light up to indicate the TV mode status.
TV mode on enabled: 44.1/192 LEDs light up

TV mode disabled: 96/705.6 LEDs light up

Frequently asked questions
Will the DacMagic 200M playback 32-bit files?
Whilst the DacMagic 200M hardware is capable of handling 32-bit audio, the USB interface is reporting the host to be only 24-bit capable.
If you attempt to play 32-bit files the USB driver will convert them to 24-bit by removing the least significant info.
How can I connect the DacMagic 200M to CXN/851N to allow the playback of MQA files?
If you own a network player such as the CXN/851N, then you may be aware that they do not contain the correct hardware to properly decode MQA files for accurate playback. However, it is possible to perform 'MQA passthrough' with these units, using them alongside the DacMagic 200M which then can 'unfold' the files completely.
You can connect the digital output of your device to one of the digital inputs on the DacMagic 200M either via TOSLINK, or S/P DIF. Please note that CXN and 851N don't support USB audio host functionality, so USB connection cannot be used in conjunction with DM200M.
MQA files will then be passed onto the Dacmagic 200M where full unfolding, and processing can take place, completely bypassing the internal DAC of the connected unit.
The MQA indicator LED on the front panel of the DacMagic 200M will indicate when, and how an MQA file is being processed.
Green:
Signifies the output as an MQA File. This indicates that a full decode is being performed by the 200M.
Blue:
Signifies MQA Studio. Approved in the studio by the artist/producer or verified by the copyright holder as accurate to the original recording. This indicates that a full decode is being performed by the 200M.
Magenta:
The MQA stream is pre-decoded and the unit is operating as a renderer; this means that the unit is outputting a stream that has been decoded by the TIDAL app. Although this is perfectly fine, a better solution is to enable the 200M to execute a full decode.
To do this, turn on MQA passthrough in your TIDAL settings to allow the DacMagic 200M to complete the unfolding process rather than the source device (e.g.: the computer).
How do I install the latest USB audio driver for the DacMagic 200M?
To install the latest USB Audio driver for your DacMagic 200M, please follow the following steps:
- Download the correct driver for your Windows operating system fromhttps://techsupport.cambridgeaudio.com/hc/en-us/articles/207434895-Windows-Audio-USB-Class-2-Driver
- Unzip the downloaded folder, and double click on the application file to run the installer.
- Run the installer and follow the on-screen instructions.
- Allow the installation to progress, click next, and then finish to complete the installation.
- Confirm the installation by opening the CA Control Panel with the DacMagic 200M connected and checking the driver version.


Technical specifications
DIGITAL TO ANALOGUE CONVERTERS
Dual ESS ES9028Q2M DACs
DIGITAL FILTER
Selectable, Fast – Slow – Short delay
FREQUENCY RESPONSE
10Hz to 50KHz (±1dB)
THD+N @ 1KHZ 0DBFS
<0.0005% (A-Weighted)
SIGNAL TO NOISE RATIO
>115dB (A-Weighted)
CROSSTALK @ 10KHZ
< -110dB
OUTPUT IMPEDANCE
<50 Ohms (unbal), <100 Ohm (bal)
MAX. OUTPUT LEVEL (UNBALANCED)
2.1V rms (fixed or variable – user selectable)
MAX. OUTPUT LEVEL (BALANCED)
4.2V rms (fixed or variable – user selectable)
DIGITAL INPUT WORD WIDTHS SUPPORTED
16bit (Bluetooth)
16-24bit (Optical, Coaxial)
16-24bit (USB)
DIGITAL INPUT SAMPLING FREQUENCIES SUPPORTED
44.1kHz to 96kHz PCM, DoP64 (Optical)
44.1kHz to 192kHz PCM, DoP64 (Coaxial)
44.1kHz to 768kHz PCM, Native DSD 64x to 512x, DoP 64x to 256x (USB)
MQA COMPATIBILITY
Full decoding (Core + Renderer)
BLUETOOTH
v4.2, A2DP profile, SBC and AptX codecs
HEADPHONE OUTPUT THD+N
< 0.001% at 1kHz 0dBFS @ 100mW into 32 Ohm
S/N
> 115dB (A-Weighted)
MAX OUTPUT POWER
>300mW @ 32 Ohm, >65mW @ 150 Ohm
FREQUENCY RESPONSE
10Hz - 50KHz (±1dB)
RECOMMEND HEADPHONE IMPEDANCE
10 Ohm to 600 Ohm
MAX POWER CONSUMPTION
12W
COLOUR
Lunar Grey
DIMENSIONS (HXWXD)
52 x 215 x 191mm; (2.0 x 8.6 x 7.6")
WEIGHT
1.2Kg/2.6lbs
© Copyright Cambridge Audio Ltd
For upcoming news on future products, software updates and exclusive offers, make sure you register your product at http://www.cambridgeaudio.com/register
Documents / ResourcesDownload manual
Here you can download full pdf version of manual, it may contain additional safety instructions, warranty information, FCC rules, etc.
Download Cambridge Audio DacMagic 200M - MQA HiFi DAC and Headphone Amplifier with Bluetooth Manual
Advertisement


Need help?
Do you have a question about the DacMagic 200M and is the answer not in the manual?
Questions and answers