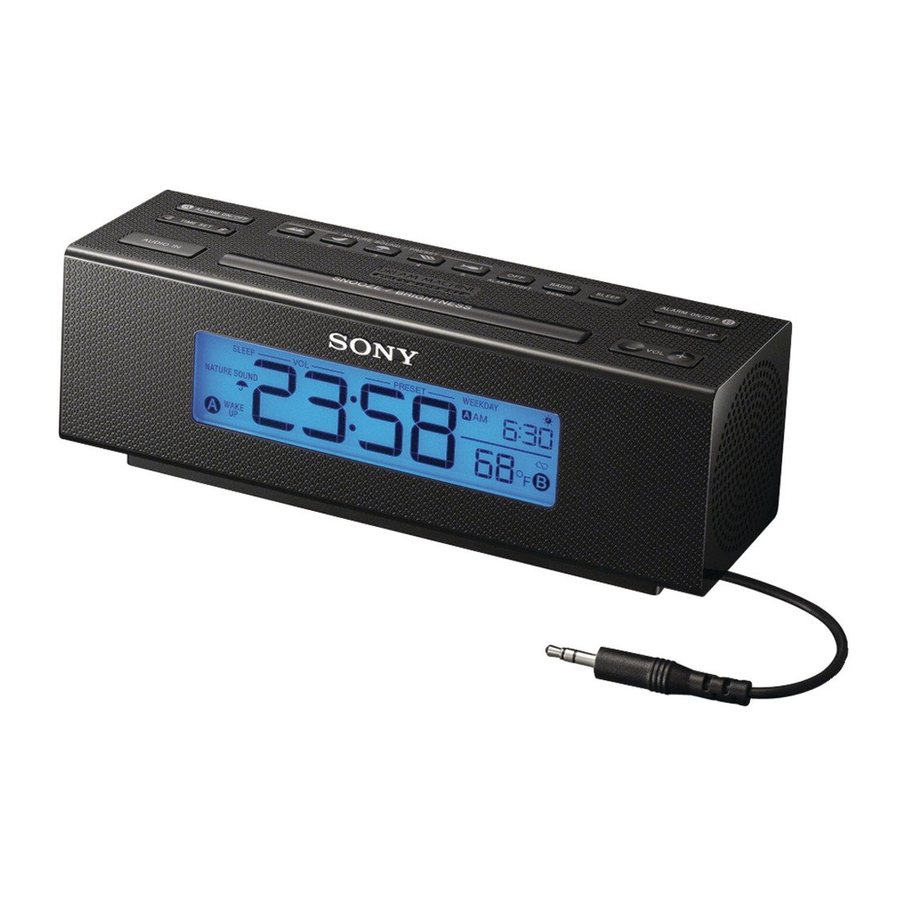
Sony DREAM MACHINE ICF-C707 - FM/AM Clock Radio Manual
- Operating instructions (2 pages) ,
- Specifications (2 pages) ,
- Operating instructions (2 pages)
Advertisement
- 1 Important Safety Instructions
- 2 Features
- 3 Connecting the antenna
- 4 About the backup battery
- 5 Setting the clock for the first time
- 6 Setting the clock
- 7 Setting the brightness of the display
- 8 Playing the radio
- 9 Improving the reception
- 10 Selecting a Nature Sound
- 11 Setting the alarm
- 12 Setting the sleep timer
- 13 Using the temperature function
- 14 Connecting external equipment
- 15 Troubleshooting
- 16 Precautions
- 17 Specifications
- 18 Documents / Resources
Important Safety Instructions
- Read these instructions.
- Keep these instructions.
- Heed all warnings.
- Follow all instructions.
- Do not use this apparatus near water.
- Clean only with dry cloth.
- Do not block any ventilation openings. Install in accordance with the manufacturer's instructions.
- Do not install near any heat sources such as radiators, heat registers, stoves, or other apparatus (including amplifiers) that produce heat.
- Do not defeat the safety purpose of the polarized or grounding-type plug. A polarized plug has two blades with one wider than the other. A grounding type plug has two blades and a third grounding prong. The wide blade or the third prong are provided for your safety. If the provided plug does not fit into your outlet, consult an electrician for replacement of the obsolete outlet.
- Protect the power cord from being walked on or pinched particularly at plugs, convenience receptacles, and the point where they exit from the apparatus.
- Only use attachments/accessories specified by the manufacturer.
- Use only with the cart, stand, tripod, bracket, or table specified by the manufacturer, or sold with the apparatus. When a cart is used, use caution when moving the cart/apparatus combination to avoid injury from tip-over.
![]()
- Unplug this apparatus during lightning storms or when unused for long periods of time.
- Refer all servicing to qualified service personnel. Servicing is required when the apparatus has been damaged in any way, such as power-supply cord or plug is damaged, liquid has been spilled or objects have fallen into the apparatus, the apparatus has been exposed to rain or moisture, does not operate normally, or has been dropped.


To reduce the risk of fire or electric shock, do not expose this apparatus to rain or moisture.
To reduce the risk of fire, do not cover the ventilation of the apparatus with newspapers, tablecloths, curtains, etc. And do not place lighted candles on the apparatus.
To reduce the risk of fire or electric shock, do not expose this apparatus to dripping or splashing, and do not place objects filled with liquids, such as vases, on the apparatus.
Do not install the appliance in a confined space, such as a bookcase or built-in cabinet. Do not expose the batteries (battery pack or batteries installed) to excessive heat such as sunshine, fire or the like for a long time. As the main plug is used to disconnect the unit from the mains, connect the unit to an easily accessible AC outlet. Should you notice an abnormality in the unit, disconnect the main plug from the AC outlet immediately.
The unit is not disconnected from the AC power source (mains) as long as it is connected to the wall outlet, even if the unit itself has been turned off.
You are cautioned that any changes or modifications not expressly approved in this manual could void your authority to operate this equipment.
The nameplate and important information concerning safety are located on the bottom exterior.

Danger of explosion if battery is incorrectly replaced. Replace only with the same type.
NOTE
This equipment has been tested and found to comply with the limits for a Class B digital device, pursuant to Part 15 of the FCC Rules. These limits are designed to provide reasonable protection against harmful interference in a residential installation. This equipment generates, uses and can radiate radio frequency energy and, if not installed and used in accordance with the instructions, may cause harmful interference to radio communications. However, there is no guarantee that interference will not occur in a particular installation. If this equipment does cause harmful interference to radio or television reception, which can be determined by turning the equipment off and on, the user is encouraged to try to correct the interference by one or more of the following measures:
- Reorient or relocate the receiving antenna.
- Increase the separation between the equipment and receiver.
- Connect the equipment into an outlet on a circuit different from that to which the receiver is connected.
- Consult the dealer or an experienced radio/TV technician for help.

- Replace the battery for the clock backup with a Sony CR2032 lithium battery. Use of another battery may present a risk of fire or explosion.
- Battery may explode if mistreated. Do not recharge, disassemble or dispose of in fire.
- Dispose of the used battery promptly. Keep away from children.
Features

- Dual alarm FM/AM synthesized clock radio
- Nature Sound (Sea Waves, Birds, Rain, Brook, Under the Sea)
- Temperature display (Centigrade/Fahrenheit)
–15°C – 50°C (5°F – 122°F) - Built-in audio cable for Digital Music Player
- 10 Station Presets (5 FM/5 AM)
- Various types of alarms - radio, buzzer and Nature Sounds (5)
- Automatic time set: when you plug the clock in for the first time, the current time will be shown in the display
- Automatic Daylight Savings Time Set/ Summer time adjustment
- 100 year calendar and DATE/TIME ZONE button to display year, month and date
- Brightness Control (High/Low/Off)
- No Power No Problem alarm system to keep the clock and the alarm operating during a power interruption with a CR2032 battery installed
- Extendable Snooze system - Snooze time can be set from 10 to 60 minutes
- Progressive Alarm Speed (buzzer only)
Connecting the antenna
To connect the AM loop antenna
The shape and the length of the antenna is designed to receive AM signals. Do not dismantle or roll up the antenna.
- Remove only the loop part from the plastic stand.
- Set up the AM loop antenna.

- Connect the cords to the AM antenna terminals.
Cord (A) or cord (B) can be connected either way round.
Insert the cord while pushing down the terminal clamp.

- Make sure the AM loop antenna is connected firmly by pulling softly.


Adjusting the AM loop antenna
Find a place and an orientation that provides good reception.
- Do not place the AM loop antenna near the unit or other AV equipment, as noise may result.
Tip
Adjust the direction of the AM loop antenna for best AM broadcast sound.
About the backup battery
To maintain accurate time, this unit includes an internal CR2032 battery as a backup power source in the event of a power interruption.
Note for customers in Canada
The clock is preset at the factory, and its memory is powered by the preinstalled Sony CR2032 battery. If the "AM 12:00" appears on the display when the unit is connected to AC outlet for the first time, the battery may be weak. In this case, consult a Sony dealer. The preinstalled CR2032 battery is considered part of the product, and is covered by the warranty. You are required to show "Note for customers in Canada" (in this instruction) to a Sony dealer in order to validate the warranty for this product.
Knowing when to replace the battery
When the battery becomes weak, "  " will appear in the display.
If a power interruption occurs while the battery is weak, the current time and alarm will be initialized.
Replace the battery with a Sony CR2032 lithium battery. Use of another battery may cause a fire or explosion.
Installing and replacing the backup battery
- Keep the AC plug connected to the AC outlet, remove the screw that secures the battery compartment at the bottom of the unit using a screwdriver, and pull the battery compartment marked PULL OPEN.
![]()
- Insert a new battery in the battery holder with the
![]() side facing up.
side facing up.
To remove the battery from the battery compartment, push it out from the side marked PUSH.
![]()
- Insert the battery compartment back into the unit and secure it with the screw.
![]()
- When you are replacing the battery, press any of the following buttons:
RADIO BAND, AUDIO IN, or NATURE SOUND / PRESET to turn "![]() " off in the display.
" off in the display.

 side facing up.

Note
When you replace the battery, do not disconnect the AC plug from AC outlet. Otherwise, the 100 year calendar, current time, alarm and station presets will be initialized.
Setting the clock for the first time
This unit is preset to current EST (Eastern Standard Time) at the factory, and is powered by a backup battery. All you need to do the first time is just plug it in and select your time zone.
- Plug in the unit."year" (about 4 seconds)
![]() "month and date" (about 4 seconds)
"month and date" (about 4 seconds) ![]() "the current EST (Eastern Standard Time)" appears in the display in turn.
"the current EST (Eastern Standard Time)" appears in the display in turn. - Press and hold DATE/TIME ZONE for at least 2 seconds.
Area number "2" flashes in the display. - Press TIME SET + or – repeatedly to select the time zone as follows:
 "month and date" (about 4 seconds)
 | Area number | Time zone |
| 1 | Atlantic standard Time |
| 2 | Eastern standard Time (default setting) |
| 3 | Central standard Time |
| 4 | Mountain standard Time |
| 5 | Pacific standard Time |
| 6 | Yukon standard Time |
| 7 | Hawaiian standard Time |
- Press DATE/TIME ZONE to set.
Notes
- Though the clock is correctly set at the factory, discrepancies may arise during transport or storage. If necessary, set the clock to the correct time by referring to "Setting the clock."
- While setting the time zone, you must perform each step within 65 seconds, or the time zone setting mode will be cancelled.
When daylight saving time (summer time) begins
This model automatically adjusts for daylight saving time (summer time).
"  " is displayed from the beginning of daylight saving time (summer time), and disappears at the end of daylight saving time (summer time) automatically.
- Daylight saving time (summer time) begins at: 2:00 AM on the second Sunday of March.
- Standard time begins at: 2:00 AM on the first Sunday of November.
To cancel Automatic DST/Summer Time adjustment during the daylight saving time (summer time) period
Automatic DST/Summer Time adjustment can be canceled.
Press and hold DISPLAY/CLOCK and SNOOZE / BRIGHTNESS at the same time for at least 2 seconds while the clock is displayed. " " and "OFF" appear in the display to show that Automatic DST/Summer Time adjustment has been canceled. The display returns to the clock.
Notes
- Time change of Automatic DST/Summer Time adjustment (see above) is subject to variations in circumstances and laws of each country/region. Cancel Automatic DST/ Summer Time adjustment and set the DST display manually as necessary. Customers living in a country/region that does not use daylight saving time (summer time) must cancel Automatic DST/Summer Time adjustment before using the unit.
- To activate Automatic DST/Summer Time adjustment again, press and hold DISPLAY/CLOCK and SNOOZE / BRIGHTNESS at the same time for at least 2 seconds.
"![]() " and "On" appear in the display to show that Automatic DST/Summer Time adjustment has been activated. The display returns to the clock.
" and "On" appear in the display to show that Automatic DST/Summer Time adjustment has been activated. The display returns to the clock.
Setting the clock
- Plug in the unit.
- Press and hold DISPLAY/CLOCK for at least 2 seconds.
The year starts to flash in the display. - Press TIME SET + or – repeatedly to set the year.
- Press DISPLAY/CLOCK.
- Repeat steps 3 and 4 to set the month, day, hour and minute, and then press DISPLAY/CLOCK.
The seconds start incrementing from zero.
Notes
- While setting the clock, you must perform each step within 65 seconds, or the clock setting mode will be cancelled.
- When pressing any of the rear buttons, hold the unit firmly to prevent slippage.
To display the year and date
Press DATE/TIME ZONE once for the year, and press again for the date.
After a while, the display will change back to the current time automatically.
Setting the brightness of the display
Three levels of brightness are available by pressing SNOOZE / BRIGHTNESS.

Note
When the alarm is sounding, the brightness function cannot be used.
Playing the radio
Manual tuning
- Press RADIO BAND to turn on the radio and select the AM or FM band.
- Press TUNING + or – to tune in to a desired frequency.
- Adjust the volume using VOL + or –.
Tuning in to a station
The unit automatically scans AM or FM stations.
- Press RADIO
![]() BAND to turn on the radio to select the AM or FM band.
BAND to turn on the radio to select the AM or FM band. - Press and hold TUNING + or –.
+: scans upward through the frequency bands.
–: scans downwards through the frequency bands.
Scanning starts from the currently-tuned frequency. When a station is received, scanning stops. - Adjust the volume using VOL + or –.
Preset tuning
You can preset 5 stations for FM and 5 stations for AM.
Presetting a station
- Follow steps 1 and 2 in "Manual tuning" to tune the frequency you wish to preset.
- Hold down the desired NATURE SOUND / PRESET 1 to 5 button until you hear two beeps.
Example: The following display appears when you preset FM 105.7 MHz to preset number 3 for FM.
The display shows the frequency for a few seconds and then changes back to the current time.
To change the preset station, tune into the desired station and hold down the NATURE SOUND / PRESET 1 to 5 button until you hear two beeps.

To preset another station, repeat these steps.
Note
If you try to store another station with the same preset number, the previously stored station will be replaced.
Tuning in to a preset station
- Press RADIO
![]() BAND to turn on the radio and select the AM or FM band.
BAND to turn on the radio and select the AM or FM band. - Press NATURE SOUND / PRESET 1 to 5 where the desired station is stored.
- Adjust the volume using VOL + or –.
Improving the reception
FM: Extend the FM wire antenna fully to increase reception sensitivity.
AM: Connect the supplied AM loop antenna to the unit. Rotate the antenna horizontally for optimum reception.
Note on radio reception
Keep digital music players or mobile phones away from the AM loop antenna or the FM antenna, as this may lead to reception interference.
Selecting a Nature Sound
This unit includes 5 types of Nature Sounds: (Sea Waves, Birds, Rain, Brook and Under the Sea.)
You can choose any one of these by pressing the corresponding button.
| Icons | Sound type |
 | Sea Waves |
 | Birds |
 | Rain |
 | Brook |
 | Under the Sea |
Note
When other functions are in use, Nature Sound is not available.
Setting the alarm
The dual alarm function allows you to set two alarm programs (ALARM ON/OFF A and ALARM ON/OFF B).
The alarm time can be set for each program and the alarm sound is selectable from "NATURE SOUND," "RADIO," or "BUZZER."
Notes
- Before setting the alarm, make sure to set the clock. (See "Setting the clock")
- The factory setting alarm time is "PM 12:00."
- To set the radio alarm, first preset your favourite station. (See "Presetting a station")
- While setting the alarm, you must perform each step within 65 seconds, or the alarm setting mode will be cancelled.
To set the alarm
- Press and hold ALARM ON/OFF A or B for a few seconds.
- Press TIME SET + or – to set the desired hour, and press ALARM ON/ OFF A or B.
- Press TIME SET + or – to set the desired minute, and press ALARM ON/ OFF A or B.

- Press TIME SET + or – to set the desired alarm period ("WEEKDAY," "WEEKEND" or everyday*), and press ALARM ON/OFF A or B.
* In the case of everyday, both "WEEKDAY" and "WEEKEND" are displayed. - Press TIME SET + or – to set the desired alarm mode ("NATURE SOUND," "RADIO," or "BUZZER"), and press ALARM ON/OFF A or B.
You can choose one of 3 settings: "NATURE SOUND," "RADIO," or "BUZZER." Set the alarm mode as follows:

- NATURE SOUND: see "Setting the nature sound alarm."
- RADIO: see "Setting the radio alarm."
- BUZZER: see "Setting the buzzer alarm."
Setting the Nature Sound alarm
- Perform steps 1 to 5 in "To set the alarm."
- Press TIME SET + or – to select "NATURE SOUND" alarm mode, and press ALARM ON/OFF A or B. "NATURE SOUND" appears in the display.
- Press TIME SET + or – to select the NATURE SOUND / PRESET 1 to 5, and press ALARM ON/OFF A or B.
- Press TIME SET + or – to adjust the volume, and press ALARM ON/OFF A or B. The setting is entered.
- Press ALARM ON/OFF A or B. "
![]() " or "
" or " ![]() " appears in the display after about 4 seconds. Nature sound will sound at the set time.
" appears in the display after about 4 seconds. Nature sound will sound at the set time.
Setting the radio alarm
- Perform steps 1 to 5 in "To set the alarm."
- Press TIME SET + or – to select "RADIO" alarm mode, and press ALARM ON/OFF A or B. "RADIO" appears in the display.
- Press TIME SET + or – to select the AM band, FM band or the last station, and press ALARM ON/OFF A or B.
If you select the last station, jump to step 5. - Press TIME SET + or – to select the station, and press ALARM ON/OFF A or B.
- Press TIME SET + or – to adjust the volume, and press ALARM ON/OFF A or B.
The setting is entered. - Press ALARM ON/OFF A or B. "
![]() " or "
" or " ![]() " appears in the display after about 4 seconds.
" appears in the display after about 4 seconds.
The radio will turn on at the set time.
Setting the Buzzer alarm
- Perform steps 1 to 5 in "To set the alarm."
- Press TIME SET + or – to select "BUZZER" alarm mode, and press ALARM ON/OFF A or B. The setting is entered.
- Press ALARM ON/OFF A or B. "
![]() " or "
" or " ![]() " appears in the display after about 4 seconds.
" appears in the display after about 4 seconds.
The buzzer will sound at the set time.
When the alarm setting is completed, the alarm time setting is displayed.
When both ALARM "  " and ALARM "
  " are turned on, you can switch the ALARM A and ALARM B display by pressing DISPLAY/ CLOCK.
Notes
- When you use the radio alarm, the timed alarm sounds with the last broadcasting station tuned to before the power went off. When you set the radio alarm, select the desired broadcasting station before turning the power off.
- The ALARM "
![]() " (or "
" (or " ![]() ") indicator flashes in the display when the alarm sounds.
") indicator flashes in the display when the alarm sounds. - If a second alarm sounds during a first (or the SNOOZE function is active), the second alarm takes priority.
- The alarm function works as usual at the beginning and end day of daylight saving time (summer time). While Automatic DST/ Summer Time adjustment is set, as a result, if the alarm is set at a time skipped when the daylight saving time (summer time) begins, the alarm is skipped, or if the alarm is set at a time overlapped when the daylight saving time (summer time) ends, the alarm sounds twice.
- If the same alarm time is set for both alarms (ALARM A and B), ALARM A takes priority.
To confirm an alarm time setting
Turn off the ALARM ON/OFF " " or " " indicator in the display, and press the ALARM ON/OFF A or B button again.
You can confirm the alarm time by pressing TIME SET + or – after the alarm time is set.
To change an alarm setting
There are two ways to set the alarm:
- To change all alarm settings
Set the alarm again. - To change an alarm time only
When setting the alarm (ALARM "![]() " or ALARM "
" or ALARM " ![]() " appears), this function is available.
" appears), this function is available.
Press and hold TIME SET + for at least 2 seconds to move the alarm time forwards.
Press and hold TIME SET – for at least 2 seconds to move the alarm time back. When you release the button, the changed time will be displayed for about 2 seconds. To change the alarm time, press TIME SET + or – within these 2 seconds, otherwise the setting change will be fixed as displayed.
To doze for a few more minutes
Press SNOOZE / BRIGHTNESS.
The sound turns off but will automatically come on again after about 10 minutes.
You can change the snooze time by pressing SNOOZE / BRIGHTNESS repeatedly within 4 seconds.
The maximum the snooze time is 60 minutes.
To stop the alarm
Press OFF ALARM RESET to turn off the alarm.
The alarm will sound again at the same time depending on the next day setting.
To deactivate the alarm
Press ALARM ON/OFF A or B to turn off the ALARM " " or " " indicator in the display.
Note on the alarm in the event of a power interruption
In the event of a power interruption, the alarm will work until the internal battery is worn out.
However, certain functions may be affected as follows:
- The backlight will not light up.
- If the alarm mode is set to Nature Sound or radio, it will change to BUZZER automatically.
- If a power interruption occurs while the alarm is sounding, the alarm will stop.
- If OFF ALARM RESET is not pressed, the alarm will sound for about 5 minutes.
- If "
![]() " appears in the display, the alarm will not sound in the event of power interruption.
" appears in the display, the alarm will not sound in the event of power interruption.
Replace the battery if "![]() " appears.
" appears. - The snooze function will not work.
- During a power interruption, the alarm will sound at the set time only once.
 " appears in the display, the alarm will not sound in the event of power interruption.
Setting the sleep timer
You can fall asleep to the "NATURE SOUND," "RADIO," or "AUDIO IN" using the built-in sleep timer that turns off the "NATURE SOUND," "RADIO," or "AUDIO IN" automatically after a preset duration.
- Press SLEEP while the unit is turned on.
"SLEEP" appears and the sleep time flashes in the display. - Press SLEEP to set the sleep timer duration.
Each time you press SLEEP, the duration (in minutes) changes as follows:

The display returns to clock mode for about 4 seconds after you have finished the duration setting and released SLEEP, and then the sleep timer starts.
The unit will play for the duration you set, and then shut off.

Note
Even if the Sleep Timer is set, it cannot turn off the power of optional components connected to the AUDIO IN jack of this player.
To turn off the unit before the preset time
Press OFF ALARM RESET.
To change the sleep timer setting
You can press SLEEP repeatedly to select the desired sleep timer setting even after the sleep timer has been activated.
To deactivate the sleep timer
Press SLEEP repeatedly to set the sleep timer to "OFF" in step 2.
Using the temperature function
This unit includes an external temperature sensor, allowing you to monitor ambient temperature.
The temperature is displayed in Centigrade or Fahrenheit.
To switch between Centigrade and, Fahrenheit press and hold the SNOOZE / BRIGHTNESS and DATE/TIME ZONE buttons for more than 2 seconds.
Notes
- In the example, the display shows Centigrade; however, Fahrenheit can also be displayed.
- Do not use in water.
- Do not forcefully pull on the external temperature sensor. Improper use of the external temperature sensor may cause a malfunction.
- The display temperature and actual temperature may differ depending on the usage environment.
- Do not place the temperature sensor near the floor, a heat source such as a radiator or airduct, or in a place subject to direct sunlight.
The temperature sensor reading may differ from actual surrounding temperature. - The operating temperature range is –15°C (5°F) to 50°C (122°F).
In the case of lower than –15°C (5°F) or higher than 50°C (122°F), the "Lo" or "Hi" indicator appears. - When plugging in the unit or recovering from a power interruption, the temperature display of this unit will flash "--".
The temperature will be displayed after 20 seconds.
Connecting external equipment
To listen to sound
- Connect the built-in audio cable with the stereo-miniplug on the bottom of the unit to the line output jack or headphones jack on the optional component (e.g., portable music player).
- Press AUDIO IN.
"AUDIO IN" appears in the display. - Play the optional component connected to the unit's built-in audio cable.
- Adjust the volume using VOL + or – and the connected component's volume.
To return to the radio
Press RADIO BAND.
The frequency is shown in the display.
To stop listening
Press OFF ALARM RESET, and stop playback on the connected unit.
To turn off the sound from the optional component
Press OFF ALARM RESET, and then turn off the optional component.
Notes
- Refer also to the connected equipment's manual.
- Connect the audio cable firmly to prevent a malfunction.
- Keep digital music players away from the speaker.
- If you increase the volume too much, loud sound may occurs when switching to the radio.
- Confirm the volume when you remove the connected component from this unit to listen by headphones. Otherwise, high volume may affect your hearing.
- AUDIO IN cannot be set for the alarm sound.
- When you listen to the radio with external equipment connected, turn off the connected equipment to prevent noise. If noise occurs, even when the equipment is turned off, disconnect and place the external equipment away from the unit.
Troubleshooting
Should any problem persist after you have made the following checks, consult your nearest Sony dealer.
The clock flashes "AM 12:00" due to a power interruption.
- The battery is low. Replace the battery.
Remove the old battery and install a new one.
The alarm settings do not sound at the preset alarm time.
- Check that alarm "
![]() " or alarm "
" or alarm " ![]() " is properly set/displayed.
" is properly set/displayed.
The alarm settings are activated but there is no sound at the preset alarm time.
- Check the alarm volume setting.
When daylight saving time begins, the clock does not employ the daylight saving time automatically.
- Make sure the clock is set correctly.
- Press and hold DISPLAY/CLOCK and SNOOZE / BRIGHTNESS simultaneously for at least 2 seconds to activate the Automatic DST function.
Precautions
- Play the unit on the power source specified in "Specifications."
- To disconnect the power cord (mains lead), pull it out by the plug, not the cord.
- Since a strong magnet is used for the speaker, keep personal credit cards using magnetic coding or spring-wound watches away from the unit to prevent possible damage from the magnet.
- Do not leave the unit in a location near a heat source such as a radiator or airduct, or in a place subject to direct sunlight, excessive dust, mechanical vibration, or shock.
- Allow adequate air circulation to prevent internal heat build-up. Do not place the unit on a thick pile surface (rug, a blanket, etc.), or near materials that might block the ventilation holes (such as a curtain, etc. ).
- Should any solid object or liquid fall into the unit, unplug the unit and have it checked by qualified personnel before operating it any further.
- To clean the casing, use a soft cloth dampened with a mild detergent solution.
- Never touch the wire of the external FM antenna during a thunderstorm.
Furthermore, immediately disconnect the main plug from the wall outlet.
NOTES ON THE LITHIUM BATTERY
- Wipe the battery with a dry cloth to assure a good contact.
- Be sure to observe the correct polarity when installing the battery.
- Do not hold the battery with metallic tweezers, otherwise a short-circuit may occur.
If you have any questions or problems concerning your unit, please consult your nearest Sony dealer.
Specifications
Time display
12-hour system
Radio section
| Frequency range | ||
| Band | Frequency | Channel step |
| FM | 87.5 MHz – 108 MHz | 0.1 MHz |
| AM | 530 kHz – 1,710 kHz | 10 kHz |
General
Speaker
Approx. 3.6 cm (1 7/16 inches) dia. 8 Ω
Input
Built-in audio cable with stereo-mini plug (ø 3.5 mm)
Power output
0.7 W (at 10% harmonic distortion)
Power requirements
120 V AC, 60 Hz
For clock back up: 3V DC, one CR2032 battery
Nature Sound
Sea Waves, Birds, Rain, Brook, Under the Sea
Temperature range
–15°C – 50°C (5°F – 122°F)
Temperature resolution
1°C (1°F)
Dimensions
Approx. 190 mm × 67 mm × 62 mm (w/h/d)
(7 1/2 inches × 2 3/4 inches × 2 1/2 inches) not including projecting parts and controls
Mass
Approx. 620 g (1 lb 5.87 oz) including power supply unit and CR2032 battery
Supplied accessories
AM loop antenna (1)
Design and specifications are subject to change without notice.
Dream Machine is a trademark of Sony Corporation.
No Power No Problem is a trademark of Sony Corporation.
©2010 Sony Corporation

Documents / Resources
References
Download manual
Here you can download full pdf version of manual, it may contain additional safety instructions, warranty information, FCC rules, etc.
Download Sony DREAM MACHINE ICF-C707 - FM/AM Clock Radio Manual
Advertisement


Need help?
Do you have a question about the DREAM MACHINE ICF-C707 and is the answer not in the manual?
Questions and answers