Advertisement
Foreword
Thank you for purchasing this Godox Product!
This LED video light is excellent for macrophotography, product shooting, photojournalistic and video recording, etc. This lightweight and portable light provides high brightness and accurate color temperature. It comes with a diffusion filter and a yellow filter, and also supports multiple power supply modes. You can flexibly control the light brightness by using the dimmer and change the illumination direction by using the angle adjusting knobs.

 Always keep this product dry. Do not use in rain or in damp conditions.
Do not disassemble. Should repairs become necessary, this product must be sent to an authorized maintenance center.
Keep out of reach of children.
As this product do not have waterproof function, please take measures of waterproof in rainy or damp environment.
Do not use or store the product if the ambient temperature reads over 50°C.
Do not use the flash unit in the presence of flammable gases, chemicals and other similar materials. In certain circumstance, these materials may be sensitive to the strong light emitting from this flash unit and fire or electromagnetic interference may result.
Observe precautions when handling batteries
- Do not put batteries into a fire or apply direct heat to them.
- Batteries are prone to leakage when fully discharged. To avoid damage to the product, be sure to remove batteries when the product is not used for a long time or when batteries run out of charge.
- Should liquid from the batteries come into contact with skin or clothing, rinse immediately with fresh water.
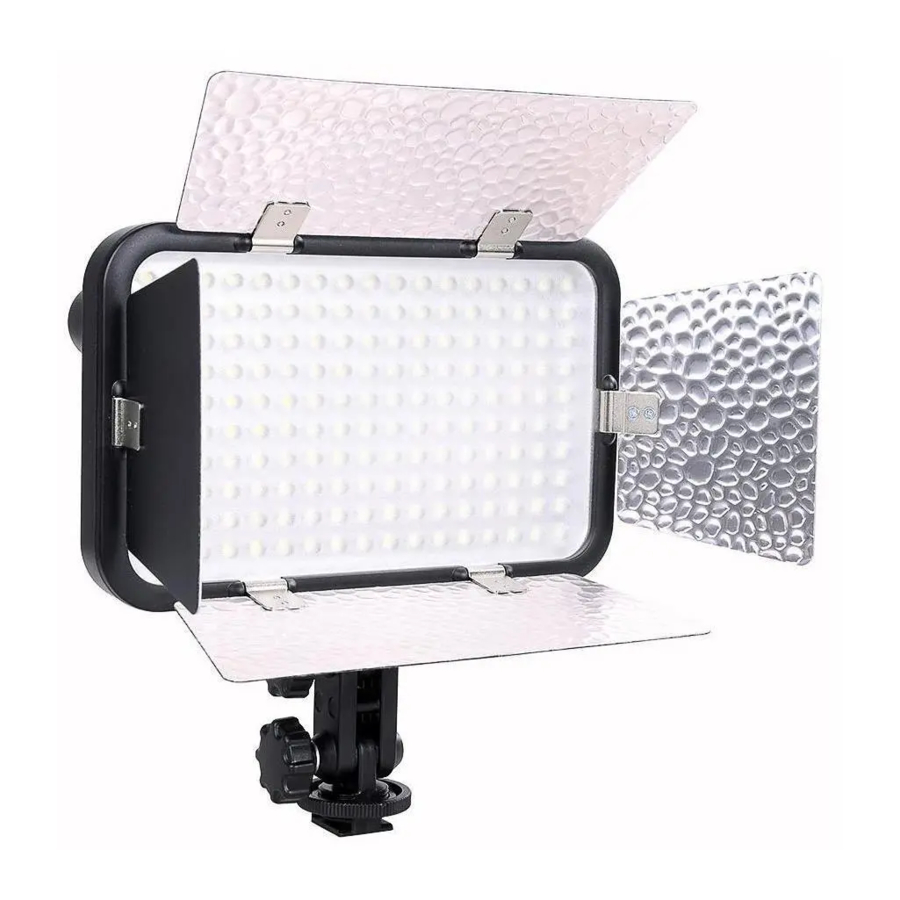
Parts

- LED Beads
- Color Filters
- Power Switch
- Brightness Controller
- Battery Level Indicator
- DC Power Jack
- Battery Compartment Lock
- Battery Compartment
- Lithium Battery Container
- Angle Adjusting Knob A
- Angle Adjusting Knob B
- Locking Ring
- Camera Hotshoe Connection
- 1/4' Bracket Mounting Hole
- Reflector
Installation and Operation
Power Supply
Three power supply modes are available:
- Using batteries: This light uses AA-sized alkaline or Ni-MH rechargeable batteries.
![]()
- Using lithium battery: This light uses SONY NP-F970 model lithium battery.
![]()
- Using DC power jack: This light can be powered by DC power supply. Use an adapter (purchased separately) to connect the light with the AC power supply. LED126 uses a 6V-9V adapter and LED170 uses a 6-12V adapter.
![]()


- When using AA batteries or lithium battery, the Battery Level Indicator (05) turns green, meaning battery power is sufficient. When the indicator turns red, the battery power is low.
- When the indicator turns red and blinks, the lithium battery power is low. Please recharge it immediately before use in order to avoid forceful auto off.
- When using DC power supply, the indicator shows green.
Installing the Video Light
- Screw the Locking Ring (12) to the highest point and insert the Camera Hotshoe Connection (13) horizontally into the hotshoe of a camera or a camcorder.
- Tighten the Locking Ring (12).
![]()

Note: If your camcorder has no hotshoe connection, you are advised to purchase a connecting bracket for camcorder. The video light has a 1/4'Bracket Mounting Hole as your camcorder does. Therefore, you can easily connect both the light and the camcorder to the purchase a connecting bracket for camcorder. The video light has a 1/4' Bracket
Using the Video Light
- Turn the Battery Compartment Lock (07) down and at the same time push the Battery Compartment (08) to the left and open it.
![]()
- Install AA batteries according to indications in the compartment and then lock it.
![]()
- Switch the power on, the video light giving out light.
![]()
- Turn the Brightness Controller (04) to adjust the brightness.
![]()
- By operating the Angle Adjusting Knob A and B, you can change the LED illumination direction.
![]()
- Instead of AA batteries, the light can be powered by DC power supply. Use an adapter (purchased separately) to connect the light with the AC power supply. LED126 uses a 6V-9V adapter and LED170 uses a 6- 12V adapter.
![]()
- After using the light, please power it off.


Using Lithium Battery
- Turn the Power Switch (03) off.
- Target the socket of the lithium battery towards the "+""-" contacts of the Lithium Battery Container (09). Push the battery in until it locks.
![]()
- Power the light on.
- After using the light, please power it off.

Replacing A Color Filter
- Slightly press the color filter (02) and push it to the right at the same time.
![]()
- Pull the color filter out after hearing a click sound.
- Insert a new color filter in and push it to the left. With a click sound, the color filter is securely in position.

Technical Data
| Model | LED170 II |
| LED Beads Quantity | 170 |
| Battery | 8*AA |
| DC Power Supply | 6-12V |
| Power (Max.) | <10W |
| Brightness | >2700Lux (0.5m) |
| Lithium Battery | Sony NP-F970 model camera or camcorder lithium-ion battery |
| Color Temperature | 5500-6500K |
| Brightness Control | Steplessly |
| Battery Life (with alkaline batteries) | Approx. 1 hour |
| Color Filters | Includes a diffusion filter and a yellow filter |
| Operation Temperature | -10~55°C |
| Dimension | 172*108.6*42.5mm |
| Net weight | 350g |
* Product design and specifications are subject to change without notice.
GODOX Photo Equipment Co., Ltd.
Add: Building A4, Xinhe Huafa Industrial Zone, Fuzhou RD West, Fuyong Town, Baoan District, Shenzhen 518103, China
Tel: +86-755-29609320(8062)
Fax: +86-755-25723423
E-mail: godox@godox.com

Documents / ResourcesDownload manual
Here you can download full pdf version of manual, it may contain additional safety instructions, warranty information, FCC rules, etc.
Advertisement


Need help?
Do you have a question about the LED170II and is the answer not in the manual?
Questions and answers