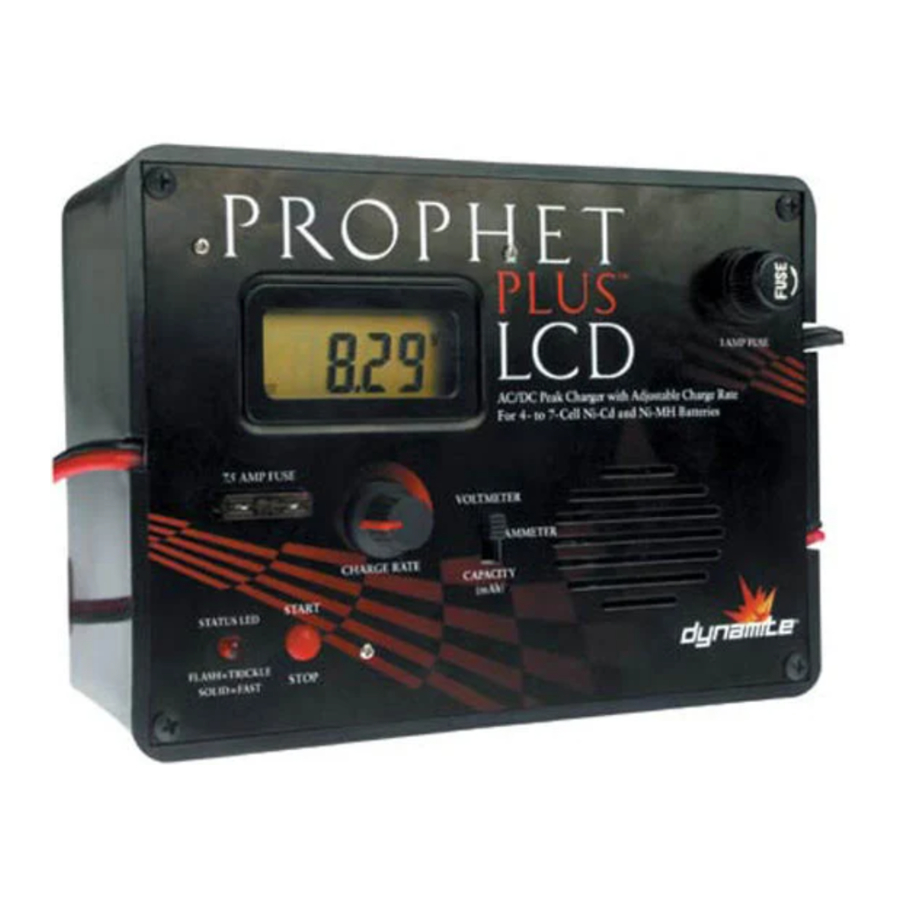
Dynamite PROPHET PLUS LCD - AC/DC-Powered Peak Prediction Charger Manual
- Instruction manual (6 pages) ,
- Instruction manual (4 pages) ,
- User manual (2 pages)
Advertisement
Introduction
This charger uses unique peak prediction circuitry that ensures an accurate charge every time and protects your Ni-Cd and Ni-MH batteries from the dangers of overcharging. This charger continuously monitors the battery's charge curve and calculates (predicts) when the peak will occur (100% charge) and then stops fast charging at exactly that point. This is essential in order to avoid damaging Ni-Cd and especially Ni-MH cells, which are very sensitive to heat caused by overcharging.
After your battery pack has peaked, the charger automatically switches to trickle charge. This feature will keep your batteries fully charged and in top performing condition until you are ready to use them again.
Features

- 110V AC power cord
- 12V DC power cord with alligator clips
- Adjustable charge rates from 100mA–5000mA (5 amps)
- LED and beeper indicate when charge is complete
- LCD display shows charge capacity, charge current and battery voltage
- Start/Stop fast charge button
- Input and output fuse protection
- Tamiya-style output connector
- Includes receiver battery adapter
Additional Features
- Limited 5-year warranty
- Auto trickle charge (150mA)
- Advanced peak prediction circuitry calculates when the peak will occur and stops fast charging at exactly that point
- Multi-function LCD shows capacity, charge current and voltage
- Charges virtually all 4- to 7-cell Ni-MH & Ni-Cd packs
- Adjustable charge rates from 0.1A–4A
- Input and output fuse protection
Operating Guidelines
Connecting the Input Power Source
This charger is powered by either connecting the AC power cord to a 110V AC outlet or using the provided alligator clips to connect the charger to a 12V DC power source, such as a 12V hobby battery (HAN102) or an automobile battery. Connect the red (positive) end of the alligator clips to the red terminal of the DC power source and the black (negative) end of the alligator clips to the black terminal of the DC power source. If you choose to power your charger with an automobile battery, never do so with the automobile running!
Fail-Safe
If the power source has been interrupted or drops below a usable voltage level, the Prophet Plus™ automatically goes into a Fail-Safe mode to let you know that the battery has not been fully charged. In this mode, the charge status LED flashes "RED" and the beeper sounds, indicating the loss of proper source power. To reset, disconnect the battery being charged and reconnect a fully charged power source of 12–14 volts DC or AC power.
Charging 6/7-Cell Ni-Cd or Ni-MH Sub-C Car Packs
- When power is supplied to the charger, the LCD will enter the self test mode, counting from "1111" to "9999" then the charger will beep indicating it is ready for operation.
- Connect the battery to the charge lead. The charger will beep and the LED will flash until you begin the fast charging process.
- Push the Start button to begin the charge process.
- Move the LCD selector switch to the "ammeter" position.
- Adjust the current rate to match the battery type.
Note: Charge sport packs and older batteries at lower rates (below 3 amps). Higher quality (matched) battery packs can be charged at higher rates to shorten charge times. (See figure 1)
![]()
Once you have begun to charge the battery pack, the beeper will sound once and the LCD will display "Fast." The charge status LED will go from flashing to solid red. - When the battery pack has peaked, the charger will repeatedly beep, the LED will flash red and the charger will automatically transition to trickle charge.
The LCD will display "Trickle." (See figure 2)
![]()


Charging 4/5-Cell Ni-Cd or Ni-MH Receiver Packs
- When power is supplied to the charger, the LCD will enter the self test mode, counting from "1111" to "9999" then the charger will beep indicating it is ready for operation.
- Connect the receiver battery adapter to the charger. For some batteries, you may need to use the included charge lead adapter. (See figure 3)
![]()
- Connect the receiver battery to the charge lead. The LED will flash until you begin the fast charging process.
- Push the Start button to begin the charge process. Move the LCD selector switch to the ammeter position. Select a charge rate below 2 amps, depending on what receiver pack you are going to charge. Charge 600mAh receiver packs at 1 amp or less, while higher capacity packs, such as 1000mAh, can be charged at 2 amps.
- Once you have begun to charge the battery pack, the charge status LED will go from flashing to solid red and the LCD will display "fast."
- When the battery is fully charged, the charger will beep repeatedly, the LED will flash and the LCD will display "trickle"and drop to a safe 150mAh trickle charge current rate.

Trickle Charge
Once your batteries are fully charged, the charger will automatically enter into trickle charge. This feature allows your batteries to stay fully charged until you are ready to use them again. Trickle charging also helps "equalize" the battery voltage of the individual cells within a pack. This raises the total battery pack voltage (power) and increases capacity (runtime). You will know that your charger has entered trickle charge when you hear the charger beep and the LED continuously flashes.
Voltmeter
The voltmeter function allows you to monitor the charge voltage of the battery to determine the battery's charge state. The higher the battery's average voltage, the more power it can deliver. This is also a good indicator of how well the battery cells are matched, which translates to longer runtimes. (See figure 4)

mAh
The mAh (milli-Amp/hour) setting displays the amount of capacity the battery pack has accepted during fast charge. This can help determine how long the battery will operate your vehicle and reveal any problems with the battery pack. A fully discharged battery pack should accept its rated capacity in mAh. Partially charged batteries and battery packs with damaged cells or cells that have developed memory will result in a lower mAh rating. (See figure 5)

Fuses
This charger is protected by a 7.5 Amp spade fuse and a 1 Amp glass fuse. If you need to replace a fuse, your local hobby retailer should be able to supply one. You can also find replacement fuses at automotive stores. Always replace your fuse with a new fuse of the same rating.
Safety Precautions
- Do not leave your battery and charger unattended during use.
- Always allow charger to cool between charges.
- Never connect the charger to an automobile 12V battery while the vehicle is running.
- Faceplate can become hot during charging. Keep the charger away from any material that may be affected by heat.
- Carefully observe connector polarities at all times.
- Do not let children charge battery packs without adult supervision.
- If either charger or battery becomes hot to the touch during the charge process, end the charge process immediately.

Documents / Resources
References
Download manual
Here you can download full pdf version of manual, it may contain additional safety instructions, warranty information, FCC rules, etc.
Download Dynamite PROPHET PLUS LCD - AC/DC-Powered Peak Prediction Charger Manual
Advertisement


Need help?
Do you have a question about the PROPHET PLUS LCD and is the answer not in the manual?
Questions and answers