Ambient NanoLockit - Timer Quick Start Guide
- Quick start up manual (20 pages) ,
- Manual (19 pages) ,
- Quick start manual (5 pages)
Advertisement
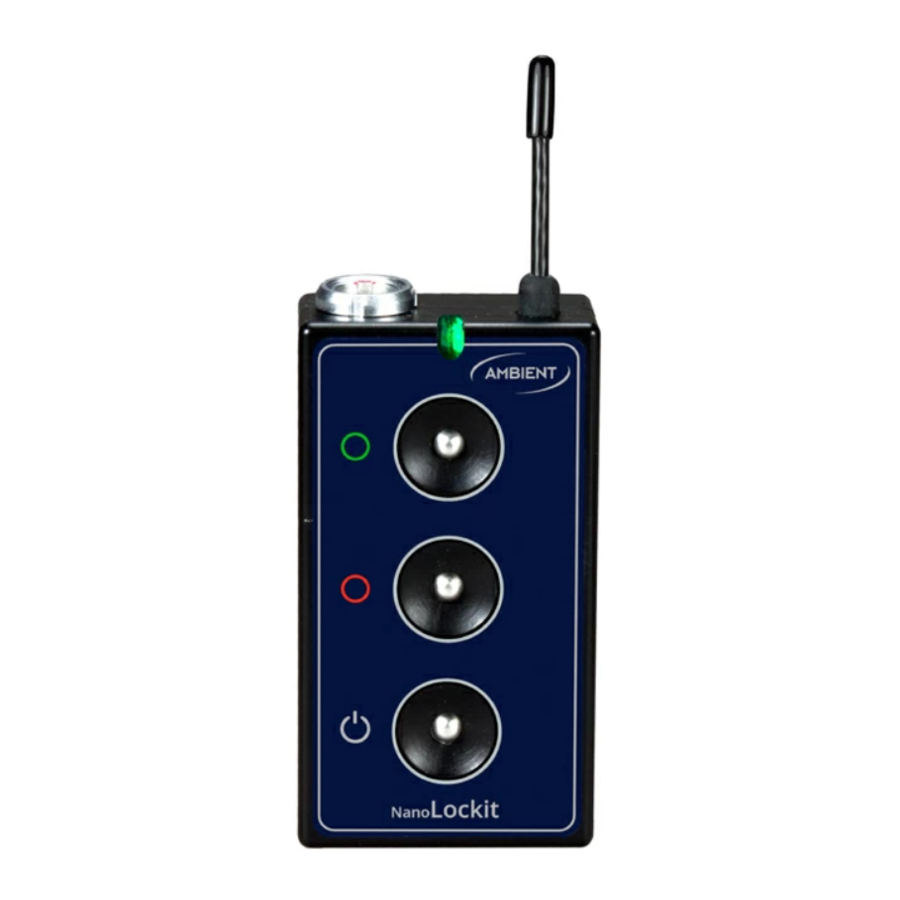
Overview

Lemo Connector:
TC (and metadata) interface
ACN Antenna:
for wireless sync with other Lockits
Micro USB:
charge and external power
| Charge time | Operation |
| 15 min | 5 hrs |
| 30 min | 10 hrs |
| 2 hrs | 35 hrs (full) |
LED status overview

| Status LED Codes | 1 sec | 2 sec | |
| ext. power, idle, charging |  | ||
| ext. power, idle, fully charged |  | ||
 | |||
| int. power, lo bat |  | ||
| Generator Mode: | |||
| idle, no TC out, RTC lost |  |  | |
| idle, no TC out, RTC OK | | | |
| generator set, TC out | | ||
| generator set, TC out, lo bat* |  | ||
| generator set, TC level reduced |  | | |
| TRX Mode: | |||
| idle, no TC on input or ACN |  | | |
| TX (LTC/MTC via cable) |  | | |
| RX (LTC/MTC over ACN) |  | | |
*ca. 30 min left
Example setup
The goal: syncing timecode (TC) and frame rate (FPS).

*NOTE: The specific cable required is dependent on the connected device. The most common cables are: TC-IO-35RA, TC-IO, LTC-Out, LTC-Out/Epic. Please check our website.
Turn on all NanoLockits
Press the Power Button on all NanoLockits for 3 seconds until the LED lights up green  . Then release and LEDs start to flash.

NOTE: To reset the unit to factory default, start by holding the Power Button for 10 seconds until LED lights up red  .
.

The NanoLockit starts up with muted output at last selected frame rate (default 25 fps).
To activate the LEMO Output and to jam other Lockits with the internal Real Time Clock (RTC), proceed with step Set and jam from internal RTC.
To adjust the RTC and frame rate, proceed with step Set the internal clock of the NanoLockit. To jam from an external device, proceed with step Set the internal clock of the NanoLockit.
Set the internal clock of the NanoLockit

To set the RTC and the frame rate, use the Lockit- Toolbox software (PC and Mac, available at nanolockit.com).
NOTE: On start a valid RTC will be indicated by LEDs flashing red/green  , a lost RTC by flashing red .

To jam your NanoLockit from an external device, connect it with the appropriate timecode cable. If successful, the LED will flash green  . Finish by disconnecting the cable.
Set and jam from internal RTC

Press the Green Button for 3 seconds until LED double blinks green:  .
.
This sets the TC and FPS, wirelessly syncs all other NanoLockits, and activates all LEMO outputs. If successful, all units will flash green ![]() in sync.
in sync.
Sync your devices
Option A

Device with timecode interface: connect NanoLockit to TC Input.
NOTE: Adjust the device menu settings to accept external timecode. Please check the manufacturer's manual.
Option B

DSLR & cameras without timecode interface: connect NanoLockit with audio input and set audio level. TC signal will be written on audio track.
Learn more about the NanoLockit and watch helpful tutorials at nanolockit.com and ambient.de/en/university.
Setting the TC audio level
Track levels must be set correctly:
- Manually set the camera audio input level to 50% of the range.
- Adjust the NanoLockit TC output level so the meter falls between –30 dB to –20 dB.


Hold Green Button and repeatedly press Red Button to reduce level.

Hold Red Button and repeatedly press Green Button to increase level.
Final setup

Congratulations! All your devices are now in perfect timecode sync.
To power down a NanoLockit, press and hold the Power Button for 5 seconds.
Switch off

To power down a NanoLockit, press and hold the Power Button for 5 seconds.
NOTE: Power down your NanoLockit manually after charging/supplying with external power to avoid battery drain when not in use.
SPECIAL TRX Mode
For sending a prerecorded timecode to slates or remotely start/stop recorders via external record run timecode.

To use your NanoLockits in this special mode start them by holding the Red Button while "confirming" with a single tap on the Power Button.
The units will switch to ACN channel 11 and blink in TRX idle mode  .
.
Timecode from an external source can now be sent from one device to other devices. This external source must be permanently connected to this NanoLockit via TC input or MIDI USB.

The NanoLockits will now automatically start and stop their generators along with the source.
NOTE: Source timecode and Lockits are not synchronized, this may lead to drift between source and receivers on long takes. Do not use for standard sync situations.

Documents / Resources
References
Download manual
Here you can download full pdf version of manual, it may contain additional safety instructions, warranty information, FCC rules, etc.
Advertisement


Need help?
Do you have a question about the NanoLockit and is the answer not in the manual?
Questions and answers