NuWave Moxie - Vacuum Digital Blender Manual
- Owner's manual & complete recipe book (88 pages)
Advertisement
REGISTER NOW!
for an additional 6 months warranty!
As a special thank-you for registering your NuWave unit, you'll automatically receive an additional 6 months added to your limited manufacturer's warranty!*
All you have to do is follow these simple steps.
- Using your smartphone or smart device, scan the QR code located on the unit label on the back of the unit.

- You will be directed to NuWave's product registration page with your unit's unique serial number automatically entered in the appropriate field.
NOTE: If you do not have a web-enabled smart device, simply visit nuwavenow.com/QR and manually enter in your unit's serial number. - Fill out the remaining information and complete the optional survey.
- Once you submit your information, you will receive a confirmation email containing your extended warranty details.

*Register your product within 1 year of date of purchase for a free 6-month extension of your limited warranty.
DOWNLOAD THE QR CODE APP TO YOUR MOBILE DEVICE

- Open your mobile app store (App Store, Google Play).
![www.apple.com]()
![play.google.com]()
- Search for "QR code readers."
![]()
- Simply download the QR code reader to your phone, open it, scan the code and you are ready to go.
NOTE: You may need to open your downloaded QR code reader each time you want to scan a QR code.


IMPORTANT SAFEGUARDS
HOUSEHOLD USE ONLY • READ ALL INSTRUCTIONS BEFORE USE

When using the Moxie Blender, basic safety precautions should always be followed:
- To protect against risk of electrical shock, do not immerse Blender Base, cord, plug, or any part of the main unit in water or any other liquids.
- Close supervision is necessary when any appliance is used near children. The Moxie Blender is not intended for use by children, persons with reduced physical, sensory, or mental capabilities or those with lack of expertise or knowledge of this unit.
- Avoid contact with moving parts.
- Do not operate the Moxie Blender with a damaged cord or plug, if the appliance malfunctions, is dropped, or damaged in any manner. Contact Customer Service at 1-877-689-2838 or email help@nuwavenow.com for information on examination, repair, or adjustment.
- NOT INTENDED FOR OUTDOOR USE. FOR HOUSEHOLD USE ONLY.
- Do not let cord hang over the edge of table or counter. Do not let cord contact hot surfaces, including from a stove.
- Discard the protective plastic covering the power plug before use.
- Do not place on or near a hot gas or electric burner, or in a heated oven.
- Keep hands, utensils, and foreign objects out of the Jar while blending to reduce the risk of severe injury to persons or damage to blender. A scraper may be used, but only when blender is NOT running.
![]()
Blades are sharp. Handle blender carefully. Do not handle blades.- Always operate blender with Lid and Jar correctly in place. Blender will not operate if Lid is not firmly in place and the dot is not lined up with the handle.
- Alteration or modification of any part of the blender or the use of attachments not recommended by the manufacturer may cause fire, injury, or damage to property.
- Do not use the unit for other than its intended use.
- Do not add hot or boiling liquids to Jar.
- Never knock Jar against a surface to loosen ingredients. Remove Jar from Moxie Blender's Base first, then use a rubber spatula to remove mixture from bottom of Jar.
- Do not shake or rattle Jar while in use.
- Never remove Jar before the Moxie Blender's blades have come to a complete stop.
- When making nut butters or recipes with oil-based ingredients, do not process for more than 1 minute after the mixture begins to circulate in Jar. Blending for longer periods than this can cause overheating of the Moxie Blender.
- First turn off then unplug the Moxie Blender from outlet when not in use, before putting on or taking off parts, and before cleaning.
- Keep manual handy for future reference.
ADDITIONAL SAFEGUARDS
SEE CLEANING & MAINTENANCE BEFORE USE
| Electrical Information A short power-supply cord is provided to reduce the risk resulting from becoming entangled in or tripping over a longer cord. Longer detachable power-supply cords or extension cords are available and may be used if care is exercised in their use. If a longer detachable power-supply cord or extension cord is used:
|
SAVE THESE INSTRUCTIONS
Read and understand the entire manual before using the Moxie.
DO NOT USE THE UNIT FOR OTHER THAN INTENDED USE.
Note: Put the Moxie on a surface that is horizontal, even, and stable. This appliance is intended for normal household use. It is not intended to be used in environments such as staff kitchens/cafeterias of shops, offices, farms, or other work environments, nor is it intended to be used by clients in hotels, motels, bed and breakfasts, and nonresidential environments.
NOTICE: THE FAILURE TO FOLLOW ANY OF THE IMPORTANT SAFEGUARDS, ADDITIONAL SAFEGUARDS, OR THE INSTRUCTIONS FOR SAFE USE IS A MISUSE OF YOUR MOXIE THAT CAN VOID YOUR WARRANTY AND CREATE THE RISK OF SERIOUS INJURY.
 | |
| In case of malfunction, immediately unplug and contact Customer Service Department. 1-877-689-2838 • help@nuwavenow.com |
- Do not place the Moxie close to flammable materials, heating units, or wet environments.
- It is normal for some smoke to escape the Moxie when heating for the first time.
- If a lot of smoke is escaping from the air vent during operation, unplug the Moxie immediately and contact Customer Service.*
- DO NOT remove blades in any way or attempt to remove for cleaning.
- Extreme caution must be exercised when operating the Moxie or any other appliance.
- Do not move the Moxie while in operation. Only after the Moxie has completely cooled should moving be attempted. Always wait for the Moxie to cool down prior to handling it.
- Children should be supervised to ensure that they do not play with the Moxie.
- If any trouble arises during operation, service MUST be done by NuWave LLC or authorized by the manufacturer for repairs.
- Do not disassemble the Moxie or replace any parts without prior written consent from the manufacturer.
- Do not use metal utensils as this can damage the Jar.
- Make sure the Moxie is always clean prior to use.
- Turn power off and unplug Moxie blender BEFORE touching movable parts or reaching in with a utensil. Turn power OFF and unplug when Moxie Blender is unattended.
- Do not operate blender if abnormal sounds or motion is detected. If a hard or foreign object comes into contact with blades in Jar, do not serve.
- Inspect the Moxie Blender's blade assembly after each use, and if there are loose, damaged, or missing parts, contact Customer Service at 1-877-689-2838 or email help@nuwavenow.com.
- Always use extreme caution when inspecting or maintaining the Moxie Blender or any appliance.
- The appliance is not intended to be operated by means of an external timer or separate remote-control system.
*Customer Service Department:
1-877-689-2838 • help@nuwavenow.com
| |  |
| Never use the Moxie Blender's blade assembly with loose, damaged, or missing parts. |
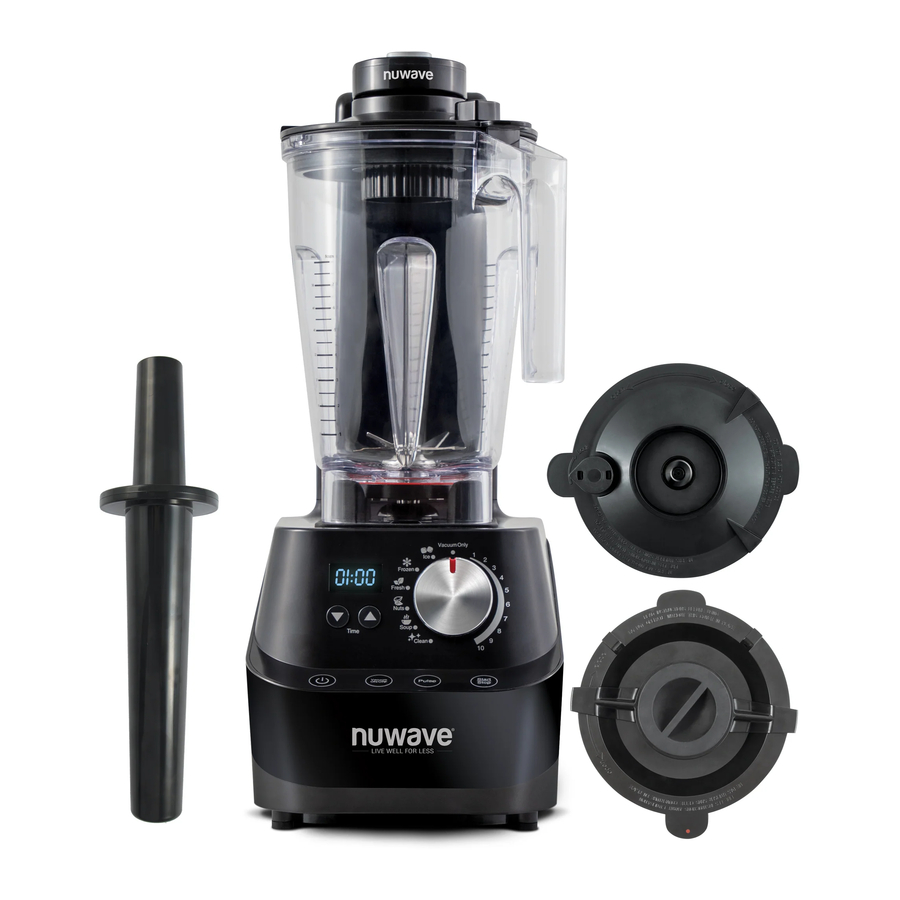
PARTS & ACCESSORIES

To order replaceable parts head over to Replaceable Parts section and then NuWaveNow.com.
- Plunger Lid
Part #: 27413- Plunger Lid Seal Ring
Part #: 27418 - Plunger Cap
Part #: 27414
- Plunger Lid Seal Ring
- Vacuum Lid
Part #: 27412- Vacuum Lid Seal Ring
Part #: 27417 - Vacuum Cap
Part #: 27415 - Vacuum Cap O-Ring
Part#: 27419 - Vacuum Plug
Part #: 27420
- Vacuum Lid Seal Ring
- Jar with Blade
Part #: 27411 - Storage Jar (Optional)
Part #: 27410 - Vacuum Switch
- Vacuum Arm
- Blender Base
Part #: 27421 - Plunger
Part #: 27416
Part# 27441 is comprised of the Jar with Blade and Vacuum Lid.
Part# 27442 is comprised of the Storage Jar and Vacuum Lid.
Part# 27443 is comprised of the Storage Jar and Plunger Lid.
ASSEMBLY GUIDE

Plunger Lid Assembly
- Line up red dot on Lid with the handle.
- Push down on the Lid until it sits firmly in place.
- The Lid Lock has two Lock Hooks that will lock the Lid in place. Make sure the two Lock Hooks line up with the Jar Tabs.
- Turn the Lid Lock clockwise to close and lock.
- To unlock, turn the Lid Lock counterclockwise.
| | |
| Make sure all parts are securely attached. |
As with most electrical appliances, electrical parts are live even when the Moxie Blender is off. Be sure the unit is unplugged when assembling.
When using the Plunger

Remove the Plunger Cap from the Plunger Lid before inserting the Plunger.
The Plunger Lid is designed with the hole opening so that the Plunger does not come into contact with blades.
When not using Plunger, place Plunger Cap in Plunger Lid by pressing down.
Use Vacuum Lid when vacuum-blending only.

Vacuum Lid Assembly

- Underneath Vacuum Lid, make sure the Vacuum Plug is in place and screw Vacuum Cap up into Vacuum Lid clockwise until tight.
- Line up red dot (located on top of Lid) with the handle.
- Push down on the Lid until it sits firmly in place.
- Make sure to turn the Release Valve to the Lock position before using vacuum function.
- Vacuum Lid will NOT open when in Lock position.
Jar Assembly with the Vacuum Lid
- Lift the Vacuum Arm up.
- Place the Jar on Base by aligning it on top of the 4 Rubber Columns.
- The Vacuum Cap needs to be screwed tightly into place prior to use.
- Push the Vacuum Arm down and press on Lid until a connection is made and a click is heard.
- Make sure the Release Valve is in Lock position before vacuuming.
- Before removing Vacuum Lid, turn the Release Valve to open position.
| | |
| Make sure all parts are securely attached. |
QUICKSTART

Blending times and speeds can be adjusted before and during the blending process.
Press the up and down arrows or turn the dial to set or adjust.
Turn the Moxie® ON and OFF
Turn the red main Base Power Switch ON. Switch is located on the right side of Blender Base. Press Power button once to turn your Moxie on. Press the Power button again and press the red main Base Power Switch OFF to turn your Moxie off.
Set your time
Press the up and down arrows to increase or decrease the time on the display.
Times are displayed in minutes and seconds. This can be done on all settings except Vacuum Only.
Note: When blending for a long period of time, steam may escape from Plunger Cap.
Use the numbered settings
When in Vacuum, default will be set to 02:00.
For standard blending, you can select from one of the numbered speed settings between 1 and 10. Adjust to desired time then press Start/Stop to begin blending.
Note: The lowest setting is #1 (5,000 RPM). The highest setting is #10 (27,000 RPM).
Use the vacuum setting
Maximize nutritional value while keeping your creations fresher longer.
Select your desired setting using the dial then press Vacuum ON/OFF. Press Start/Stop and the unit will remove air from jar and will automatically start blending after all air is removed.
Icon settings are used for specialized blending tasks
Each icon setting has default time and RPM built in.
Turn the dial to desired icon setting and press Start/Stop to begin blending.
Note: Always start with cold liquids when blending. DO NOT add hot liquids to the blender.
Cleaning your Moxie Jar
Add water and 1-2 drops of liquid dish soap to your Jar, place on the Base, and close the Lid. Turn the dial to Clean. 00:15 will be shown on the LED display. Adjust the time, if desired, then press Start/Stop. Once finished, remove the Jar, rinse thoroughly, and dry before using.
Note: See "Cleaning and Maintenance" for more.
INSTRUCTIONS
Getting Started
- Turn the red main Base Power Switch ON. Switch is located on the right side of Blender Base.
- The Power button will flash.
- Press Power button once to turn your Moxie Blender on. The LED display will show the default time for the selected setting.
- Turn the dial to choose your appropriate blending function.
- Press Start/Stop to start blending.
- Press Start/Stop again to stop blending.
- Press the Power button again and press the red main Base Power Switch OFF to turn your Moxie off.
Note:
Lid must be on the Jar for the Moxie to turn on.
Time Setting
Press the up and down arrows to increase or decrease the time on the display.

- Times are displayed in minutes and seconds.
![]()
- This can be done on all settings except Vacuum Only.

Example:
Press Power button. Turn dial to Ice. 00:15 (15 seconds) will be displayed. Press up and down arrows to adjust the time. Press Start/Stop.
Note:
Time can only be adjusted when the Lid is on. If the Lid is taken off the time reverts back to original setting time for each icon.
Numbered Settings

For standard blending, you can select from one of the numbered speed settings between 1 and 10.
- Turn the dial to your desired1 setting between 1 and 10. When in Vacuum, default will be set to 02:00.
- Adjust the time if desired1, then press Start/Stop to begin blending at selected setting.
- Adjust the number setting using the dial at any point while blending, if needed.
1 If blending for more than 3 minutes, use Plunger Lid.
Vacuum
By vacuuming the air out of your Moxie blender, you can ensure no air is being mixed with ingredients during the blending process, maximizing the nutritional value while keeping your blender creations fresher longer.
Follow these steps to take advantage of your Moxie blender's vacuum capabilities BEFORE blending:
- Place Vacuum Lid on jar. Attach vacuum arm to the Lid. Make sure Release Valve is in Lock position.
![]()
- Turn the unit on. Press red switch on the side of Base and press Power button.
- Select your desired setting using the dial.
- Press Vacuum ON/OFF. The button will be lit blue.
- Press Start/Stop. The display will flash default time for selected setting.
- Unit will remove all air from Jar.
- Once all air has been removed your Moxie will automatically start blending.

Note:
Vacuum arm is only to be used when using the vacuum function.
Example:
- Turn dial to Frozen. 00:35 seconds will be displayed.
- Press Vacuum On/Off. The button will be lit blue.
- Press Start/Stop. Once all air has been removed, the blender will start blending.
Vacuum Only
Follow these steps to take advantage of your Moxie blender's vacuum capabilities AFTER blending:
- Turn the dial to Vacuum Only. 00:00 will be shown on the LED display.
- Press Start/Stop. The unit will vacuum excess air from the blender, then automatically power off for you. The display will show 00:00.
Note:
The Vacuum Lid should only be used when using vacuum or Vacuum Only function.
Icon Setting
For more specialized blending tasks you can select one of the preset icons with the dial. Each icon setting has a default time and RPM built into the Moxie.
- Turn the dial to your desired icon setting. The LED display will show the default time.
- Adjust the time, if needed, then press Start/Stop to begin blending at your selected setting.
- If desired, increase or decrease time at any point while blending.
| Icon | Default Min.: Sec. | Min. Sec. | Max. Min. | Notes |
| 1-10 (With Vacuum)* | 02:00 | 00:05 | 03:00 | Adjustable speed |
| 1-10 (Without Vacuum) | 03:00 | 00:05 | 05:00 | Adjustable speed |
 Ice Ice | 00:15 | 00:05 | 02:00 | Smoothies and sorbet |
 Frozen Frozen | 00:35 | 00:05 | 02:00 | Ice-based drinks |
 Fresh Fresh | 00:30 | 00:05 | 02:00 | Sauces |
 Nuts Nuts | 01:30 | 00:05 | 02:00 | Jams and spreads |
 Soup Soup | 03:00 | 00:05 | 05:00 | Soup and hot chocolate |
 Clean** Clean** | 00:15 | 00:05 | 02:00 | Self-cleaning |
*Notes:
- When blending for a long period of time, liquids will get hot and steam may escape from Plunger Cap.
- Always start with cold liquids when blending. DO NOT add hot liquids to the blender.
- Do not fill Jar above ¾ capacity. For best results, do not fill more than 1.5 liters (51 fl oz) of liquid.
- Cannot use vacuum on Ice or Soup settings.
**Tips for Cleaning Your Moxie Jar:
- Add water and 1-2 drops of liquid dish soap to your Jar, place on the Base, and close the Lid.
- Turn the dial to Clean. 00:15 will be shown on the LED display. Adjust the time if desired, then press Start/Stop.
- Once finished, remove the Jar, rinse thoroughly, and dry before using.
For detailed instructions on cleaning, see "Cleaning and Maintenance."
| | |
| Moving parts may become hot with extended use. DO NOT TOUCH. |
CLEANING & MAINTENANCE
Before First Use
Wash all removable parts in warm, soapy water or in the dishwasher, top rack only. The Jar can be washed using the Clean function.
See "Instructions" for details.

Pull down and remove the Vacuum Plug to clean. After the part is cleaned and dried, push the Vacuum Plug firmly back into place. Remember to reattach Vacuum Cap before you use the Moxie again.
Note: Residue and moisture may build up inside Vacuum Cap and on Vacuum Plug. Clean and dry thoroughly after each use.
Unscrew the Vacuum Cap counterclockwise, and hand-wash or clean in dishwasher, top rack only. Make sure that the Vacuum Cap is screwed tightly into place prior to use.
Lid Seal Ring Assembly (for both lids)
Removal of Lid Seal Ring may be necessary for cleaning or if the part is worn, damaged, or needs replacing.
To assemble:

- Line the inside of the Lid Seal Ring into the rim.
- Press the Seal Ring into the rim to ensure it is properly sealed.
- Make sure the lower part of the Seal Ring lines up with the bottom side of the rim.
Do not immerse Moxie Base in water. Clean with damp sponge or cloth and wipe dry.

| | |
| The power cord needs to be unplugged from the power source before inserting or removing any attachments and before cleaning. |
TROUBLESHOOT GUIDE
| The Moxie is not turning on or working. |
|
| Blender does not work when plugged in and Power button and Power Switch are both ON. |
|
| Blender is not running at a high enough speed for the recipe. |
|
| Blender is not vacuuming out air from Jar. |
|
| Vacuum Lid will not open after air is vacuumed out. |
| Release Valve on Vacuum Lid is in Lock position. Turn Release Valve to the open position to open Lid. |
| Blender becoming clogged and not operating efficiently. |
|
| Blended mixture has lumps or texture is not even. |
| Air pocket has formed (cavitation) and mixture is too cold or has solidified in areas, and blades are spinning in cavity. Increase temperature by reducing ice in recipe. |
| Noises or motions unusual for normal operation of the blender are detected. |
|

Documents / Resources
References
Download manual
Here you can download full pdf version of manual, it may contain additional safety instructions, warranty information, FCC rules, etc.
Advertisement


Need help?
Do you have a question about the Moxie and is the answer not in the manual?
Questions and answers