Advertisement
PRODUCT SPARE PARTS

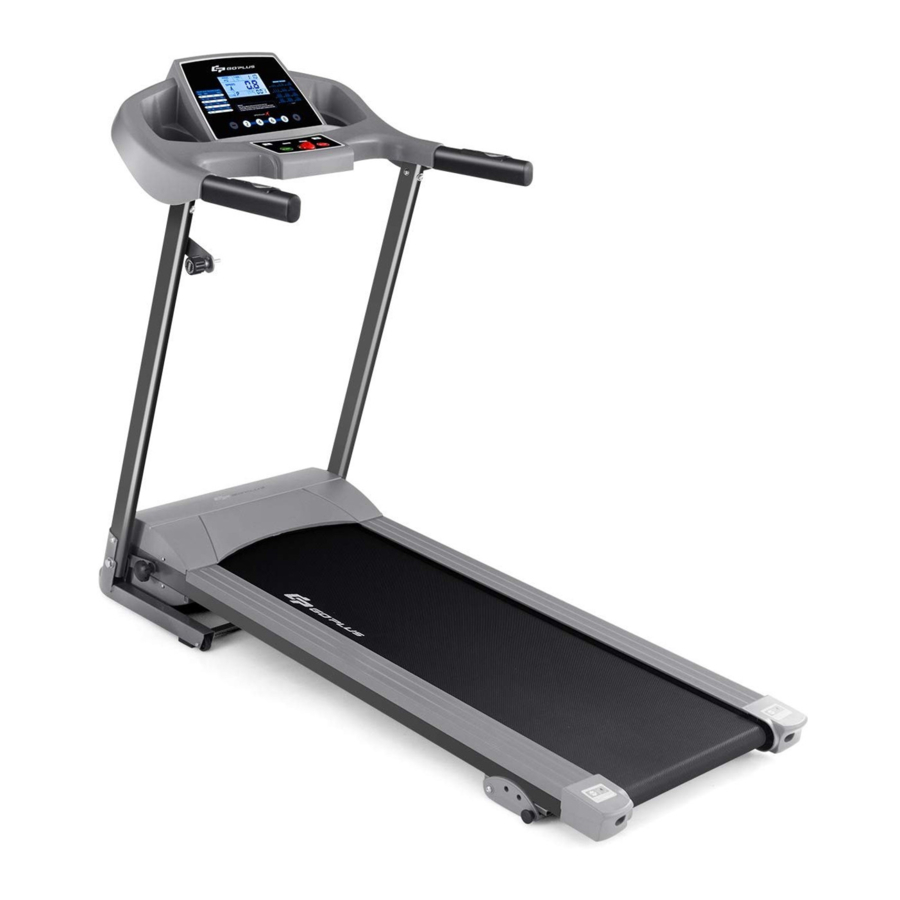
PRODUCTS MAIN PARTS

ASSEMBLY
- Place the treadmill on level ground, unfold the treadmill by hand carefully.
![]()
- Fix the frame to the base with 1 x M8*40 screw and 1 x M8*16 screw on each side, do not tighten them in this step
![]()
- Connect the signal cable from the console and supporting frame and fix the panel to the supporting frame with the pre-installed screws on the support tube on the console.

- Tighten all the screws, [Important] Put safety key on the console and finish the assembly
![]()


CONSOLE INSTRUCTION

- "START" key: During STAND BY or COUNTDOWN mode(H1~H3), press "START" key, SPEED window will show "3 2 1 0" to start working. TIME starts counting from 0:00~99:59 and restart. The default speed is 1.0KM/H.
- "STOP" key: During working, press "STOP" key and the machine will be stopped. Press "STOP" key for 2 seconds, the system will reboot.
- "SPEED +", "SPEED -" is the key for increasing or decreasing speed. Press shortcut key of speed +- can also adjust the speed.
- "MODE(M)" key: During STAND BY, you can change the following setting by pressing MODE, including TIME count down (setting range 5:00~90:00), Distance count down (setting range 1.0~99.0), Calorie count down (setting range 10~999), 12 programs (P01-P12), Pulse Program Hr1~2, Body Fat testing MODE etc.
- "SHORTCUT" Key: Press 2, 4, 6,8 to set the speed quickly.
- "PULSE PROGRAM" Hrc: Continue press "PROGRAM(P)" key to select Hr1~2 mode, press "MODE(M)"key to set age, adjust by pressing speed +- (default setting is 35, can select between 10~99). After setting the age, press "MODE(M)"key to change preset pulse data (Hr 1 default pulse = (220-age) × 60%, Hr 2 default pulse = (220-age) × 80%), adjust by pressing speed+- to select between 70~199 time/minute.
- "BMI" MODE: Press BMI key to enter into FAT mode. Press "MODE(M)" to set gender (F-1), age(F-2), height(F-3), and weight(F-4). After selecting one of the parameter category, press speed +- to adjust the data. With all the data being set up, press Mode Key, and the display will show "---". Put your hand on touch heart frequency key, and the program can calculate your body index.
Default data and setting range
| Parameter Category | Default Data | Setting Range | Note |
| Gender F-1 | 2 | 1/2 | 1 is male, 2 is female |
| Age F-2 | 35 | 10~99 | |
| Height F-3 | 170 | 50~250 | Unit: CM |
| Weigh F-4 | 60 | 20~200 | Unit: KG |
Body Mass Index Chart
| Body Mass Index (BMI) | BMI Categories |
| <19 | Slim |
| 19~26 | Normal |
| 26~30 | Overweight |
| >30 | Fat |
- "SLEEP" Mode: During Standby mode, if the console is let sit idle (without pressing any key) for 10 minutes, it enters into Sleep Mode automatically, and no display will show. To resume or wake up the machine in Standby mode, you can press any key on console.
- "SAFETY" Mode: In case of emergency, pull off the safety key, the machine will stop immediately, and the display window shows "---".
- Press Reset key, all data will cleared to standby status.
AUTO PROGRAM

FOLDING UP AND SETTING DOWN

Fold:
Turn on the fixed knob then lift the running board to assemble the machine. Pull out the tension knob, aimed at the platform then release the knob to fix the machine. Move the machine.
Unfold:
Pull out the tension knob then fall down the running board and fix the machine with the fixed knob then use the machine after electrify.
USAGE OF SILICONE OIL

Pull up the running belt slightly, apply silicone oil to the backside of the belt and the top surface of the running deck. Start the machine and keep it running for 3 minutes so that the oil spread and even out. It is necessary to maintain your treadmill like this every 30 working hours of the machine for optimal performance, which also helps extend the service life of parts.
RUNNING BELT ADJUSTMENT
- Running belt deviate to left
Start the machine by speed at 2-3KM/H without loading, use Allen wrench to screw the bolt 1/4 turn clockwise. Keep the machine running without loading for 1-2 minutes to gauge. Repeat the previous step if more adjustment is needed, until the belt moves to the center.
![]()
- Running belt deviate to right
Start the machine by speed at 2-3KM/H without loading, use Allen wrench screw the bolt 1/4 turn clockwise. Keep the machine running without loading for 1-2 minutes to gauge. Repeat the previous step if more adjustment is needed, until the belt moves to the center.
![]()
- Running belt slipping
If the running surface becomes slipping, tighten bolts on both ends 1/2 turn clockwise with Allen key. Repeat if necessary until the belt is properly adjusted.
![]()


- Running belt logjam
If the running belt is in dead condition, loosen bolts Allen wrench to make the screw 1/2 circle both left and right till this logjam solved.
TROUBLE SHOOTING
| Error Code | Meaning | Problem | Solution |
| Err(or E00) | No Safety key on Panel | Safety key is not on the panel or it is not properly put on |
|
| E2 | Control Board Error | Control board is broken or pseudo soldering on control board | Replace control board |
| E4 | Control Board Error | Control board is broken | Replace control board |
| E5 | Overcurrent Protection | Control board short circuit or motor blocked |
|
| E6 | Motor Error | Motor broken or motor line fall off |
|
| E7 | Communication Failures | Wires from the control board to panel board are broken or not properly connected |
|
| E8 | Overload Protection | Excess of electricity or user exceeded max load weight |
|

US office: Fontana
UK office: Ipswich
CAUTION
To avoid any hurts, please read this manual carefully before using.

- For safety purpose, do not stand on running belt while start.
![]()
- Please stop immediately if you experience any kind pain, including but not limited to chest pains, nausea, dizziness, or cramp.
- Please speed up slowly if needed.
- Adjustment of belt is prohibited during using.
- It is suggested to wear sports shoes while using this equipment.
- Children, the elder, the pregnant, and patients are prohibited from using this machine.
![]()
- Please clip the safety key on your clothing during using.
- Please firmly hold the handle bars during using.


SAFETY AND NOTICE
- Please put the machine on flat ground. It is unsuitable to put the machine at following places:
- Outdoors.(The machine is specially designed for indoor use only)
- Slant ground or slant places on balcony.
- Sunlight area or near heater.
- Noisy places.
- The proper power for the machine is A.C 110V.
- Error may appear on display if the power is not stable. Please do not use the same socket together with computer, air conditioner etc.
- It is suggested to wear sports shoes and gym suit while use the machine.
- Please speed up or speed down slowly.
- Make sure no child or other object is near while folding or unfolding the machine.
- The treadmill should not be located near water or wet object. Error or damage may be caused if water or other liquids drop into the equipment.

Documents / ResourcesDownload manual
Here you can download full pdf version of manual, it may contain additional safety instructions, warranty information, FCC rules, etc.
Advertisement


Need help?
Do you have a question about the SP36602 and is the answer not in the manual?
Questions and answers