Table of Contents
Advertisement
Quick Links
GB
OPERATING MANUAL . . . . . . . . . . . . . . . . . . . . . . . . . . . . . . PAGE
DE
GEBRAUCHSANWEISUNG . . . . . . . . . . . . . . . . . . . . . . . . . . . . PAGE 18
FR
MANUAL D'UTILISATION . . . . . . . . . . . . . . . . . . . . . . . . . . . . PAGE 34
NL
GEBRUIKSAANWIJZING . . . . . . . . . . . . . . . . . . . . . . . . . . . . . PAGE 50
ES
INSTRUCCIONES DE USO . . . . . . . . . . . . . . . . . . . . . . . . . . . . PAGE 66
IT
ISTRUZIONI D'USO . . . . . . . . . . . . . . . . . . . . . . . . . . . . . . . . . PAGE 82
PT
MANUAL DE INTRUÇÕES . . . . . . . . . . . . . . . . . . . . . . . . . . . . PAGE 98
DK
BRUGERVEJLEDNING . . . . . . . . . . . . . . . . . . . . . . . . . . . . . . . PAGE 114
NO
BRUKERINSTRUKSEN . . . . . . . . . . . . . . . . . . . . . . . . . . . . . . . PAGE 130
SE
INSTRUKTIONERNA INNAN ANVANDNING . . . . . . . . . . . . . . PAGE 146
FI
KäyTTöOHJEET . . . . . . . . . . . . . . . . . . . . . . . . . . . . . . . . . . . PAGE 162
LC – 150
2
Advertisement
Table of Contents

Subscribe to Our Youtube Channel
Related Manuals for Toyotomi Zibro LC-150


Summary of Contents for Toyotomi Zibro LC-150
- Page 1 LC – 150 OPERATING MANUAL . . . . . . . . . . . . . . . . . . . . . . . . . . . . . . PAGE GEBRAUCHSANWEISUNG .
- Page 2 We hope that you’ll enjoy your Toyotomi appliance for years to come! We invite you to read this instruction manual first, to ensure the maximum lifetime for this appliance. Get to know us better… visit us at www.toyotomi.eu for our full line of products. 1 Read the diRections foR Use fiRst.
-
Page 3: General Directions For Use
GENERAL DIRECTIONS FOR USE Below you will find the main steps to be taken for using your heater. For more details, please refer to the MANUAL. Remove all packaging materials (refer to Section A, Fig. A). Fill the removable tank 6 (refer to Section B, Fig. C). Insert the plug into the wall-socket. -
Page 4: What You Need To Know In Advance
WHAT YOU NEED TO KNOW IN ADVANCE ventilate sufficiently Read this user manual carefully before using the appliance and keep it for future reference. Install this device only when it complies with local/national legislation, ordinances and standards. This product is intended to be used as a heater in residential houses and is only suitable for use in dry locations, in normal household conditions, indoors in living room, kitchen and garage. - Page 5 14 tiPs fOR safe use 1 Children should be supervised to ensure that they do not play with the appliance. 2 DO NOT move the heater when it is burning or still hot. DO NOT refill nor service the heater when it is burning or still hot.
-
Page 6: Set Altitude
MANUAL installinG tHe HeateR Carefully remove your heater from the box and check the contents. In addition to the heater you also need to have: a manual fuel pump a transportation cap these directions for use Keep the box and the packaging materials (Fig. A) for storage and/or transportation. -
Page 7: Weekly Timer
Check the removable tank fuel gauge while filling the tank (Fig. E). Stop filling once the gauge indicates that the tank is full. Never overfill the tank, especially not when the fuel is very cold (fuel expands when it heats up). 5 Let the remaining fuel in the pump flow back into the jerrycan and carefully remove the pump. - Page 8 PROGRAMMING THE WEEKLY TIMER Make sure the heater is connected to the mains and not burning. Press the timer-key . Also make sure the time and day are set correctly. Choose the day you would like to program by pressing the adjustment keys N. Press the adjustment key M to increase the day by one step and press the key N to decrease the day.
- Page 9 Then, use the adjustment keys N to set the minute. Press the adjustment key M to increase the minute and the key N to decrease the minute. Press extension/day/set to select the right minute. Use the adjustment keys N to set the hour at which the heater must shutt off.
- Page 10 Use the adjustment keys M or N N to choose copy. Press extension/day/set to select the copy function. Use the adjustment keys M or N N to select the day to which the settings should be copied. Press extension/day/set to choose the selected day.
-
Page 11: Setting The Required Temperature
iGnitinG tHe HeateR When used for the first time, a new heater may give out a smell for a short while. You should therefore provide extra ventilation. Always ignite the heater with the button L. Never use matches or a cigarette lighter. -
Page 12: Automatic Deactivation
tHe infORMatiOn DisPlay The information display K not only serves as an indicator of the (set) time and temperature (Sections C, D, and F), it also indicates any malfunctioning of the heater. The code on the information display tells you what is the matter: In case of any malfunctioning the cODe... - Page 13 cHilDPROOf lOcK / PaRental cOntROl The childproof lock can be used to prevent children accidentally changing the heater settings. When the heater is burning and the childproof lock is on, the heater can only be switched off. Other functions are blocked then. If the heater has already been switched off, the childproof lock also prevents accidental ignition of the H: When the mark...
- Page 14 THE ‘VENT’ INDICATOR When the VENT indicator starts blinking, this is a sign that the room is not vented sufficiently (Fig. K). The heater will switch off automatically. If the indicator continues blinking after extra ventilation, please contact your dealer.. K: A blinking VENT indicator is a sign that you need extra...
- Page 15 tRansPORtatiOn Take the following measures to avoid fuel leakage during the transportation of the heater: 1 Let the heater cool down. 2 Remove the removable tank 6 from the heater and remove the fuel filter Transportation (refer to Section M, Fig. M). Some drops may leak from the filter; keep a cloth at hand.
- Page 16 WaRRanty PROvisiOns Your heater comes with a 48-month warranty starting on the date of purchase. Within this period all defects in material or workmanship will be repaired without any charge. The following provisions shall apply regarding this warranty: 1 We expressly dismiss all other claims for damages, including consequential damages.
-
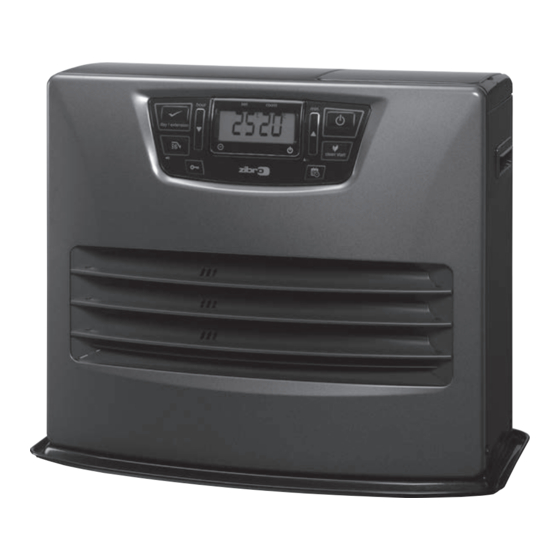
Page 17: Main Components
Main cOMPOnents front plate Grid Base plate lid for removable tank Operation panel Removable tank air filter vent filter thermostat Plug + cord information display childproof lock adjustment keys (time and temperature) timer save key Handle ... - Page 18 Caso necessite de mais informações ou se ocorrerem problemas específicos que não constem neste manual de instruções, por favor, visite nosso website www .toyotomi .eu ou entre em contato com o nosso Suporte de Vendas (encontrará o número de telefone em www .toyotomi .eu) .
Need help?
Do you have a question about the Zibro LC-150 and is the answer not in the manual?
Questions and answers