
Related Manuals for Sanus VSF409B1


Summary of Contents for Sanus VSF409B1
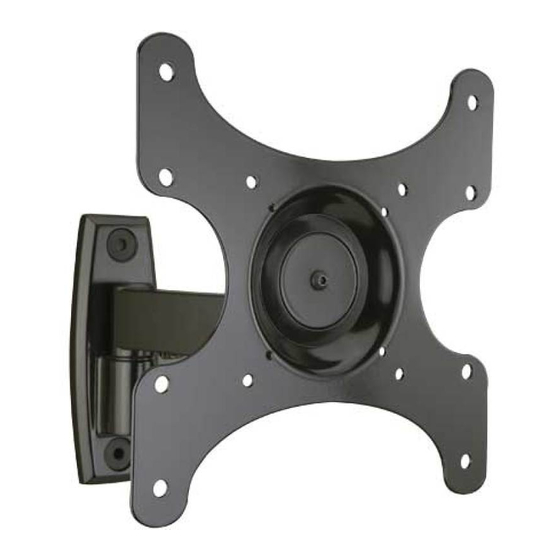
- Page 1 THANK YOU FOR CHOOSING SANUS THE #1 TV MOUNT BRAND IN THE US. VSF409 Instruction Manual Scan for easy install video...
- Page 2 TWO SIMPLE STEPS TO FINDING YOUR STUDS: Step 1 Holding it vertically, lightly move the SANUS Pull apart the SANUS Magnetic Stud Finder to Step 2 Magnetic Stud Finder up and down while expose the probing pin within. Starting about sliding across your wall.
- Page 3 VSF409 We’ll Make It Stress-Free If you have any questions along the way, just give us a call. 1-800-359-5520 (UK: 0800-056-2853) We’re ready to help! Lo haremos sin estrés Si tiene preguntas mientras realiza la instalación, llámenos. 1-800-359-5520 (Reino Unido: 0800-056-2853) Estamos listos para ayudarlo.
- Page 4 Does your TV weigh No — Perfect! more than 50 lb 50 lb (22.7 kg) including Yes — This mount is NOT compatible. Visit MountFinder.Sanus.com or call (22.7 kg) accessories? 1-800-359-5520 (UK: 0800-056-2853) to fi nd a compatible mount. What is your...
- Page 5 STEP 1 Attach Bracket to TV Parts and Hardware for STEP 1 WARNING: This product contains small items that could be a choking hazard if swallowed. Before starting assembly, verify all parts are included and undamaged. If any parts are missing or damaged, do not return the damaged item to your dealer;...
- Page 6 1-1 Select TV Screws 1-2 Spacers Hand thread screws into the threaded inserts on the back of your TV Your TV type will help you determine which hardware to determine which screw diameter (M4, M6, or M8) to use. confi guration to use. Match your type of TV to the suggested hardware confi...
- Page 7 1-3 Attach TV Bracket Position the TV bracket over your TV hole pattern and install using the screw, washer, and spacer (if needed) combination you selected for your TV. M4/M6/M8 screw and washer 05 07 M4 spacer, screw, and washers M6/M8 spacer, screw, and washer 06 09...
- Page 8 fi elds may aff ect the operation of those devices, resulting in serious injury or death. If you have an implanted medical device, keep at least 13 cm (5 in.) between your device and the magnet. Please consult with your physician or medical professional prior to using this product. Sanus Magnetic Stud Finder* NOTE: Not all hardware included will be used.
- Page 9 89 mm (1½ x 3½ in.) (1 1/2 in.) ● Stud center must be verified Locate a nail/screw in the stud using the Sanus magnetic stud fi nder provided. Find the edges of the stud using the probe of the stud fi nder...
- Page 10 Level the wall plate template and tape in place. NOTE: For assistance in determining wall plate location, see HeightFinder at sanus.com. IMPORTANT : Be sure you mark and drill into the center of the stud.
- Page 11 Level the wall plate template and mark the hole locations. NOTE: For assistance in determining wall plate location, see Height Finder at sanus.com. Drill two pilot holes using a 10 mm (3/8 in.) diameter drill bit.
- Page 12 Tighten lag bolts only until the washers are pulled fi rmly against the wall plate CAUTION: Improper use could reduce the holding power of the lag bolt. To avoid potential injuries or property damage Do not over- tighten the lag bolts Fit lag bolt covers over lag bolts...
- Page 13 STEP 3 Hang TV Mount to Arm Parts and Hardware for STEP 3 WARNING: This product contains small items that could be a choking hazard if swallowed. Before starting assembly, verify all parts are included and undamaged. If any parts are missing or damaged, do not return the damaged item to your dealer;...
- Page 14 STEP 3 Hang TV Mount to Arm Fit nut and cover into underside of mount arm Place washer and pivot pin onto mount arm bracket Fit the bracket onto pivot pin . Slide washers and spacer onto mounting bolt and fi t bolt through mounting and pivot pin until it meets nut .
- Page 15 Adjustments Use hex key to adjust left/right/rotation swivel tension.
-
Page 16: Manage Cables
Manage Cables Parts and Hardware for Manage Cables WARNING: This product contains small items that could be a choking hazard if swallowed. Before starting assembly, verify all parts are included and undamaged. If any parts are missing or damaged, do not return the damaged item to your dealer;... - Page 17 Manage Cables Option A: Thread cable through channels the secure with plate and plate screws Option B: Install plate with plate screws . Thread cable ties through end holes in plate . Arrange cables then secure them with the cable ties NOTE: Pull the arm to its full extension before routing the cables through the channels, then loosely route the cables.
- Page 18 Dimensions 200 mm (7.87 in.) 100 mm (3.94 in.) 75 mm (2.95 in.) 360° 237.0 mm 200 mm 100 mm 75 mm (9.33 in.) (7.87 in.) (3.94 in.) (2.95 in.) 133.4 m (5.25 237.7 mm (9.36 in.) 245.9 mm ±15° (9.68 in.) 59.18 mm 171.5 mm...
- Page 20 22,7 kg No — ¡Perfecto! 22,7 kg (50 lb), incluidos Sí — Este soporte NO es compatible. Visite MountFinder.Sanus.com o llame al (50 lb) los accesorios? 1-800-359-5520 (Reino Unido: 0800-056-2853) para encontrar un soporte compatible. ¿De qué está...
- Page 21 ESPAÑOL PASO 1 Coloque el soporte en el televisor Piezas y elementos de sujeción para el PASO 1 ADVERTENCIA: Este producto contiene piezas pequeñas que podrían causar asfixia si fuesen tragadas. NOTA: No se utilizarán Antes de comenzar a montar la unidad, verifique que todas las piezas estén incluidas y en buen estado. todos los elementos de En caso de que falten piezas o alguna esté...
- Page 22 Nivele la plantilla de la placa de pared y péguela con cinta adhesiva en su posición. NOTA: Si necesita ayuda para determinar la posición de la placa de pared, consulte Height Finder en sanus.com. IMPORTANTE : Asegúrese de hacer las marcas y taladrar en el centro del montante.
- Page 23 Nivele la plantilla de la placa de pared y marque la posición de los orificios. NOTA: Si necesita ayuda para determinar la posición de la placa de pared, consulte Height Finder en sanus.com. Taladre los dos orificios guía utilizando una broca de 10 mm (3/8") de diámetro.
- Page 24 ESPAÑOL Apriete los pernos tirafondo solo hasta que las arandelas queden firmemente sujetas contra la placa de pared PRECAUCIÓN: El uso incorrecto podría reducir la capacidad de sujeción del perno tirafondo. Para evitar posibles lesiones o daños materiales, no apriete excesivamente los pernos tirafondo Coloque las cubiertas sobre los pernos tirafondo PASO 3 Cuelgue el soporte de televisor en el brazo...
- Page 25 ESPAÑOL Ajustes Utilice la llave hexagonal para ajustar la tensión del giro a la izquierda/derecha. Organización de cables Piezas y elementos de sujeción para el PASO 3 ADVERTENCIA: Este producto contiene piezas pequeñas que podrían causar asfixia si fuesen tragadas. NOTA: No se utilizarán Antes de comenzar a montar la unidad, verifique que todas las piezas estén incluidas y en buen estado.
- Page 26 Milestone AV Technologies and its affi liated corporations and subsidiaries (collectively, “Milestone”), intend to make this manual accurate and complete. However, Milestone makes no claim that the information contained herein covers all details, conditions, or variations. Nor does it provide for every possible contingency in connection with the installation or use of this product. The information contained in this document is subject to change without notice or obligation of any kind.
- Page 27 Learn ways to get the most out of your space. FACEBOOK.COM/SANUSSYSTEMS Find product updates and more. Learn installation tips, tricks and household know-hows. TWITTER.COM/SANUSSYSTEMS View step-by-step product videos to ease your install experiences. YOUTUBE.COM/SANUSSYSTEMS Find the latest news stories about your favorite SANUS products.
- Page 28 If you ever have questions about your SANUS product, give us a call at 1-800-359-5520. We're ready to help! If you ever have questions about your SANUS product, give us a call at 1-800-359-5520. We're ready to help! ‘Monthly prize’...
Need help?
Do you have a question about the VSF409B1 and is the answer not in the manual?
Questions and answers