Table of Contents
Advertisement
Quick Links
Advertisement
Table of Contents

Related Manuals for Kemppi MinarcMig Adaptive 180 AU


Summary of Contents for Kemppi MinarcMig Adaptive 180 AU
- Page 1 MinarcMig Adaptive 180 AU Operating manual • English...
- Page 3 Operating Manual english...
-
Page 4: Table Of Contents
COntents preFaCe ......................... General .......................... Properties ........................About welding ......................MaCHine use ....................Before implementation ..................General view of the machine ................Distribution network ..................... Cable connections ....................Filler wire ........................2.5.1 Changing the feed roll groove ..............2.5.2 Threading the filler wire ................2.5.3 Reversing polarity .................. -
Page 5: Preface
While every effort has been made to ensure that the information contained in this guide is accurate and complete, no liability can be accepted for any errors or omissions. Kemppi reserves the right to change the specification of the product described at any time without prior notice. Do not copy, record, reproduce or transmit the contents of this guide without prior permission from Kemppi. -
Page 6: About Welding
The machine has both an automatic and manul mode. In the automatic mode, you must first select the filler wire material after which the welding voltage and wire feed speed can be adjusted with one control according to the thickness of the welded sheet. Thus, selecting the right parameters is easy. -
Page 7: Machine Use
MaCHine use The machine is delivered ready for operation without adjustments with 0.8 mm diameter filler wire. If you use different thickness filler wire, make sure that the feed roll groove, welding gun contact tip and machine polarity are suited for the used wire size and type. -
Page 8: General View Of The Machine
general View OF tHe MaCHine Welding gun Earthing cable Main switch Supply voltage cable Shielding gas hose connector DistriButiOn netwOrk All regular electrical devices without special circuits generate harmonic currents into distribution network. High rates of harmonic current may cause losses and disturbance to some equipment. - Page 9 The machine can also be used with a generator. The minimum power for the generator is 4.2 kVA, and the recommended power 8.0 kVA in order for the machine to be used at maximum capacity. earthing The earthing cable is already connected to the machine. Clean the workpiece surface and fix the earthing cable clamp to the piece in order to create a closed and interference-free circuit needed for welding.
- Page 10 shielding gas The shielding gas used for steel wires is carbon dioxide or a mixture of argon and carbon dioxide which replaces air in the arc’s area. Shielding gas for stainless steel wires is a mixture of argon and carbon dioxide (2 %) and argon for aluminium wires.
-
Page 11: Filler Wire
Filler wire The machine is delivered with the welding gun connected to +pole making it suitable for steel solid wire, stainless steel wire and aluminium wire welding without adjustments. 2.5.1 Changing the feed roll groove The feed roll groove is factory set for welding filler wires of 0.8–1.0 mm diameter. -
Page 12: 2.5.2 Threading The Filler Wire
2.5.2 threading the filler wire Open the reel housing by pressing on the opening button and install the wire reel in such a way that it rotates counter clockwise. You can use either a 5 kg (diameter 200 mm) or 1 kg (100 mm) wire reel in the machine. -
Page 13: Reversing Polarity
CAUTION! When driving the wire in to the gun, do not point the gun at yourself or others or put, for example, your hand in front of the tip, because the cut wire end is extremely sharp. Also, do not put your fingers near the feed rolls, because they might get squeezed between the rolls. -
Page 14: Controls And Indicator Lights
COntrOls anD inDiCatOr ligHts Welding power control (automatic mode) OR Wire feed speed control (manual mode) Arc length trimmer (automatic mode) OR Welding voltage control (manual mode) Standby indicator light Overheating indicator light Mode selection button Material selection button (automatic mode) Display In automatic mode, the welding power is adjusted according to the thickness of the welded sheet. -
Page 15: Display In Automatic Mode
When you switch the machine on, a green standby light switches on. Simultaneously, the main switch indicator light switches on. If the machine overheats or the supply voltage is too low or too high, the welding operation automatically switches off and the yellow overheating indicator light switches on. -
Page 16: Welding Power Adjustment In Automatic Mode
When adjusting the arc length, the voltage display shows a comparative scale (-9 ... 0 ... 9) which will disappear from the display after some time once the adjustment is made. 2.6.2 welding power adjustment in automatic mode Adjusting the welding power according to sheet thickness affects simultaneously both wire feed speed and amount of current lead to the wire. -
Page 17: Display In Manual Mode
2.6.4 Display in manual mode Operating mode Wire feed speed chart Welding values: wire feed speed, welding voltage and welding current The selected operating mode is visible on the display. During welding, the wire feed speed chart displays the wire’s speed. Wire feed speed is the only welding parameter always visible on the display. -
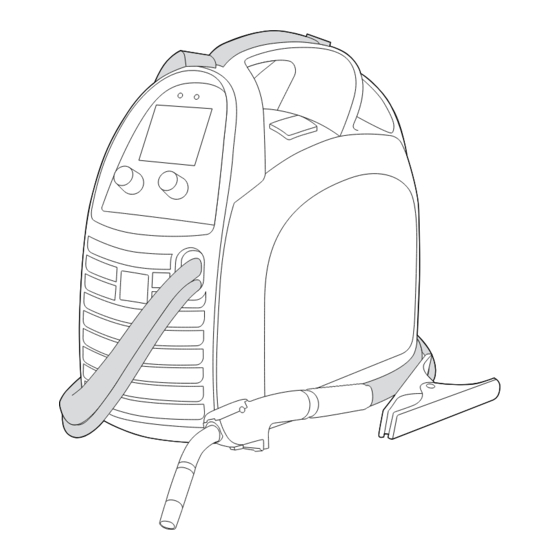
Page 18: Threading The Shoulder Strap
tHreaDing tHe sHOulDer strap The machine is delivered with a shoulder strap which helps carrying the machine. Thread the shoulder strap in place according to the picture. NOTE! The machine should not be hung up from the shoulder strap. -
Page 19: Service
• Remove welding spatters from the welding gun’s tip and check the condition of the parts. Change damaged parts to new ones immediately. Only use original Kemppi spare parts. • Check that the insulating tips of the welding gun’s neck are undamaged and in place. - Page 20 Cleaning the wire guide Pressure of the feed rolls remove metal dust from the filler wire’s surface which then finds its way to the wire guide. If the wire guide is not cleaned, it gradually clogs up and causes wire feed malfunctions. Clean the wire guide in the following manner: Remove the welding gun’s gas nozzle, contact tip and contact tip’s adapter.
-
Page 21: Disposal
The owner of the equipment is obliged to deliver a decommissioned unit to a regional collection centre, per the instructions of local authorities or a Kemppi representative. By applying this European Directive you will improve the environment and human health. -
Page 22: Ordering Numbers
OrDering nuMBers Product Ordering number MinarcMig™ Adaptive 180 AU 6108180AU (including gun, cables, gas hose and shoulder strap) Welding gun MMG20 (3 m) 6250200 Earthing cable and clamp (3 m) 6184003 Shielding gas hose (4.5 m) W001077 Shoulder strap 9592162 Consumables for wire feed mechanism Feed roll 0.6 –... -
Page 23: Technical Data
teCHniCal Data MinarcMig™ Adaptive 180 AU Connection voltage 1 ~ 230 V ±15%, 50/60 Hz Connection power: • 25% ED 8.6 kVA 180 A • 60% ED 5.3 kVA 120A • 100% ED 4.2 kVA 100A Supply current I 1max 30 A I 1eff 15 A Connection cable/fuse 2.5 mm² S–3.3 m / 16 A delayed Load capacity: •... - Page 24 Temperature class H (180 °C) / F (155 °C) Dimensions L 400 x W 180 x H 340 mm Weight (incl. gun and cables 3.0 kg) 9.8 kg Operating temperature range -20 °C ... +40 °C Storage temperature range -40 °C ... +60 °C Protection class IP23C...
- Page 26 Tel +358 3 899 11 Tel +7 495 739 4304 65 Avenue de la Couronne des Prés Telefax +358 3 734 8398 Telefax +7 495 739 4305 78681 EPONE CEDEX myynti.fi@kemppi.com info.ru@kemppi.com FRANCE Tel +33 1 30 90 04 40 KEMPPI SVERIGE AB KEMPPI, TRADING (BEIJING) COMPANY, Telefax +33 1 30 90 04 45 LIMITED Box 717 sales.fr@kemppi.com Room 420, 3 Zone, Building B, S-194 27 UPPLANDS VÄSBY No.12 Hongda North Street, SVERIGE KEMPPI GmbH Beijing Economic Development Zone, Tel +46 8 590 783 00 Otto-Hahn-Straße 14...
Need help?
Do you have a question about the MinarcMig Adaptive 180 AU and is the answer not in the manual?
Questions and answers