Table of Contents
Advertisement
Quick Links
Advertisement
Table of Contents

Related Manuals for VTech My Busy Workbench


Summary of Contents for VTech My Busy Workbench
- Page 1 Instruction Manual My Busy Workbench...
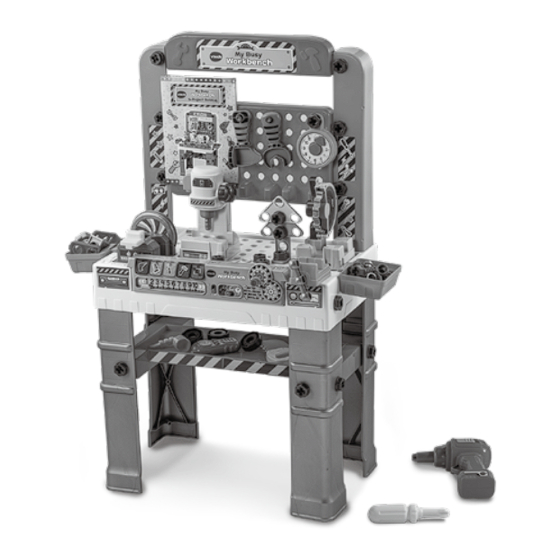
- Page 3 INTRODUCTION Thank you for purchasing the My Busy Workbench. Let’s build! Get ready for role-play fun with the included workbench, working toy drill, hammer, spanner, sander, saw and screws. Let’s get to work! 5 Tool Off/Low/High Buttons Volume Switch Gears...
-
Page 4: Included In The Package
INCLUDED IN THE PACKAGE • 1 Workbench top • 1 Electronic panel • 1 Back panel • 1 Back panel top • 2 Panel supports • 4 Legs • 2 Trays • 1 Left leg support • 1 Right leg support •... - Page 5 • 1 Sander base • 1 Sander top • 1 Drill press top • 1 Drill press base • 1 Project Guide holder • 1 Clock • 1 Drill • 1 Spanner • 1 Hammer • 1 Walkie-Talkie • 1 Saw •...
- Page 6 • 1 Vice • 1 Screwdriver • 1 Large gear • 17 Building pieces • 4 Toy pegs & 4 Toy Wheels • 10 Blue toy screws & nuts • 5 Toy bolts For Workbench Assembly • 19 Grey toy screws & nuts •...
- Page 7 • 1 Label sheet • Project Guide • Quick Start Guide...
- Page 8 WARNING All packing materials such as tape, plastic sheets, packaging locks, removable tags, cable ties, cords and packaging screws are not part of this toy and should be discarded for your child’s safety. NOTE Please save this Instruction Manual as it contains important information.
-
Page 9: Battery Instructions
BATTERY INSTRUCTIONS Battery Removal and Installation 1. Make sure the unit is turned Off. 2. Find the battery cover located on the back of the electronic panel, use a screwdriver to loosen the screws, and then open the battery cover. 3. - Page 10 In the UK, give this toy a second life by disposing of it at a small electricals collection point* so all of its materials can be recycled. Learn more at: www.vtech.co.uk/recycle www.vtech.com.au/sustainability * Visit www.recyclenow.com to see a list of collection points near you.
-
Page 11: Label Application
LABEL APPLICATION Please securely stick the labels to the toy as indicated below:... - Page 13 WORKBENCH ASSEMBLY INSTRUCTIONS Please refer to images on pages 3, 4 and 5. 1. NOTE: Use the included L-Shaped Spanner to screw a Grey Toy Nut to a Grey Toy Screw during assembly. 2. Use the included Drill or Screwdriver to tighten 8 Grey Toy Screws and Nuts to attach the Right and Left Leg Supports where the centre tray will rest on the left and right legs.
- Page 14 4. Insert the Large Gear into the Electronic Panel. Insert the Electronic Panel into the slot of the Workbench Top. Use four of the Real Screws and your own screwdriver to securely attach the Electronic Panel. 5. Use four of the Real Screws and your own screwdriver to securely attach the Vice.
- Page 15 7. Use the remaining two Real Screws to attach the Project Guide Holder to the Back Panel of the Workbench. 8. Use four of the Grey Toy Screws and the included Drill or Screwdriver to tighten the Back Panel of the Workbench to the Panel Supports.
- Page 16 10. Insert the Panel Supports into the Workbench Top and use two of the Grey Toy Screws and the included Drill or Screwdriver to tighten the supports. 11. Clip the two Trays into the slots to the left and right of the Workbench Top.
- Page 17 POWER TOOL ASSEMBLY INSTRUCTIONS Circular Saw, Drill Press and Sander 1. Insert the Drill Press Top into the Drill Press Base. You will hear the pieces snap into place when properly inserted. 2. Insert the Circular Saw Top into the Circular Saw Base.
- Page 18 Activating Normal Play Mode The first time the My Busy Workbench is used, you will need to exit Try-Me mode and activate Normal Play mode. 1. Turn the unit On. 2. Place a Power Tool on the Power Tool Zone. You will hear a sound indicating that the unit is in Normal Play mode.
- Page 19 Circular Saw Place the Circular Saw in the Power Tool Zone. • • Connect two rectangular Building Pieces together. Place the Building Piece on the Circular Saw base. • Press down the grey handle of the Circular Saw to “cut” the •...
-
Page 20: Product Features
TO BEGIN PLAY Move the Off/Low/High Volume Switch to Low or High to turn on the unit, then move the Mode Switch to select a game to play. PRODUCT FEATURES 1. Off/Low/High Volume Switch To turn the unit On or adjust the volume, slide the Off /Low /High... - Page 21 7. Automatic Shut-Off To preserve battery life, the My Busy Workbench will automatically shut off after approximately 1 minute without input. The unit can be turned on again by sliding the Off/Low/High Volume Switch.
- Page 22 ACTIVITIES 1. Music Mode Move the Mode Switch to Music Mode to hear fun songs. Press the buttons, or insert the circular saw, drill press, or sander tools into the Power Tool Zone, or move the ruler slider to listen to sing-along songs about tools and number facts.
-
Page 23: Care And Maintenance
CONSUMER SERVICES Creating and developing VTech products is accompanied by a ® responsibility that we at VTech take very seriously. We make every ® effort to ensure the accuracy of the information, which forms the value of our products. However, errors sometimes can occur. It is... - Page 24 Visit our website for more information about our products, downloads, resources and more. www.vtech.co.uk www.vtech.com.au TM & © 2023 VTech Holdings Limited. All rights reserved. IM-560000-000 Version: 0...
Need help?
Do you have a question about the My Busy Workbench and is the answer not in the manual?
Questions and answers