Table of Contents
Advertisement
Quick Links
USE AND CARE GUIDE
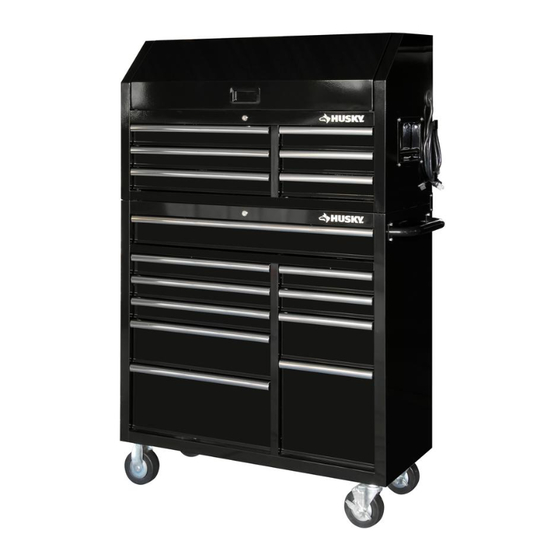
41 IN. -16 DRAWER TOOL CHEST
AND CABINET SET - POWDER COATED
Questions, problems, missing parts?
Before returning to the store, call
Husky Customer Service
8 a.m.- 7 p.m., EST, Monday-Friday
9 a.m.- 6 p.m., EST, Saturday
1-888-HD-HUSKY
HUSKYTOOLS.COM
We appreciate the trust and confidence you have placed in Husky through the purchase of this chest/cabinet. We strive to continually
create quality products designed to enhance your home. Visit us online to see our full line of products available for your home
THANK YOU
improvement needs. Thank you for choosing Husky!
SKU #1005 274 051
SKU #1006 995 182
THD.com #1005 050 362
THD.com #1006 995 182
Model #HOTC4116B13S
Model #HOTC4116B23S
Advertisement
Table of Contents

Subscribe to Our Youtube Channel
Related Manuals for Husky HOTC4116B23S


Summary of Contents for Husky HOTC4116B23S
- Page 1 THANK YOU We appreciate the trust and confidence you have placed in Husky through the purchase of this chest/cabinet. We strive to continually create quality products designed to enhance your home. Visit us online to see our full line of products available for your home...
-
Page 2: Table Of Contents
Table of Contents Table of Contents..............2 Assembly................6 Safety Information..............2-3 Operation................8 Warranty..................3 Maintenance..............9 Pre-Assembly................4 Care and Cleaning............9 Service Parts..............10 Tools Required................4 Hardware Included..............4 Specifications................4 Package Contents..............5 Safety Information 1. Do not open more than one drawer at a time. DANGER: Do not stand on this product. You 2. -
Page 3: Safety Information
The manufacturer specifically disclaims any liability and shall not be liable for any consequential or incidental loss or damage, including but not limited to any labor/expense costs involved in the replacement or repair of said product. Contact the Customer Service Team at 1-888-HD HUSKY or visit www huskytools com. -
Page 4: Pre-Assembly
Pre-assembly TOOLS REQUIRED Phillips Safety screwdriver goggles HARDWARE INCLUDED NOTE: Hardware not shown to actual size. Part Description Quantity Screw M4x10L Bolt M6x15L Bolt M8x15L 10 mm / 13 mm Wrench SPECIFICATIONS 100 lbs. Maximum capacity (per drawer) 400 lbs. Maximum capacity (chest) Maximum capacity (cabinet) 800 lbs. -
Page 5: Package Contents
Pre-assembly (continued) PACKAGE CONTENTS Part Description Quantity Part Description Quantity Gas lift Regular caster Top chest Drawer Bracket Key (set) Side handle Lock Rolling cabinet Cord bracket (set) Swivel caster with brake Drawer Liner Drawer slide (pair) Grommet HUSKYTOOLS.COM Pleas e contact 1-888-HD-HUSK Y fo r furthe r assistanc... -
Page 6: Assembly
Assembly Attaching the side handle Installing the casters □ Attach the side handle (D) to the rolling cabinet (E) CAUTION: Do not over tighten the screws. using four bolts (BB). □ Ensure all cabinet drawers are securely locked into NOTE: The holes in the cabinet are tapped and do not place using the key lock on the rolling cabinet (E). - Page 7 Assembly (continued) Installing the drawer liner Installing the cord brackets □ Place the drawer liners (M) in appropriately sized drawers NOTE: The holes in the cabinet are tapped and do not and the chest lid area to protect the surface. require nuts.
-
Page 8: Operation
Operation Locking and unlocking the unit Removing the drawers □ Fully extend and empty the drawer. IMPORTANT : The drawers must be fully closed before □ Depending on the slide, either lift or lower the locking / unlocking the unit. release lever on both sides so the slides can ride over the stops. -
Page 9: Maintenance
Maintenance Maintaining the casters Maintaining the drawers □ Periodically clean the drawer trim, and □ Grease the casters annually using high quality inside the drawers with a mild detergent and water . bearing grease . □ Remove grease and oil with a standard, nonflammable cleaning fluid. -
Page 10: Service Parts
Service Parts Part Part Code Description Quantity K0509041 Gas lift DTC36001 / DTC360015 Bracket (black/red) DTC040014 / DTC040017 Side handle (black/chrome) K03220053A Swivel caster with brake DTC35020 Drawer slide (pair) K03220263 Regular caster K0612012 Key + Lock (set) DTC50001 / DTC500012 Cord bracket (set) (black/red) K0129113 Drawer Liner... - Page 11 Questions, problems, missing parts? Before returning to the store, call Husky Customer Service 8 a.m.-7 p.m., EST, Monday-Friday, 9 a.m. - 6 p.m. EST Saturday 1-888-HD-HUSKY HUSKYTOOLS.COM Retain this manual for future use.
Need help?
Do you have a question about the HOTC4116B23S and is the answer not in the manual?
Questions and answers
The gas lifts seemed to leak oil and the top does not open. I think the gas lifts seemed to be defective. The unit is 15 months old
Yes, if the gas lifts on the Husky HOTC4116B23S are leaking oil and the top does not open after 15 months, they are likely defective. Gas lifts should not leak oil, and they must function properly to assist in opening the top.
This answer is automatically generated