Advertisement
Quick Links
USA office: Fontana
AUS office: Truganina
GBR office: Ipswich
If you're having difficulty, our friendly
customer team is always here to help.
FRA office: Saint Vigor d'Ymonville
USA:cs.us@costway.com
AUS:cs.au@costway.com
GBR:cs.uk@costway.com
FRA:cs.f r @costway.com
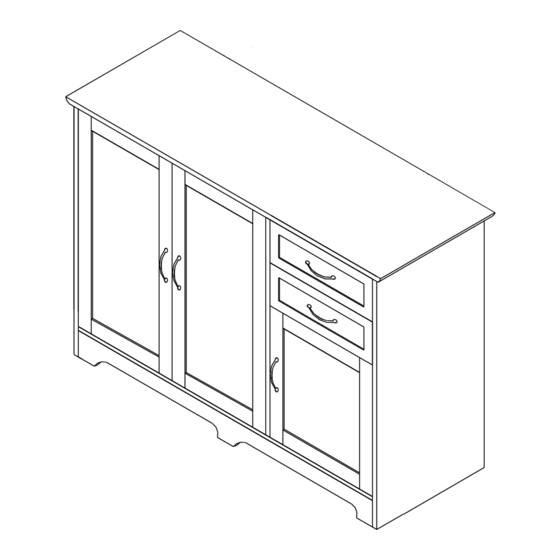
Storage Cabinet
Cabinet de Rangement
HW58545/HW65638
THIS INSTRUCTION BOOKLET CONTAINS IMPORTANT SAFETY INFORMATION. PLEASE READ AND KEEP FOR FUTURE REFERENCE.
Advertisement

Related Manuals for Costway HW58545


Summary of Contents for Costway HW58545
- Page 1 GBR office: Ipswich FRA office: Saint Vigor d'Ymonville USA:cs.us@costway.com If you're having difficulty, our friendly AUS:cs.au@costway.com customer team is always here to help. GBR:cs.uk@costway.com THIS INSTRUCTION BOOKLET CONTAINS IMPORTANT SAFETY INFORMATION. PLEASE READ AND KEEP FOR FUTURE REFERENCE. FRA:cs.f r @costway.com...
-
Page 2: Before You Start
Hardware List / Liste des Accessoires Cam-bolt Before You Start /Boulon à Came Please read all instructions carefully. Cam-lock Retain instructions for future reference. /Serrure à Came Separate and count all parts and hardware. Read through each step carefully and follow the proper order. Wood Dowel We recommend that, where possible, all items are assembled near to the area in /Cheville en Bois... - Page 3 Part List / Liste des Pièces Handle Bolt 4*14 m m /Boulon de Poignée Handle /Poignée Top Panel Left Side Panel Divide Panel /Panneau du Haut /Panneau Latéral Gauche /Planche de Division Plastic Glide /Patin en Plastique Stopper /Bouchon Shelf Pin Right Side Panel Adjustable Shelf Left Door...
- Page 4 Part List Assembly Overview / Vue d'ensemble de l'assemblage de la liste de pièces Middle Back Panel Right Back Panel Drawer Right Panel /Panneau du Milieu /Panneau Arrière Droit /Panneau Droit du Tiroir du Dos Drawer Left Panel Drawer Back Panel Drawer Front Panel /Panneau Gauche /Panneau Arrière...
- Page 5 EN: a)Screw In Cam-bolt (A) into designated holes on Drawer Front Panel (18). b) Fit Bottom Panel (19) to Drawer Panels (15, 16 & 17) via groove on respective drawer panels. c) Align Cam-bolts on (18) to the holes on Drawer Side Panels and attach (18) firmly.
- Page 6 3*12mm 3*14mm EN: a) Screw in Cam-bolt (A) into designated holes on Bottom Panel (11). EN: a) Attach Plastic Glide (M) to Divide Panel (3) and Right Side b) Insert Wood Dowel (C) to the designated holes on Bottom Back and Front Connect Bar (9 &...
- Page 7 3*14mm EN: a) Screw in Cam-bolt (A) to the designated holes on Side Panels (2 & 4). b) Insert Wood Dowel (C) to the designated holes on (3, 9, 10 & 11) as shown. EN: a) Screw in Cam-bolt (A) to the designated holes on Top Panel (1). c) Attach Divide Panel (3) to Bottom Panel (11) via Wood Dowels, then fix by using Screw (P).
- Page 8 3*12mm EN: a) Attach Back Panel (12, 13 & 14) by using Screw (I). EN: a) Attach Hinge (J) and Magnetic Bar (G) to Door (6, 7 & 8) by b) Attach Belt (Q) to top middle hole on (12 & 14) with Flat Wahser using Screw (F) as shown.
- Page 9 EN: Insert drawers and Put Stopper (N) into the designated hole on Drawer Side Panels. The assembly of the Storage Cabinet unit is complete. EN: Insert Shelf Pin (O) and place Adjustable Shelf (5) on it. Important: Before inserting Stopper (N), check that the hole does not pass the front end of Plastic Glide (M).
- Page 10 Return / Damage Claim Instructions DO NOT discard the box / original packaging. In case a return is required, the item must be returned in original box. Without this your return will not be accepted. Take a photo of the box markings. A photo of the markings (text) on the side of the box is required in case a part is needed for replacement.
Need help?
Do you have a question about the HW58545 and is the answer not in the manual?
Questions and answers