Table of Contents
Advertisement
Available languages
Available languages
Quick Links
Advertisement
Chapters
Table of Contents

Related Manuals for Vestfrost FZ419W


Summary of Contents for Vestfrost FZ419W
- Page 1 FZ419W DK Brugsanvisning GB Instructions for use...
-
Page 2: Advarsel
Advarsel ADVARSEL: Da kølemidlet, som anvendes i apparatet, er en brændbar Undgå at beskadige kølemiddel- gasart, er det vigtigt at sikre, at systemet kølekredsløb og rør ikke er be- ADVARSEL: skadigede. Anvend ikke elektriske apparater Mængde og type af kølemiddel inde i apparatet, medmindre de i apparatet er angivet på... - Page 3 ADVARSEL: Apparatet er udelukkende be- ● Fare og risiko for brand eller regnet til opbevaring af vin. eksplosion da kølemidlet er brændbart. Apparatet må kun re- CLASS 1 LED PRODUCT pareres af uddannet personale. Opbevar altid nøgler et separat ● sted utilgængeligt for børn.
-
Page 4: Table Of Contents
Indhold Advarsel............2 Energispare forslag ........4 Lær vinskabet at kende ......5 Inden brug ..........6 Støj .............6 Tekniske data..........7 Ibrugtagning og installation......7 Installation ..........8 Betjening og funktion ........10 Afrimning, rengøring og vedligeholdelse ..12 Fejlfindningsliste ........13 Reklamation, reservedele og service ..14 Bortskaffelse ..........15 Energispare forslag Energiforbruget reduceres .. -
Page 5: Lær Vinskabet At Kende
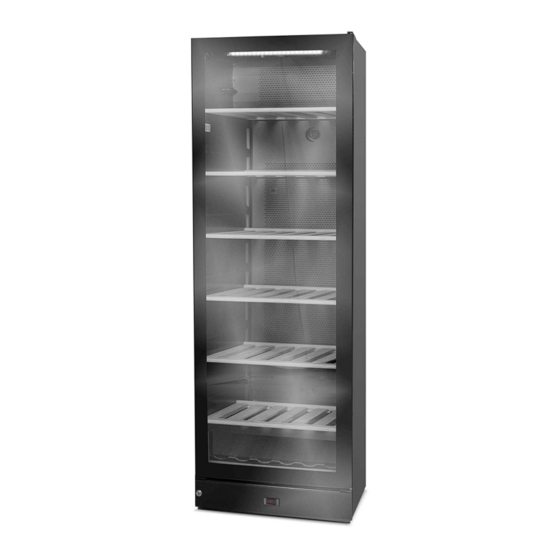
Lær vinskabet at kende Knap til dæmpbar lys Belysning Kulfilter Træhylde Tætningsliste Typeskilt Kontrolpanel Fodspark Lås Justerbare fødder fig.1... -
Page 6: Inden Brug
Inden brug Tekniske data Kontroller at skabet ikke er beskadiget ved Denne enhed overholder de relevante EU- modtagelsen. Transportskader skal anmel- direktiver, herunder Lavspændingsdirektivet des til forhandleren inden køleskabet tages 2014/35/EU - Elektromagnetisk kompatibi- i brug. litet direktiv 2014/30/EU Fjern emballagen. Rengør skabet indven- Typeskiltet, fig. -
Page 7: Ibrugtagning Og Installation
Ibrugtagning og installation Placering Af sikkerhedsmæssige og driftsmæssige grunde må apparatet ikke placeres uden- dørs. Stil skabet på et plant underlag i et tørt og godt ventileret rum (max. 75% relativ luftfugtighed). Anbring ikke skabet tæt på varmekilder såsom komfur eller radiator og undgå... -
Page 8: Installation
Installation Underlaget hvorpå skabet opstilles skal være plant. Brug ikke en ramme eller lignende. Skabet kan stå frit op ad en væg, bygges ind i et køkkenelement eller stå side om side med andre skabe. Ventilation Det er vigtigt, at skabet får tilstrækkelig ventilation og at der er uhindret luftcirkula- tion over, under og omkring det. - Page 9 Max. 85 kg. Afstandsstykkerne på skabets bagside sik- rer den nødvendige luftcirkulation. Monter de to afdækninger som følger med skabet (se fig. 7) Fig. 8 fig. 6 Opstilling Det er vigtigt, at skabet står helt lige. Man kan justere skabet ved at dreje de stil- bare fødder i front op eller ned (se figur 8).
-
Page 10: Betjening Og Funktion
Betjening og funktion Temperatur-indstilling Termostaten har børnesikring. Denne akti- veres ved at trykke ”op og ned” knapperne samtidig. Efter ca 3 sek blinker ”Pof” i diplayet. Herefter vises de aktuelle tempe- fig. 10 raturer som normalt. Desuden kan man se de indstillede temperaturer ved at trykke Elektronisk styring hhv SET1 og SET2. - Page 11 Permanent belysning Alarm for lav temperatur: beep lyd + display skift mellem LtA og aktuel temperatur. For præsentation af Deres vin, kan De vælge at have lyset tændt permanent ved Alarmtemperaturen afhænger af setpunk- at trykke på lyssymbolet to gange. Hvis terne.
-
Page 12: Afrimning, Rengøring Og Vedligeholdelse
Afrimning, rengøring og vedligeholdelse Automatisk afrimning af køle- skabet Afrimning af køleskabet sker automatisk, smeltevandet løber gennem et rør ned til tøvandsskålen der sidder oven på kom- pressoren. Vandet fordamper på grund af varmen fra kompressoren. Tøvandsskålen bør gøres ren engang imellem. Rengøring Før rengøring påbegyndes skal stikproppen fjernes fra stikkontakten. -
Page 13: Fejlfindningsliste
Fejlfindningsliste Fejl Mulig årsag Afhjælpning Skabet virker ikke. Skabet er slukket. Tryk på tænd/sluk knappen. Strømsvigt; sikringen er slået fra; Kontrollér om strømmen er netstikket er ikke sat rigtigt i. tilsluttet. Sikringen skal være slået til. Der løber vand i Tøvandsafløbsrøret er tilstoppet. -
Page 14: Reklamation, Reservedele Og Service
Reklamation, reservedele og service Reklamationsretten omsorg for, at forbrugeren stilles tilfreds, inden du tilkalder serviceassistance, bedes Såfremt der konstateres fejl ved produktet, du kontrollere de fejlmuligheder, du selv kan kan De over for leverandøren gøre brug af afhjælpe. (Se brugsanvisningen) reklamationsretten ifølge gældende lovgiv- ning. -
Page 15: Bortskaffelse
Bortskaffelse Brugerinformation om indsamling og For kommercielle brugere i Den Europæiske Union bortskaffelse af elktronikskrot og brugte batterier Når du ønsker at kassere elektriske eller elektroniske apparater, bedes du Disse symboler på produkter, embal- henvende dig til din forhandler eller lage og/eller ledsagedokumenter leverandør for nærmere information. - Page 16 Warning WARNING: As the appliance contains a flammable refrigerant, it is es- Do not damage the refrigerant sential to ensure that the refrig- system erant pipes are not damaged. WARNING: The quantity and type of the Do not use electrical appli- refrigerant used in your appli- ances inside the refrigerated ance is indicated on the rating...
- Page 17 Frost formation on the interior ● evaporator wall and upper parts is a natural phenom- enon. Therefore, the appliance should be defrosted during WARNING: normal cleaning or mainte- Danger risk of fire or explosion if nance. flammable refrigerant are used. Please note that changes to ●...
- Page 18 Contents Warning ............2 Savings in energy consumption in the use .4 Get to know your wine cooler .....5 Before use ..........6 Noise level ..........6 Electrical connection........7 Installation and start-up ......7 Installation ..........8 Operation and function ......10 Defrosting, cleaning and maintenanc ..12 Fault finding ..........13 Warranty, spare parts and service ....14 Disposal ............15...
-
Page 19: Get To Know Your Wine Cooler
Get to know your wine cooler Button for dimmer light Lighting Charcoal filter Wooden shelf Sealing strip Name plate Control panel Kick plate Lock Adjustable feet fig.1... -
Page 20: Before Use
Before use Noise level On receipt, check to ensure that the ap- The noise level is very low. Both the com- pressor and the fan has a very low noise pliance has not been damaged during transport. Transport damage should be level during normal operation. -
Page 21: Electrical Connection
Installation and start-up Electrical connection Placement Wiring and connections in power supply systems must been all applicable (local and For safety and operational reasons, the ap- national) electrical codes. Consult these pliance must not be installed outdoors. codes lengths and sizes prior to cabinet The appliance should be placed on a level installation. -
Page 22: Installation
Installation The surface on which the appliance is to be placed must be level. Do not use a frame or similar. The appliance can be installed as a free- standing unit against a wall, built into a closet or lined up with other appliances. It is important that the appliance be well ventilated and that air can circulate unhin- dered above, below and around it. - Page 23 The distance pieces on the rear of the ap- pliance ensure sufficient air circulation. Fit the two caps supplied with the appliance as shown in fig. 6. Max. 85 kg. fig. 8 fig. 6 Setting up It is important that the appliance be abso- lutely level.
-
Page 24: Operation And Function
Operation and function Temperature setting The thermostat is equipped with a child lock device. This device is activated by pushing the “up and down” buttons simultaneously. After approx. 3 seconds “Pof” flashes in the display. Then the actual temperatures fig. 10 are shown as usual. - Page 25 Alarm devices Dimming function (see page 5): There is a sub-alarm for the low-temper- ● On/off: Short push on the switch. ature sensor and an excess-alarm for the ● Stepless dimming: Long push on the high-temperature sensor. switch. With every other long push, the lights level goes the opposite direction.
-
Page 26: Defrosting, Cleaning And Maintenanc
Single-zone setting for long- term storage For long-term wine storage, the top and bot- tom sections should both be set at 12°C. With identical settings for the top and bot- tom sections, the controls will maintain an even temperature throughout the cabinet. However, the temperature in the room will gradually affect the temperature in the cabinet through its door and sides, creating... -
Page 27: Fault Finding
Fault finding Fault Possible cause Remedy The appliance is not The appliance is switched off. Press the on/off switch. working. Power failure; the fuse is blown; Check that power is connected. the appliance is not plugged in Reset the fuse. correctly. -
Page 28: Warranty, Spare Parts And Service
Warranty, spare parts and service Warranty disclaimer Spare parts Faults and damage caused directly or When ordering spare parts, please state indirectly by incorrect operation, misuse, the type, serial and product numbers of insufficient maintenance, incorrect building, your appliance. This information is given on installation or mains connection. -
Page 29: Disposal
Disposal For business users in the Euro- Information for Users on Collection and Disposal of Old Equipment and pean Union. If you wish to discard electrical and used Batteries electronic equipment, please contact These symbols on the products, your dealer or supplier for further packaging, and/or accompanying information. - Page 32 Ret til ændringer forbeholdes. Reserving the right to alter specifications without prior notice. 8060260 rev 02...
Need help?
Do you have a question about the FZ419W and is the answer not in the manual?
Questions and answers