
Related Manuals for Grasslin talento easy B1


Summary of Contents for Grasslin talento easy B1
- Page 1 Vor Beginn aller Arbeiten Anleitung lesen! Operating instructions ta le n to e a sy 16 (1 0) A 25 0V talento easy B1 – Weekly Timer Zeitschaltuhr Thermostat...
- Page 2 This manual ensures the safe and efficient use of the clock timer (referred to as “device” in the following). This manual is a component of the device and must remain accessible at all times for everyone who uses the device. Everyone who uses the device must have read and understood this manual before commencing any work.
-
Page 3: Table Of Contents
Overview ................63 Design and function .......................63 Operating modes ........................68 Safety ................... 70 Installation ................73 Configuration ............... 75 Initial commissioning......................75 Setting the date and time .......................76 Setting the time format ......................77 Setting the date format ......................78 Setting the first day of the week .....................79 Setting the time zone ......................80 Selecting summer/winter time ....................81 Selecting the operating mode ....................85... - Page 4 Creating a new holiday switching program ................110 Activating the holiday switching program ................111 Viewing the holiday switching program ................112 Modifying the holiday switching program ................113 Deleting the holiday switching program ................114 Deleting an individual holiday switching program ............114 Deleting all holiday switching programs ................115 Disposal ................
-
Page 5: Overview
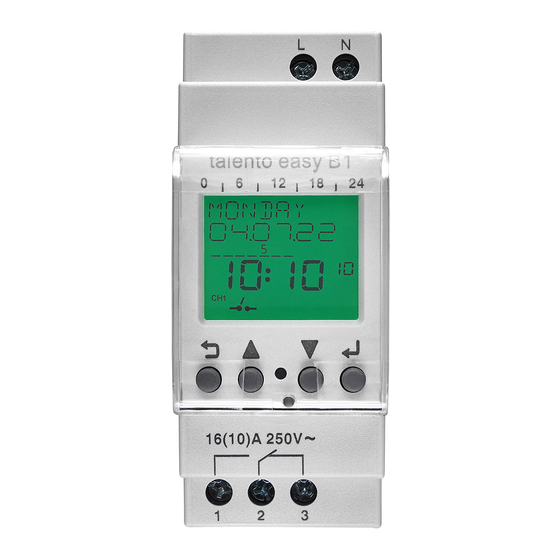
Overview Design and function ta le n to e a sy 16 (1 0) A 25 0V Fig. 1: Clock timer Click system for installation on a DIN rail Terminal for phase Terminal for neutral conductor Sealable housing Display Control buttons Terminal for relay output Description of function The clock timer is a timer that is installed on a DIN rail (Fig. 1/... - Page 6 Technical data (DIN EN 60730-1) Mode of operation Pollution degree Rated impulse voltage 4000 V The technical data for the devices described in this manual can be found at: https://graesslin.co.uk/product/talento-easy-b1/ Possible uses The following functions can be programmed on the clock timer: •...
- Page 7 Display and control elements talento easy B1 Fig. 2: Display layout Programmed switching times Day of the week or menu Date Day of the week Time Summer/winter Day/night Symbol bar Enter button Down button Reset button ...
- Page 8 ENTER • Make selection • Adopt RESET Hardware reset The settings are not deleted. Button combinations Symbol Designation Function ESC + UP Override mode Symbols (Fig. 2/ + 7 + Symbol Description Summer time Day time Night time Channel 1 The channel is switched on The channel is switched off Override mode active...
- Page 9 Menu structure Manual Program Clock Holiday Options Perm On Channel Status Date/Time Operating Hour Time Format Override On/Off View Multi function Date Format Perm Off View Modify Backlight Week Start Day Modify Delete Password Time Zone Delete Factory Restore Device Info Fig.
-
Page 10: Operating Modes
Operating modes Automatic mode In automatic mode, the channel is switched on or off based on the programmed switching times. For the description, see Chapter “Creating a new automatic switching program” on page 97 Pulse mode In pulse mode, the channel is switched on or off in short, programmed pulses (1 – 60 seconds). For the description, see Chapter “Creating a new pulse switching program”... - Page 11 Holiday mode With the holiday mode, the channel can be switched on or off for a defined period of time within one year. For the description, see Chapter “Creating a new holiday switching program” on page 110 Priorities When several programs are used, various switching commands can be present at the same time. There- fore, the channel is switched in accordance with the following priority: Permanently ON/permanently OFF/override Holiday mode ON...
-
Page 12: Safety
Safety Safety instructions Safety instructions are indicated in this manual by symbols. The safety instructions are introduced by signal words that express the extent of the danger. This combination of symbol and signal word indicates a potentially dangerous situation that may result in death or severe injuries if the situation is not avoided. - Page 13 Any use other than the intended use is considered incorrect use. The legal warranty is voided by any interference with, or modifications to, the device. Danger due to insufficient wire cross-section! If wires with an insufficiently large cross-section are used, short circuits or fires may occur. WARNING! −...
- Page 14 Personnel requirements Qualified electrician Professional training, knowledge and experience, and knowledge of the relevant standards and regu- lations allows the qualified electrician to perform work on electrical systems and to identify, and avoid, potential dangers of their own accord. A qualified electrician is specifically trained for the work environment in which they work, and are familiar with the relevant standards and regulations.
-
Page 15: Installation
Installation Connecting the electricity Life-threatening danger from electric shock! Improper assembly and installation of the device can lead to life-threatening electrical WARNING! voltages. − Only allow a qualified electrician to install and connect the device. Personnel: • Qualified electrician Materials: •... - Page 16 Fig. 5: Circuit diagram Connect the clock timer in accordance with the circuit diagram (Fig. 5).
-
Page 17: Configuration
Configuration Back-up battery Reduced power reserve in the back-up battery! After six years of storage without being connected to the mains, the back-up battery will be NOTE! fully discharged. Initial commissioning The programming of the clock timer may only be carried out after connecting it to an external power supply. -
Page 18: Setting The Date And Time
Setting the date and time CLOCK HOUR 21:48 DATE/TIME MINUTE 21:48 YEAR SAVED 21.10.12 MONTH 21.10.12 21.10.12 Fig. 6: Setting the date and time Press the button. Select and confirm with the button. CLOCK Select and confirm with the button. DATE/TIME Set the year and confirm with the button. -
Page 19: Setting The Time Format
Setting the time format CLOCK TIME FORMAT AM/PM SAVED Fig. 7: Setting the time format Press the button. Select and confirm with the button. CLOCK Select and confirm with the button. TIME FORMAT Select time format and confirm with the button. -
Page 20: Setting The Date Format
Setting the date format CLOCK DATE FORMAT MM.DD.YY SAVED Fig. 8: Setting the date format Press the button. Select and confirm with the button. CLOCK Select and confirm with the button. DATE FORMAT Select date format and confirm with the button. -
Page 21: Setting The First Day Of The Week
Setting the first day of the week CLOCK WEEK START DAY SUNDAY SAVED Fig. 9: Setting the first day of the week Press the button. Select and confirm with the button. CLOCK Select and confirm with the button. WEEK START DAY Select the first day of the week (Saturday to Sunday) and confirm with the button. -
Page 22: Setting The Time Zone
Setting the time zone CLOCK TIME ZONE TIME ZONE SAVED Fig. 10: Setting the time zone Press the button. Select and confirm with the button. CLOCK Select and confirm with the button. TIME ZONE Set the time zone and confirm with the button. -
Page 23: Selecting Summer/Winter Time
Selecting summer/winter time The summer/winter time (summer time = DST – Daylight Saving Time) can be automatically calculated in accordance with the following possible settings. The last entered setting has the top priority. In order to prevent accidental adjustments when changing the day, the time adjustment range is locked from 9.01 PM - 11.59 PM. - Page 24 Setting fixed summer time The change is carried out in accordance with the set date and time with an offset of 1 hour (corrective value). CLOCK START HOUR 02:00 START MINUTE 02:00 FIX DST END MONTH START MONTH END DAY START DAY SAVED Fig.
- Page 25 Setting customer-specific summer time The change is carried out in accordance with the set date and time. The offset range (corrective value) can be set from 1 minute to 2 hours. CLOCK START MINUTE 02:00 END MONTH CUSTOM DST END WEEK START MONTH SUNDAY START WEEK...
- Page 26 Setting summer time in accordance with the table of countries CLOCK EUROPE SAVED Fig. 14: Setting summer time in accordance with the table of countries Press the button. Select and confirm with the button. CLOCK Select and confirm with the button.
-
Page 27: Selecting The Operating Mode
Selecting the operating mode In this menu, different operating modes can be activated or deactivated. The last entered setting has the top priority. When the operating modes are deactivated, the clock timer is in automatic mode. Possible settings Permanently ON Channel is permanently switched on. - Page 28 Permanently OFF MANUAL MANUAL PERM OFF STOP PERM OFF Fig. 16: Permanently OFF operating mode Press the button. Select and confirm with the button. MANUAL Confirm with the button to start the permanently OFF operating mode. PERM OFF o end the permanently OFF operating mode, confirm with the button.
-
Page 29: Reading The Operating Hour Counter
Reading the operating hour counter Reading the operating hour counter OPTIONS OPERATING HOUR VIEW HOUR 00036h SINCE 10.04.21 Fig. 18: Reading the operating hour counter Press the button. Select and confirm with the button. OPTIONS Select and confirm with the button. - Page 30 Deleting the operating hour counter OPTIONS OPERATING HOUR DELETE DELETE ? NO/YES Fig. 19: Deleting the operating hour counter Press the button. Select and confirm with the button. OPTIONS Select and confirm with the button. OPERATING HOUR Select and confirm with the button.
- Page 31 Setting the service alarm It is possible to display an alarm message once a preset number of operating hours has been reached. OPTIONS OPERATING HOUR SERVICE 00200h Fig. 20: Setting the service alarm Press the button. Select and confirm with the button.
-
Page 32: Activating Multi Function
Activating multi function OPTIONS MULTI FUNCTION DISABLE/ENABLE SAVED Fig. 21: Activating multi function Press the button. Select and confirm with the button. OPTIONS Select and confirm with the button. MULTI FUNCTION Select whether or not multi function is to be activated and confirm with the button. -
Page 33: Setting The Backlight
Setting the backlight OPTIONS BACKLIGHT ONE MINUTE SAVED Fig. 22: Setting the backlight Press the button. Select and confirm with the button. OPTIONS Select and confirm with the button. BACKLIGHT Select the type of backlight and confirm with the button. Setting Effect The backlight of the display remains on for one minute after the last button press. -
Page 34: Setting A Password
Setting a password OPTIONS PASSWORD ENABLE/DISABLE PASSWORD 1234 SAVED Fig. 23: Setting a password Press the button. Select and confirm with the button. OPTIONS Select and confirm with the button. PASSWORD Select and confirm with the button. PASSWORD ENABLE Enter password and confirm with the button. -
Page 35: Restoring To Factory Settings
Restoring to factory settings All settings, apart from the date and time, will be restored to the original factory settings. OPTIONS FACTORY RESTORE RESTORE ? NO/YES DONE Fig. 24: Restoring to factory settings Press the button. Select and confirm with the button. - Page 36 Factory settings Setting Effect Time format 24 h Date format DD:MM:YY First day of the week Sunday Summer time No summer time Holiday mode Deactivated Multi function Deactivated Backlight 1 minute Password Deactivated...
-
Page 37: Device Information
Info Description Device name, XXXX = firmware version TALENTO EASY B1 XXXX Date of manufacture (date on which the firmware was installed on the device) MANUFACTURE ON Total time since manufacture that the device has been running in battery mode... -
Page 38: End Menu
End menu End menu appears in several places in the menu navigation, e.g. the main menu, program, clock, holiday and options. It is used to close the menu and return to the start screen. Fig. 26: End menu Press the button. -
Page 39: Programming
Programming The programming of the clock timer may only be carried out after connecting it to an external power supply. Creating a new switching program Up to 50 switching programs may be created. Creating a new automatic switching program Example The channel is switched on from 12:30 a.m. - Page 40 Select and confirm with the button. The automatically assigned program number will be displayed briefly. Select and confirm with the button. SWITCH is only displayed if multi function has been activated for automatic mode, cycle SWITCH mode and pulse mode (Ä Chapter “Activating multi function” on page 90). Start - select day(s) of the week on which the switching program is to be carried out and confirm with the button.
- Page 41 13. Select and confirm with the button. Selecting skips this function. WITH DATE YES Option Entry Result Program the clock timer without a date The switching commands are valid independently of the range. date. Program the clock timer with a date The switching commands are valid for the days or periods range.
- Page 42 Creating a new cycle switching program Cycle mode is only possible when multifunction is active (Ä Chapter “Activating multi func- tion” on page 90). 9:00 h 19:00 h Fig. 28: Example of a cycle switching program Components of a cycle switching command: •...
- Page 43 PROGRAM SUNDAY WITH DATE NO/YES _23456_ END HOUR START MONTH 06.-- 19:00 PRG NO END MINUTE START DAY 06.01 19:00 CYCLE CYCLE ON HOUR END MONTH 08.-- 00:00 SUNDAY CYCLE ON END DAY START MINUTE 09.30 _23456_ 00:10 START HOUR CYCLE OFF HOUR SAVED 00:00...
- Page 44 End - select day(s) of the week on which the switching program is to be ended and confirm with the button. The days of the week 1 – 7 are set by default. Individual days of the week can be set as follows: Days of the week can be selected with the button.
-
Page 45: Creating A New Cycle Switching Program
Creating a new pulse switching program Pulse mode is only possible when multifunction is active (Ä Chapter “Activating multi func- tion” on page 90). 15:00 h Fig. 30: Example of a pulse switching program Components of a pulse switching command: • (Fig. - Page 46 PROGRAM START HOUR START DAY 06.01 15:00 START MINUTE END MONTH 08.-- 15:00 PRG NO PULSE ON END DAY SECOND 09.30 CYCLE WITH DATE SAVED NO/YES SUNDAY START MONTH START 06.-- _23456_ Fig. 31: Creating a new pulse switching program Press the button.
- Page 47 End - select day(s) of the week on which the switching program is to be ended and confirm with the button. The days of the week 1 – 7 are set by default. Individual days of the week can be set as follows: Days of the week can be selected with the button.
-
Page 48: Viewing The Switching Program
Viewing the switching program PROGRAM VIEW PRG 01 SWITCH … Fig. 32: Viewing the switching program Press the button. Select and confirm with the button. PROGRAM Select and confirm with the button. VIEW Select program number and confirm with the button. - Page 49 Modifying the switching program PROGRAM MODIFY PRG 01 … SAVED Fig. 33: Modifying the switching program Press the button. Select and confirm with the button. PROGRAM Select and confirm with the button. MODIFY Select program number and confirm with the button.
-
Page 50: Modifying The Switching Program
Deleting the switching program DELETING AN INDIVIDUAL SWITCHING PROGRAM PROGRAM DELETE SINGLE DELETE PRG 01 DELETE NO/YES DONE Fig. 34: Deleting an individual switching program Press the button. Select and confirm with the button. PROGRAM Select and confirm with the button. -
Page 51: Deleting An Individual Switching Program
DELETING ALL SWITCHING PROGRAMS PROGRAM DELETE ALL DELETE DELETE NO/YES DONE Fig. 35: Deleting all switching programs Press the button. Select and confirm with the button. PROGRAM Select and confirm with the button. DELETE Select and confirm with the button. ALL DELETE Select whether or not all switching programs are to be deleted and confirm with the button. - Page 52 Creating a new holiday switching program Up to 10 switching programs may be created. The channel can be switched on or off for the duration of a holiday. The holiday program must be activated in order for it to be carried out, see Chapter “Activat- ing the holiday switching program”...
- Page 53 12. End date – select day and confirm with the button. 13. End time – select hours and confirm with the button. 14. Select end time – minutes and confirm with the button. – select to switch the channel to the set time period. ACTION ON Entry Result...
- Page 54 Viewing the holiday switching program HOLIDAY VIEW PRG 01 START DATE 21.06.15 … Fig. 38: Viewing the holiday switching program Press the button. Select and confirm with the button. PROGRAM Select and confirm with the button. VIEW Select program number and confirm with the button.
- Page 55 Modifying the holiday switching program PROGRAM MODIFY PRG 01 … SAVED Fig. 39: Modifying the holiday switching program Press the button. Select and confirm with the button. PROGRAM Select and confirm with the button. MODIFY Select program number and confirm with the button.
- Page 56 Deleting the holiday switching program DELETING AN INDIVIDUAL HOLIDAY SWITCHING PROGRAM PROGRAM DELETE SINGLE DELETE PRG 01 DELETE NO/YES DONE Fig. 40: Deleting an individual holiday switching program Press the button. Select and confirm with the button. PROGRAM Select and confirm with the button.
- Page 57 DELETING ALL HOLIDAY SWITCHING PROGRAMS PROGRAM DELETE ALL DELETE DELETE NO/YES DONE Fig. 41: Deleting all holiday switching programs Press the button. Select and confirm with the button. PROGRAM Select and confirm with the button. DELETE Select and confirm with the button.
- Page 58 Disposal Incorrect disposal presents an environmental danger. Incorrect disposal could result in environmental dangers. ENVIRONMENTAL − Correct disposal helps to protect the environment and prevents humans and the envi- PROTECTION! ronment from potential harm. When disposing of the device, the pertinent legal requirements must be observed. Information regarding the disposal of electrical and electronic devices within the Euro- pean Union: Within the European Union, the disposal of electrically powered appliances is governed by...
- Page 60 Grässlin Zeitschalttechnik GmbH Leopoldstr.1 78112 St. Georgen Germany +49 7724 933-0 +49 7724 933-240 info@graesslin.de www.graesslin.de 80.11.1556.7/1121/V01...
Need help?
Do you have a question about the talento easy B1 and is the answer not in the manual?
Questions and answers