Calphalon BLCLMB3 - PRECISION CONTROL BLENDER MANUAL
- Instruction manual (12 pages)
Advertisement
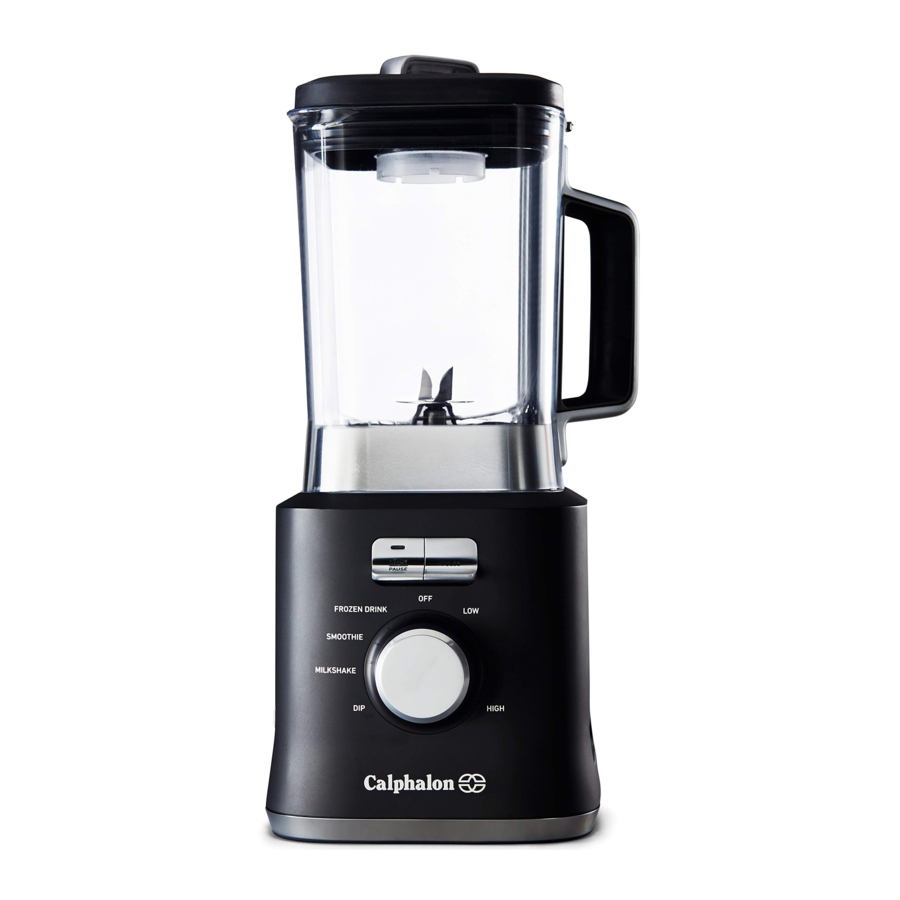
PRODUCT DIAGRAM

- Filler Cap*
- Jar Lid*
- 1.5 Liter Blending Jar*
Blade Assembly
- Locking Sealing Ring*
- Two-way Blade*
- Threaded Jar Bottom*
- Motor Base
- Start/Pause and Pulse Buttons
- Programmed Setting/Speed Dial
- LED Lights Indicator
*These parts can be replaced on calphalon.com or at 1-800-809-7267
PREPARING YOUR PRECISION CONTROL BLENDER FOR USE
NOTE: Always ensure the appliance is OFF before plugging in.
- Before you use your Precision Control Blender, remove all packaging.
- Separate the lid, filler cap and blade from the jar. Wash in warm, soapy water, or top rack in the dishwasher. Rinse and dry well.
- Place the appliance on a flat surface and do not put anything on top of it.
- Never immerse the motor base, power cord or plug in water or any other liquid.
![]()
Blade is sharp. Handle with care.
HOW TO USE YOUR PRECISION CONTROL BLENDER
- Place Blade into Threaded Jar Bottom.
- Place Locking Sealing Ring into Threaded Jar Bottom, on top of blade. Carefully press and tuck sealing ring into locking groove.
- Ensure the Locking Sealing Ring is fully and evenly tucked in place and holding the blade assembly to the threaded jar bottom.
- Install the Blade Assembly onto the Blending Jar by inserting (blade first) into the bottom of the Blending Jar and turning clockwise to tighten.
- Be sure the Blade Assembly is tightened to the Blending Jar before using.
- Put the ingredients into the Blending Jar.
- Secure the Lid and Filler Cap before placing the Blending Jar onto the Motor Base.
- Place the Blending Jar onto the base.
- Plug the power cord into a standard household outlet.
- Turn the Programmed Setting and Speed Dial to desired programmed setting or speed.
- Press Start /Pause, Pulse, or Reverse Pulse for desired function
NOTE: Always place hand on Jar Lid while operating blender.
USING THE PRE-PROGRAMMED SETTINGS
Your Precision Control blender contains four PROGRAMMED SETTINGS. These programmed settings vary in blending speed and duration. Refer to the table below for accurate blending duration.
| Programmed settings | Blending Duration |
| DIP | 27 seconds |
| MILKSHAKE | 34 seconds |
| SMOOTHIE | 1 minute 8 seconds |
| FROZEN DRINKS | 53 seconds |
- To use a programmed setting (Frozen Drink, Smoothie, Milkshake, Dip), turn the Programmed Setting and Speed Dial to desired setting and then press the START/PAUSE button. When the selected program is finished, the blender will stop.
- To pause selected programmed setting cycle before completion, press START/PAUSE.
- To change your selection, press the Start/Pause Button to pause blending cycle and turn the Programmed Setting and Speed Dial to the desired setting or blending speed.
USING THE MANUAL SETTINGS
Your Precision Control blender contains four MANUAL SETTINGS. These manual settings vary in blending speed from LOW to HIGH.
- To use THE MANUAL SETTINGS, turn the Programmed Setting and Speed Dial to the desired speed (LOW to HIGH) and press the START/PAUSE button.
- To stop the blending cycle, press the START/PAUSE button again.
USING THE PULSE FUNCTION
- Use PULSE button to crush ice or chop food.
- To use the PULSE function, turn the Programmed Setting and Speed Dial to the desired speed (LOW -HIGH). Press the PULSE button to activate the blender. Release the PULSE button to stop.
NOTE: To turn off the Precision Control Blender, turn the Programmed Setting and Speed Dial to the OFF position. This appliance is pre-programmed to turn off automatically if not used for several minutes. All lights will turn off when the unit automatically powers down.
CLEANING & MAINTENANCE

Blades are sharp. Handle carefully.
- CAREFULLY release the blade from the Blending Jar by turning the threaded jar bottom counterclockwise.
- Filler cap can be used as a tool to hold the jar bottom for better grip while unscrewing. The bottom of the filler cap will mesh with the center of the jar bottom and act as handle.
- The Blending Jar, Jar Lid, Filler Cap, Blade Assembly are dishwasher safe. Use the top rack of the dishwasher for Jar Lid, Filler Cap, and Blade Assembly. Place sealing ring into bottom basket of dishwasher.
- You can also wash the parts in warm, soapy water. Rinse well and dry. Wipe the base with a soft, damp cloth to clean.
Never submerge the blender base in a liquid.
TIP: Run blender with soapy water for 20-30 seconds at Low or Medium Speed for cleaning without disassembly. Follow with clean water rinse.
This appliance has no user serviceable parts. Any servicing beyond that described in the Cleaning Section should be performed by an Authorized Service Representative only. See Warranty Section.
TROUBLESHOOTING
| Threaded Jar bottom leaking | Ensure that the rubber gasket is on top side of blade assembly and that is tucked in all the way down against the metal surface. |
| Threaded Jar bottom leaking | Ensure that the threaded jar bottom is tight. |
| Threaded Jar bottom difficult to remove | Use filler cap as a tool to hold the jar bottom for better grip while unscrewing. The bottom of the filler cap will mesh with the center of the jar bottom and act as handle. |
| Blender not operating, no lights showing | Ensure blender is plugged in to a powered outlet. Turn knob to desired speed setting and press start/pause button. Blender changes from desired setting to off position – Turn knob to desired speed setting. The blender will automatically return to off position when left unattended for a period of time. |
| Pulse speed is low | Select desired manual speed setting before pushing pulse button. |
IMPORTANT SAFEGUARDS
When using electrical appliances, basic safety precautions should always be followed to reduce the risk of fire, electric shock, and/or injury to persons including the following:
- Read all instructions before using this product.
- To protect against electric shock, do not place or immerse cord, plugs, or appliance in water or other liquid.
- This appliance is not to be used by children or by persons with reduced physical, sensory or mental capabilities. Keep the appliance and its cord out of reach of children.
- Close supervision is necessary when any appliance is used near children. Children should not play with the appliance.
- Never leave appliance unattended when in use.
- Unplug from outlet when not in use, before putting on or taking off parts and before cleaning. Allow to cool before putting on or taking off parts, and before cleaning. To disconnect, turn any control to OFF, then unplug power cord from outlet. Do not disconnect by pulling on cord.
- Do not operate any appliance with a damaged cord or plug or after the appliance malfunctions, or has been damaged in any manner. Do not attempt to replace or splice a damaged cord. Return appliance to the manufacturer (see warranty) for examination, repair or adjustment.
- For appliances with markings on plug blade: This appliance has important markings on the plug blade. The attachment plug or entire cord set (if plug is molded onto cord) is not suitable for replacement. If damaged, the appliance shall be replaced.
- The use of attachments, including canning jars, not recommended or sold by the manufacturer may cause fire, electric shock or injury.
- Do not use outdoors or for commercial purposes.
- Do not let cord hang over edge of table or counter, or touch hot surfaces, including the stove.
- Keep hands and utensils out of container while blending to reduce the risk of severe injury to persons or damage to the blender. A scraper may be used but must be used only when the blender is not running.
- Blades are sharp. Handle carefully, especially when removing the blades from the container, emptying the container and during cleaning.
- To reduce the risk of injury, never place cutter-assembly blades on base without jar properly attached.
- Always hold container while operating the appliance. If the container should turn when the motor is turned ON, switch appliance OFF immediately and tighten the container in the threaded bottom.
- Always operate blender with cover in place. Always wait until all moving parts have stopped before removing any lid or cover.
- When blending hot liquids, remove center piece of two-piece cover (if a two-piece cover is provided). Beware of steam. Do not blend boiling liquids.
- Do not use appliance for other than intended use. Misuse can cause injuries. Always use appliance on a dry, stable, level surface. Never fill beyond the MAX fill line.
- If your blender comes with a grounded plug, connect to properly grounded outlets only. For containers with no lids or vents (when inserted in the blender), such as personal Blend and Go containers:
- Do not blend carbonated, hot or boiling liquids and ingredients, as this may create pressure buildup. Only blend non-carbonated liquids and ingredients that are at room temperature or cooler. If the container is warm to the touch, allow to cool before opening.
- Do not use the blender for longer than 1 minute at a time to avoid heat and pressure buildup. Allow to cool for 1 minute between cycles.
SAVE THESE INSTRUCTIONS
HOUSEHOLD USE ONLY
POWER CORD INSTRUCTIONS
A short power-supply cord or detachable power-supply cord is provided to reduce risks resulting from becoming entangled in or tripping over a longer cord. Longer detachable power-supply cords or extension cords are available and may be used if care is exercised in their use. If a long detachable power-supply cord or extension cord is used on short-cord models:
- The marked electrical rating of the detachable power-supply cord or extension cord should be at least as great as the electrical rating of the appliance;
- W hen the product is of the grounded type, the extension cord shall be a grounding type 3-wire cord; and
- T he longer cord should be arranged so that it will not drape over the counter top or table top where it can be pulled on by children or tripped over unintentionally.
Do not pull, twist or otherwise abuse the power cord.
Do not wrap the power cord around the main body of the blender during or after use.
POLARIZED PLUG

This appliance has a polarized plug, (one blade is wider than the other). As a safety feature to reduce the risk of electrical shock, this plug is intended to fit in a polarized outlet only one way. If the plug does not fit fully in the outlet, reverse the plug. If it still does not fit, contact a qualified electrician. Do not attempt to defeat this safety feature or modify the plug in any way. If the plug fits loosely into the AC outlet or if the AC outlet feels warm do not use that outlet.

Documents / ResourcesDownload manual
Here you can download full pdf version of manual, it may contain additional safety instructions, warranty information, FCC rules, etc.
Download Calphalon BLCLMB3 - PRECISION CONTROL BLENDER MANUAL
Advertisement


Need help?
Do you have a question about the BLCLMB3 and is the answer not in the manual?
Questions and answers