Table of Contents
Advertisement
Available languages
Available languages
Quick Links
Advertisement
Chapters
Table of Contents

Related Manuals for Asus Essentio CG8250


Summary of Contents for Asus Essentio CG8250
- Page 1 ASUS Essentio Desktop PC CG8250 User Manual...
- Page 2 Product warranty or service will not be extended if: (1) the product is repaired, modified or altered, unless such repair, modification of alteration is authorized in writing by ASUS; or (2) the serial number of the product is defaced or missing.
-
Page 3: Table Of Contents
Contents Notices ......................v Safety information ..................vii Conventions used in this guide ..............viii Where to find more information ..............viii Package contents ..................ix Chapter 1 Getting started Welcome! ....................1-1 Getting to know your computer ..............1-1 Setting up your computer ................1-5 Turning your computer ON/OFF .............. - Page 4 Contents Chapter 6 Using the Utilities ASUS AI Suite II ..................6-1 ASUS AI Manager ..................6-10 Nero 9 ..................... 6-15 Recovering your system ................6-19 Chapter 7 Troubleshooting Troubleshooting ..................7-1...
-
Page 5: Notices
Complying with the REACH (Registration, Evaluation, Authorisation, and Restriction of Chemicals) regulatory framework, we published the chemical substances in our products at ASUS REACH website at http://green.asus.com/english/REACH.htm Federal Communications Commission Statement This device complies with Part 15 of the FCC Rules. Operation is subject to the following two conditions: •... - Page 6 RF exposure warning This equipment must be installed and operated in accordance with provided instructions and the antenna(s) used for this transmitter must be installed to provide a separation distance of at least 20 cm from all persons and must not be co-located or operating in conjunction with any other antenna or transmitter.
-
Page 7: Safety Information
Safety information Disconnect the AC power and peripherals before cleaning. Wipe the Desktop PC using a clean cellulose sponge or chamois cloth dampened with solution of nonabrasive detergent and a few drops of warm water then remove any extra moisture with a dry cloth. DO NOT place on uneven or unstable work surfaces. -
Page 8: Conventions Used In This Guide
Refer to the following sources for additional information and for product and software updates. ASUS websites The ASUS website provides updated information on ASUS hardware and software products. Refer to the ASUS website www.asus.com. ASUS Local Technical Support Visit ASUS website at http://support.asus.com/contact for the contact information of local Technical Support Engineer. -
Page 9: Package Contents
Package contents ASUS Essentio Desktop PC Keyboard x1 Mouse x1 Power cord x1 Support DVD x1 Recovery DVD x1 Nero 9 burning software Installation Guide x1 Warranty card x1 DVD x1 • If any of the above items is damaged or missing, contact your retailer. -
Page 11: Chapter 1 Getting Started
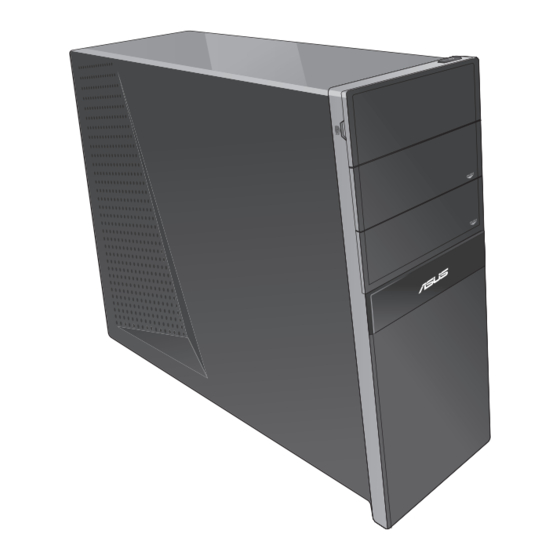
All these values are encapsulated in a stunningly futuristic and stylish system casing. Read the ASUS Warranty Card before setting up your ASUS Desktop PC. Getting to know your computer Illustrations are for reference only. The ports and their locations, and the chassis color vary with different models. - Page 12 Power button. Press this button to turn on your computer. Secure Digital™ / MultiMediaCard slot. Insert a Secure Digital™ card or MultiMediaCard into this slot. CompactFlash / Microdrive™ card slot. Insert a CompactFlash / Microdrive™ card ® ® into this slot. Memory Stick™...
- Page 13 LAN (RJ-45) port. This port allows Gigabit connection to a Local Area Network (LAN) through a network hub. LAN port LED indications ACT/LINK SPEED Activity/Link LED Speed LED Status Description Status Description No link 10Mbps connection ORANGE Linked ORANGE 100Mbps connection BLINKING Data activity GREEN 1Gbps connection LAN port ASUS CG8250...
- Page 14 – – Side Speaker Out ASUS Graphics Card (on selected models only). The display output ports on this optional ASUS Graphics Card may vary with different models. Expansion slot bracket. Remove the expansion slot bracket when installing an expansion card.
-
Page 15: Setting Up Your Computer
Connecting an external monitor Using the ASUS Graphics Card (on selected models only) Connect your monitor to the display output port on the discrete ASUS Graphics Card. To connect an external monitor using the ASUS Graphics Card: Connect a monitor to a display output port on the ASUS Graphics Card. - Page 16 HDMI monitor to the HDMI port on the rear panel of your computer. Plug the monitor to a power source. • If your computer comes with an ASUS Graphics Card, the graphics card is set as the primary display device in the BIOS. Hence, connect your monitor to a display output port on the graphics card.
- Page 17 Connect a USB keyboard and a USB mouse to the USB ports on the rear panel of your computer. Connecting the power cord Connect one end of the power cord to the power connector on the rear panel of your computer and the other end to a power source. ASUS CG8250...
-
Page 18: Turning Your Computer On/Off
Turning your computer ON/OFF This section describes how to turn on/off your computer after setting up your computer. Turning your computer ON To turn your computer ON: Turn your monitor ON. Turn the power switch ON, then press the power button on your computer. Power button Wait until the operating system loads automatically. -
Page 19: Chapter 2 Using Windows
Select Use recommended settings or Install important updates only to set up the security settings for your computer. To skip this step, select Ask me later. Review your date and time settings. Click Next. The system loads the new settings and restarts. You may now start using your computer. ASUS CG8250... - Page 20 Using Windows 7 desktop ® Click the Start icon > Help and Support to obtain more information about Windows ® Start menu Notification area Taskbar Using the Start menu The Start menu gives you access to programs, utilities, and other useful items on your computer.
- Page 21 Click the icon again to hide the ® program. You may pin programs that you want constantly displayed on the taskbar. For more details, refer to the section Pinning programs on the Start menu or taskbar on this chapter. ASUS CG8250...
- Page 22 Pinning items on the jumplists When you right-click an icon on the taskbar, a jumplist launches to provide you with quick-access to the program’s or item’s related links.You may pin items on the jumplist such as favorite websites, often-visited folders or drives, or recently played media files.
- Page 23 Click this icon to adjust the volume. Displaying an alert notification To display an alert notification: • Click the Notification icon , then click the message to open it. For more details, refer to the section Using Windows Action Center in this chapter. ® ASUS CG8250...
- Page 24 Customizing icons and notifications You may choose to display or hide the icons and notifications on the taskbar or on the notification area. To customize icons and notifications: From the notification area, click on the arrow icon Click Customize. From the dropdown list, select the behaviors for the icons or items that you want customize.
-
Page 25: Managing Your Files And Folders
Exploring files and folders To explore files and folders: Launch Windows Explorer. From the navigation or view pane, browse for the location of your data. From the breadcrumb bar, click the arrow to display the contents of the drive or folder. ASUS CG8250... - Page 26 Customizing the file/folder view To customize the file/folder view: Launch Windows Explorer. From the navigation pane, select the location of your data. From the toolbar, click the View icon From the View menu, move the slider to select how you want to view the file/folder.
- Page 27 Adding a new folder To add a new folder: Launch Windows Explorer. From the toolbar, click New folder. Key in a name for the new folder. You may also right-click anywhere on the View pane, click New > Folder. ASUS CG8250...
-
Page 28: Restoring Your System
Backing up your files Setting up a backup To set up a backup: > All Programs > Maintenance > Backup and Restore. Click Click Set up backup. Click Next. Select your backup destination. Click Next. Select Let Windows choose (recommended) or Let me choose as your backup mode. -
Page 29: Protecting Your Computer
® To launch Windows 7 Action Center: ® To launch Windows 7 Action Center, click , then click Open the Notification icon Action Center. From Windows 7 Action Center, click the task that you want to do. ASUS CG8250 2-11... - Page 30 Using Windows Update ® Windows Update allows you to check and install the latest updates to enhance the security and performance of your computer. Launching Windows Update ® To launch Windows Update: ® From the Windows taskbar, click the Start icon to launch the Start menu.
- Page 31 From the Windows taskbar, click ® Select Manage another account. Select Create a new account. Key in the name of the new user. Select either Standard user or Administrator as the user type. When done, click Create Account. ASUS CG8250 2-13...
- Page 32 Setting up a user’s password To set up a user’s password: Select the user that you would like to set a password. Select Create a password. Key in a password and confirm it. Key in your password’s hint. When done, click Create password. 2-14 Chapter 2: Using Windows ®...
-
Page 33: Getting Windows ® Help And Support
Help and Support provides you with guides and answers in using the applications ® in Windows 7 platform. ® > Help and Support. To launch Windows Help and Support, click ® Ensure that you are connected to the Internet to obtain the latest Windows online help. ® ASUS CG8250 2-15... - Page 34 2-16 Chapter 2: Using Windows ®...
-
Page 35: Chapter 3 Connecting Devices To Your Computer
When the Safe to Remove Hardware message pops up, remove the USB storage device from your computer. DO NOT remove a USB storage device when data transfer is in progress. Doing so may cause data loss or damage the USB storage device. ASUS CG8250... -
Page 36: Connecting Microphone And Speakers
Connecting microphone and speakers This desktop PC comes with microphone ports and speaker ports on both the front and rear panels. The audio I/O ports located on the rear panel allow you to connect 2-channel, 4-channel, 6-channel, and 8-channel stereo speakers. Connecting Headphone and Mic Connecting 2-channel Speakers Chapter 3: Connecting devices to your computer... - Page 37 Connecting 4-channel Speakers Connecting 6-channel Speakers ASUS CG8250...
- Page 38 Connecting 8-channel Speakers Chapter 3: Connecting devices to your computer...
-
Page 39: Connecting Multiple External Displays
Refer to Setting up your computer section in Chapter 1 for details on how to connect a monitor to your computer. For some graphic cards, only the monitor that is set to be the primary display has display during POST. The dual display function works only under Windows. ASUS CG8250... - Page 40 Turn on your computer. Do any of the following to open the Screen Resolution setting screen: > Control Panel > Appearance and Personalization > Display > • Click Change display settings. • Right click anywhere on your Windows desktop. When the pop-up menu appears, click Personalize >...
-
Page 41: Connecting An Hdtv
Connect a High Definition TV (HDTV) to the HDMI port of your computer. • You need an HDMI cable to connect the HDTV and the computer. The HDMI cable is purchased separately. • To get the best display performance, ensure that your HDMI cable is less than 15 meters. ASUS CG8250... - Page 42 Chapter 3: Connecting devices to your computer...
-
Page 43: Chapter 4 Using Your Computer
• Use your Desktop PC in a comfortably-lit area, and keep it away from sources of glare such as windows and straight sunlight. • Take regular mini-breaks from using your Desktop PC. ASUS CG8250... -
Page 44: Using The Memory Card Reader
Using the memory card reader Digital cameras and other digital imaging devices use memory cards to store digital picture or media files. The built-in memory card reader on the front panel of your system allows you to read from and write to different memory card drives. To use the memory card: Insert the memory card into the card slot. -
Page 45: Using The Optical Drive
While the system is on, do either of the following to eject the tray: • Press the eject button below the drive bay cover. Right-click the CD/DVD drive icon on the Computer screen, and then click Eject. • Remove the disc from the disc tray. ASUS CG8250... -
Page 46: Using The Multimedia Keyboard (On Selected Models Only)
Using the multimedia keyboard (on selected models only) The keyboard varies with models. The illustrations on this section are for reference only. ASUS SK-2045 keyboard 10 11 12 13 14 15 16 17 Keys Description Keys Description Launches Windows gadgets. - Page 47 ASUS-Razer Arctosa Gaming keyboard Keys Description Plays or pauses playback in a media player. Stops playback in a media player. Goes to the previous track in a media player. Goes to the next track in a media player. Decreases the system volume.
- Page 48 BTC 6200C keyboard 2 3 4 5 6 7 8 9 10 11 12 13 Keys Description Keys Description Enters into sleep mode. Press any key Increases the system volume. to wake up your computer and return to the previous working status. Returns to the last page you viewed.
- Page 49 ASUS PRIMAX/KB2621 keyboard Keys Description Increases the system volume. Turns the volume’s mute mode on/off. Increases the system volume. Goes to the previous track in a media player. Plays or pauses playback in a media player. Goes to the next track in a media player.
- Page 50 Chapter 4: Using your computer...
-
Page 51: Chapter 5 Connecting To The Internet
DSL/cable modem. Modem RJ-45 cable Turn on the DSL/cable modem and your computer. Configure the necessary Internet connection settings. Contact your Internet Service Provider (ISP) for details or assistance in setting up your Internet connection. ASUS CG8250... - Page 52 Connecting via a local area network (LAN) To connect via a LAN: Connect one end of an RJ-45 cable to the LAN (RJ-45) port on the rear panel of your computer and the other end to your LAN. RJ-45 cable Turn on your computer.
-
Page 53: Asus Ai Suite Ii
Recovery Partition feature to create the Support DVD and Recovery DVD. For details, refer to Recovering your system in this chapter. ASUS AI Suite II ASUS AI Suite II is an all-in-one interface that integrates several ASUS utilities and allows users to launch and operate these utilities simultaneously. Installing AI Suite II To install AI Suite II: Place the support DVD in the optical drive. - Page 54 The Tool menu The Tool menu includes the EPU, Probe II, and Sensor Recorder panels. Launching EPU EPU is an energy-efficient tool that provides you with a total power-saving solution. It detects the current loading and intelligently adjusts the power usage in real-time. When you select the Auto mode, the system changes modes automatically according to the current system status.
- Page 55 The Preference tab allows you to customize the time interval of sensor alerts, or • change the temperature unit. Saves your configuration Loads your saved Applies your Loads the default configuration changes threshold values for each sensor ASUS CG8250...
- Page 56 Launching and configuring Sensor Recorder Sensor Recorder allows you to monitor the changes in the system voltage, temperature, and fan speed, as well as recording the changes. To launch Sensor Recorder: Click Tool > Sensor Recorder on the AI Suite II main menu bar. •...
- Page 57 The CPU Frequency panel displays the current CPU frequency and CPU usage. To launch CPU frequency: Click Monitor > CPU Frequency on the AI Suite II main menu bar. • Resident in the right pane (system information area) Sensor panel CPU Frequency panel ASUS CG8250...
- Page 58 BIOS and the BIOS boot logo with the ASUS designed update utilities ASUS Update The ASUS Update is a utility that allows you to manage, save, and update the motherboard BIOS in Windows OS. The ASUS Update utility allows you to update the BIOS directly ®...
- Page 59 Follow the onscreen instructions to complete the update process. Updating the BIOS through a BIOS file To update the BIOS through a BIOS file: From the ASUS Update screen, select Update BIOS from file, then click Next. Locate the BIOS file from the Open window, click Open, and click Next.
- Page 60 The System Information screen The System Information screen displays the information about the motherboard, CPU, and memory slots. Click the MB tab to see the details on • the motherboard manufacturer, product name, version, and BIOS. Click the CPU tab to see the details on •...
- Page 61 • Application allows you to select the application that you want to enable. • Bar allows you to modify the bar setting, • Skin allows you to customize the interface’s contrast, brightness, saturation, hue, and gamma. ASUS CG8250...
-
Page 62: Asus Ai Manager
ASUS AI Manager ASUS AI Manager is a utility which gives you quick and easy access to frequently-used applications. Installing AI Manager To install AI Manager: Place the support DVD in the optical drive. If Autorun is enabled, the Drivers installation wizard appears. - Page 63 AI Manager quick bar The AI Manager quick bar saves the desktop space and allows you to launch the ASUS utilities or display system information easily. Click any of the Main, My Favorites, Support or Information tab to display the menu’s contents.
- Page 64 AI Security AI Security enables you to set a password to secure your devices, such as USB flash disks and CD/DVD disks, from unauthorized access. To lock a device: When using AI Security for the first time, you are asked to set a password. Key in a password with at most 20 alphanumeric characters.
- Page 65 Click Open on the file location window. The application is added to My Favorites list. Right click on the application icon to launch, delete, or rename the selected application. You can also double click to launch the selected application. ASUS CG8250 6-13...
- Page 66 Support Click any links on the Support window to go to the ASUS website, technical support website, download support website, or contact information. Information Click the tab on the Information window to see the detailed information about your system, motherboard, CPU, BIOS, installed device(s), and memory.
-
Page 67: Nero 9
Insert the Nero 9 DVD into your optical drive. If Autorun is enabled, the main menu appears automatically. If Autorun is disabled, double-click the SeupX.exe file from the main directory of your Nero 9 DVD. From the main menu, click Nero 9 Essentials. ASUS CG8250 6-15... - Page 68 Select the language you want to use for Installation Wizard. Click Next. Click Next to continue. Tick I accept the License Conditions. When done, click Next. 6-16 Chapter 6: Using the Utilities...
- Page 69 Select Typical then click Next. Tick Yes, I want to help by sending anonymous application data to Nero then click Next. When done, click Exit. ASUS CG8250 6-17...
- Page 70 Burning files To burn files: From the main menu, click Data Burning > Add. Select the files that you want to burn. When done, click Add. 6-18 Chapter 6: Using the Utilities...
-
Page 71: Recovering Your System
DO NOT delete the partition named RECOVERY. The Recovery Partition is created at the factory and cannot be restored if deleted. Take your Desktop PC to an authorized ASUS service center if you have problems with the recovery process. Using the Recovery Partition: Press <F9>... - Page 72 This feature allows you to make a backup copy of the support DVD. Follow the onscreen instructions to complete the recovery process. Visit the ASUS website at www.asus.com for updated drivers and utilities. Using the Recovery DVD (on selected models) Prepare 1~3 blank writable DVDs as instructed to create the Recovery DVD.
-
Page 73: Chapter 7 Troubleshooting
• Connect the external antennas (optional) to the antenna connectors on the ASUS WLAN Card and place the antennas on the top of your computer chassis for the best wireless performance. The arrow keys on the number key pad are not working. - Page 74 No display on the monitor. • Check if the monitor is powered on. • Ensure that your monitor is properly connected to the video output port on your computer. • If your computer comes with a discrete graphics card, ensure that you connect your monitor to a video output port on the discrete graphics card.
- Page 75 Check if the disc is centered in the tray, especially for the discs with non-standard size or shape. • Check if the disc is scratched or damaged. The DVD drive eject button is not respond. > Computer. Click , then click Eject from the menu. Right-click ASUS CG8250...
- Page 76 Power Problem Possible Cause Action • Set your computer’s power voltage switch to your area’s power requirements. Incorrect power voltage • Adjust the voltage settings. Ensure that the power cord is unplugged from the power outlet. No power Press the power key on the front panel (The power Your computer is not to ensure that your computer is turned...
- Page 77 Ensure the LAN LED is on. If not, try another LAN cable. If it still does LAN cable problems not work, contact the ASUS service center. Your computer is not Ensure that your computer is properly Cannot access properly connected to a connected to a router or hub.
- Page 78 Computer virus attack computer. • Reinstall the operating system. • Send the damaged hard disk drive to ASUS Service Center for Hard disk drive failure servicing. • Replace with a new hard disk drive. • Replace with compatible memory modules.
- Page 79 If the problem still persists, refer to your Desktop PC’s warranty card and contact the ASUS Service Center. Visit the ASUS Support site at http://support.asus.com for the service center information.
- Page 80 Chapter 7: Troubleshooting...
- Page 81 PC desktop ASUS Essentio CG8250 Manual de utilizare...
- Page 82 Product warranty or service will not be extended if: (1) the product is repaired, modified or altered, unless such repair, modification of alteration is authorized in writing by ASUS; or (2) the serial number of the product is defaced or missing.
- Page 83 Cuprins Note ......................v Informaţii pentru utilizarea în condiţii de siguranţă ........vii Convenţii utilizate în acest ghid ..............viii Unde puteţi găsi informaţii suplimentare ............viii Conţinutul ambalajului ...................ix Capitolul 1 Noţiuni de bază Bun venit! ....................1-1 Cunoaşterea computerului ................1-1 Configurarea computerului .................
- Page 84 Cuprins Capitolul 6 Folosirea utilitarelor ASUS AI Suite II ..................6-1 ASUS AI Manager ..................6-10 Nero 9 ..................... 6-15 Recuperarea sistemului ................6-19 Capitolul 7 Depanarea Depanarea ....................7-1...
-
Page 85: Note
Pentru a ne conforma cadrului normativ REACH (Registration, Evaluation, Authorisation, and Restriction of Chemicals), am publicat lista de substanţe chimice din produsele noastre pe site-ul Web ASUS REACH la adresa http://green.asus.com/english/REACH.htm. Declaraţia Comisiei federale de comunicaţii Acest dispozitiv este în conformitate cu Partea 15 a Regulilor FCC. Funcţionarea este supusă... - Page 86 Avertizare privind expunerea la emisii în RF Acest echipament trebuie instalat şi utilizat în conformitate cu instrucţiunile furnizate, iar antena utilizată pentru acest transmiţător trebuie instalată astfel încât să asigure o separare de cel puţin 20 cm faţă de persoane şi nu trebuie să fie amplasată sau să funcţioneze împreună...
-
Page 87: Informaţii Pentru Utilizarea În Condiţii De Siguranţă
Informaţii pentru utilizarea în condiţii de siguranţă Deconectaţi alimentarea c.a. şi echipamentele periferice înainte de curăţare. Ştergeţi PC-ul desktop cu un burete din celuloză curat sau cu piele de căprioară îmbibată într-o soluţie neabrazivă de curăţare şi câteva picături de apă caldă şi îndepărtaţi umezeala în exces cu NU aşezaţi produsul pe suprafeţe de lucru neregulate sau instabile. -
Page 88: Convenţii Utilizate În Acest Ghid
Consultaţi următoarele surse pentru informaţii suplimentare şi pentru actualizări de produse şi software-uri. Site-urile Web ASUS Site-urile Web ASUS oferă informaţii actualizate despre produsele hardware şi software ASUS. Consultaţi site-ul Web ASUS www.asus.com. Asistenţă tehnică locală ASUS Vizitaţi site-ul Web ASUS de la adresa http://support.asus.com/contact pentru informaţii privind contactarea inginerilor de asistenţă... -
Page 89: Conţinutul Ambalajului
Conţinutul ambalajului PC desktop ASUS Essentio Tastatură x 1 Mouse x1 Cablu de alimentare x 1 DVD de instalare x1 DVD de recuperare x1 DVD software de Ghid de instalare x 1 Certificat de garanţie x 1 inscripţionare Nero 9 x 1 •... -
Page 91: Capitolul 1
şi utilitare centrate pe utilizator. Toate aceste elemente valoroase sunt încorporate într-o carcasă futuristă şi elegantă. Înainte de a configura PC-ul desktop ASUS, citiţi Certificatul de garanţie ASUS. Cunoaşterea computerului Ilustraţiile au doar rol exemplificativ. Porturile, amplasarea lor şi culoarea şasiului variază în funcţie de model. - Page 92 Buton de alimentare. Buton de alimentare. Apăsaţi pe acest buton pentru a porni computerul. Slot pentru card Secure Digital™/MultiMediaCard. În acest slot puteţi introduce un card Secure Digital™/MultiMediaCard. Slot pentru card CompactFlash®/Microdrive™. Slot pentru card CompactFlash®/Microdrive™. În acest slot puteţi introduce un card CompactFlash®/Microdrive™.
- Page 93 LED ACT/ LED activitate/conexiune LED viteză CONEX VITEZĂ Stare Descriere Stare Descriere STINS Absenţă STINS Conexiune de 10 Mbps conexiune PORTOCALIU Conexiune Conexiune de 100 Mbps prezentă APRINDERE Activitate de VERDE Conexiune de 1 Gbps Portul LAN date ASUS CM8250...
- Page 94 – Ieşire difuzor lateral Placă grafică ASUS �numai la anumite modele�. Porturile de ieşire pentru afişare de pe această placă grafică ASUS opţională pot diferi în funcţie de model. Capac pentru slot de extindere. Îndepărtaţi capacul slotului de extindere atunci când instalaţi o placă...
-
Page 95: Configurarea Computerului
Pentru a conecta un monitor extern utilizând placa grafică ASUS: Conectaţi monitorul la un port de ieşire pentru afişare al plăcii grafice ASUS separate. Conectaţi monitorul la o sursă de alimentare. Porturile de ieşire pentru afişare de pe placa grafică ASUS pot diferi în funcţie de model. ASUS CM8250... - Page 96 HDMI la portul HDMI de pe panoul din spate al computerului. Conectaţi monitorul la o sursă de alimentare. • În cazul în care computerul se livrează cu o placă grafică ASUS, această placă grafică este setată în BIOS ca dispozitiv de afişare principal. Prin urmare, conectaţi monitorul la un port de ieşire pentru afişare de pe placa grafică.
- Page 97 Conectaţi o tastatură USB şi un mouse USB la porturile USB de pe panoul din spate al computerului. Conectarea cablului de alimentare Conectaţi un capăt al cablului de alimentare la conectorul de alimentare de pe panoul din spate al computerului şi celălalt capăt la sursa de alimentare. ASUS CM8250...
-
Page 98: Pornirea/Oprirea Computerului
PORNIREA/OPRIREA computerului În această secţiune se descrie pornirea/oprirea computerului după ce a fost configurat. PORNIREA computerului Pentru a PORNI computerul: Comutaţi întrerupătorul de alimentare pe „I”. PORNIŢI monitorul. Apăsaţi pe butonul de alimentare de pe computer. Butonul de alimentare PORNIREA OPRIREA Aşteptaţi până... -
Page 99: Capitolul 2
Pentru a ignora acest pas, selectaţi Amânare răspuns. Revizuiţi setările pentru dată şi oră. Faceţi clic pe Următorul. Sistemul încarcă setările noi şi apoi reporneşte. Acum puteţi începe să utilizaţi computerul. ASUS CM8250... -
Page 100: Utilizarea Desktopului Sistemului De Operare Windows® 7
Utilizarea desktopului sistemului de operare Windows® 7 Faceţi clic pe pictograma Start > Ajutor şi asistenţă pentru a obţine informaţii suplimentare despre sistemul de operare Windows® 7. Meniul Start Zona de notificare Bara de activităţi Utilizarea meniului Start Meniul Start vă permite să accesaţi programe, utilitare şi alte elemente utile de pe computer. De asemenea, acest meniu vă... - Page 101 Faceţi din nou clic pe pictogramă pentru a ascunde programul. Puteţi fixa programele care doriţi să se afişeze permanent în bara de activităţi. Pentru detalii suplimentare, consultaţi secţiunea Fixarea programelor în meniul Start sau în bara de activităţi din acest capitol. ASUS CM8250...
- Page 102 Fixarea elementelor în lista rapidă Atunci când faceţi clic dreapta pe o pictogramă din bara de activităţi, se lansează o listă rapidă care vă permite accesarea rapidă a legăturilor la programe sau la elemente. Puteţi fixa în lista rapidă elemente precum site-uri Web preferate, foldere sau unităţi accesate frecvent sau fişiere media redate recent.
- Page 103 Afişarea unei notificări de avertizare Pentru a afişa o notificare de avertizare: • Faceţi clic pe pictograma Notificare şi apoi faceţi clic pe mesaj pentru a deschide notificarea. Pentru detalii suplimentare, consultaţi secţiunea Utilizarea Centrului de acţiune Windows® din acest capitol. ASUS CM8250...
- Page 104 Particularizarea pictogramelor şi a notificărilor Puteţi opta pentru afişarea sau ascunderea pictogramelor şi a notificărilor din bara de activităţi sau din zona de notificare. Pentru a particulariza pictogramele şi notificările: În zona de notificare, faceţi clic pe pictograma săgeată Faceţi clic pe Particularizare. În lista verticală, selectaţi comportamentele pentru pictogramele sau elementele pe care doriţi să...
-
Page 105: Gestionarea Fişierelor Şi A Folderelor
Pentru a explora fişiere şi foldere: Lansaţi Windows® Explorer. În panoul de navigare sau de vizualizare, căutaţi locaţia datelor dorite. În bara cu calea de navigare, faceţi clic pe săgeată pentru a se afişa conţinutul unităţii sau a folderului. ASUS CM8250... - Page 106 Particularizarea vizualizării unui fişier/folder Pentru a particulariza vizualizarea unui fişierului/ folderului: Lansaţi Windows® Explorer. În panoul de navigare, selectaţi locaţia datelor. În bara de instrumente, faceţi clic pe pictograma Vizualizare În meniul Vizualizare, deplasaţi glisorul pentru a selecta modul de vizualizare a fişierului/folderului. De asemenea, puteţi să...
- Page 107 Lansaţi Windows® Explorer. În bara de instrumente, faceţi clic pe Folder nou. Tastaţi un nume pentru folderul nou. De asemenea, puteţi să faceţi clic dreapta oriunde în panoul de vizualizare şi apoi să faceţi clic pe Nou > Folder. ASUS CM8250...
-
Page 108: Restaurarea Sistemului
Copierea de rezervă a fişierelor Configurarea copierii de rezervă Pentru a configura o copiere de rezervă: > Toate programele > Întreţinere > Copiere de rezervă şi Faceţi clic pe restaurare. Faceţi clic pe Configurare copiere de rezervă. Faceţi clic pe Următorul. Selectaţi destinaţia copiei de rezervă. -
Page 109: Protejarea Computerului
Windo�s® 7: Pentru a lansa Centrul de acţiune Windows® 7, faceţi clic pe pictograma , apoi pe Deschidere Notificare Centru de acţiune. În Centrul de acţiune Windows® 7, faceţi clic pe activitatea pe care doriţi să o efectuaţi. ASUS CM8250 2-11... - Page 110 Utilizarea Windows® Update Windows Update vă permite să consultaţi şi să instalaţi cele mai recente actualizări pentru a îmbunătăţi securitatea şi funcţionarea computerului. Lansarea Windows® Update Pentru a lansa Windo�s® Update: În bara de activităţi Windows®, faceţi clic pe pictograma Start pentru a lansa meniul Start.
- Page 111 În bara de activităţi Windows®, faceţi clic pe noi. Selectaţi Gestionează alt cont. Selectaţi Creare cont nou. Tastaţi numele utilizatorului nou. Selectaţi Utilizator standard sau Administrator ca tip de utilizator. După ce terminaţi, faceţi clic pe Creare cont. ASUS CM8250 2-13...
- Page 112 Setarea unei parole de utilizator Pentru a seta o parolă de utilizator: Selectaţi utilizatorul pentru care doriţi să setaţi o parolă. Selectaţi Creare parolă. Tastaţi o parolă şi confirmaţi-o. Tastaţi un indiciu pentru parolă. După ce terminaţi, faceţi clic pe Creare parolă. 2-14 Capitolul 2: Utilizarea sistemului de operare Windows®...
-
Page 113: Obţinerea De Ajutor Şi Asistenţă Windows
Ajutorul şi asistenţa Windows® furnizează indicaţii şi răspunsuri privind utilizarea aplicaţiilor pe platforma Windows® 7. > Ajutor şi asistenţă. Pentru a lansa Ajutorul şi asistenţa Windows®, faceţi clic pe Pentru a obţine cel mai recent ajutor Windows® online, asiguraţi-vă că sunteţi conectat la Internet. ASUS CM8250 2-15... - Page 114 2-16 Capitolul 2: Utilizarea sistemului de operare Windows® 7...
-
Page 115: Capitolul 3
în siguranţă, deconectaţi dispozitivul de stocare USB de la computer. NU DECONECTAŢI dispozitivul de stocare USB în timp ce se efectuează transferul de date. Dacă procedaţi astfel, se pot pierde date sau se poate deteriora dispozitivul de stocare USB. ASUS CM8250... -
Page 116: Conectarea Microfonului Şi A Difuzoarelor
Conectarea microfonului şi a difuzoarelor Acest PC desktop se livrează cu porturi pentru microfon şi pentru difuzoare atât pe panoul frontal, cât şi pe panoul din spate. Porturile I/E de pe panoul din spate vă permit difuzoare stereo pentru 2 canale, 4 canale, 6 canale sau 8 canale. Conectarea căştilor şi a microfonului Conectarea difuzoarelor pentru 2 canale INTRĂRI... - Page 117 Conectarea difuzoarelor pentru 4 canale INTRĂRI INTRĂRI AUDIO AUDIO Faţă Spate Conectarea difuzoarelor pentru 6 canale INTRĂRI INTRĂRI INTRĂRI AUDIO AUDIO AUDIO Spate Faţă Centru/ Subwoofer ASUS CM8250...
- Page 118 Conectarea difuzoarelor pentru 8 canale Spate Faţă INTRĂRI INTRĂRI AUDIO AUDIO Lateral Centru/ Subwoofer Capitolul 3: Conectarea dispozitivelor la computer...
-
Page 119: Conectarea Mai Multor Monitoare Externe
Configurarea computerului din Capitolul 1. Pentru unele plăci grafice, numai monitorul setat ca ecran principal este activat în timpul secvenţei de autotestare la pornire (POST). Funcţia de afişare duală este acceptată numai de sistemele de operare Windows. ASUS CM8250... - Page 120 Porniţi computerul. Alegeţi una dintre variantele de mai jos pentru a deschide ecranul de setare Rezoluţie ecran: > Panou de control > Aspect şi personalizare > Afişare > • Faceţi clic pe Modificare setări de afişare. • Faceţi clic dreapta oriunde pe desktopul Microsoft®. Atunci când se afişează meniul pop-up, faceţi clic pe Personalizare >...
-
Page 121: Conectarea Unui Televizor De Înaltă Definiţie
• Pentru a conecta HDTV-ul la computer aveţi nevoie de un cablu HDMI. Cablul HDMI trebuie achiziţionat separat. • Pentru a obţine performanţe de afişare optime, cablul HDMI trebuie să aibă o lungime mai mică de 15 metri. ASUS CM8250... - Page 122 Capitolul 3: Conectarea dispozitivelor la computer...
-
Page 123: Capitolul 4
încheieturile mâinilor pentru a reduce presiunea asupra acestora în timpul tastării. • Utilizaţi PC-ul desktop într-o zonă luminată în mod adecvat şi la distanţă de surse lumină strălucitoare. • Atunci când lucraţi la PC-ul desktop, luaţi periodic scurte pauze. ASUS CM8250... -
Page 124: Utilizarea Cititorului De Carduri De Memorie
Utilizarea cititorului de carduri de memorie Camerele digitale şi alte dispozitive de imagistică digitală utilizează carduri de memorie pentru a stoca fişiere de imagini digitale sau fişiere media. Cititorul de carduri de memorie încorporat de pe panoul frontal al sistemului permite citirea/scrierea de pe/pe diverse unităţi de card de memorie. -
Page 125: Utilizarea Unităţii Optice
• Apăsaţi pe butonul de ejectare de sub capacul bay-ului unităţii optice. Faceţi clic dreapta pe pictograma unităţii CD/DVD din ecranul Computer şi apoi • faceţi clic pe Scoatere. Luaţi discul de pe sertar. ASUS CM8250... -
Page 126: Utilizarea Tastaturii Multimedia (Numai La Anumite Modele)
Utilizarea tastaturii multimedia �numai la anumite modele� Tastaturile variază în funcţie de model. Ilustraţiile din această secţiune au doar rol exemplificativ. Tastatura ASUS SK-2045 10 11 12 13 14 15 16 17 Tastă Descriere Tastă Descriere Lansează gadgeturi Windows®. Apăsaţi <Fn + F7> pentru a lansa Microsoft®... - Page 127 Tastatura pentru jocuri ASUS-Razer Arctosa Tastă Descriere Porneşte sau întrerupe redarea în media player. Opreşte redarea în media player. Revine la pista anterioară în media player. Trece la pista următoare în media player. Reduce volumul sistemului. Creşte volumul sistemului. Activează/dezactivează sunetul.
- Page 128 Tastatura BTC 6200C 2 3 4 5 6 7 8 9 10 11 12 13 Tastă Descriere Tastă Descriere Aduce computerul în starea de repaus. Creşte volumul sistemului. Apăsaţi pe orice tastă pentru a reactiva computerul şi a reveni la starea de lucru anterioară.
- Page 129 Tastatura ASUS PRIMAX/KB2621 Tastă Descriere Reduce volumul sistemului. Activează/dezactivează sunetul. Creşte volumul sistemului. Revine la pista anterioară în media player. Porneşte sau întrerupe redarea în media player. Trece la pista următoare în media player. Tastele pentru funcţii speciale funcţionează numai cu sistemele de operare Windows®...
- Page 130 Capitolul 4: Utilizarea computerului...
-
Page 131: Capitolul 5
şi celălalt capăt la modemul DSL/cu cablu. Modem Modem Cablu RJ 45 RJ-45 cable Porniţi modemul DSL/cu cablu şi computerul. Configuraţi setările necesare pentru conexiunea la Internet. Contactaţi furnizorul dvs. de servicii Internet (ISP) pentru detalii sau asistenţă la configurarea conexiunii la Internet. ASUS CM8250... - Page 132 Conectarea printr-o reţea locală �LAN� Pentru a stabili o conexiune prin LAN: Conectaţi unul dintre capetele cablului RJ-45 la portul LAN (RJ-45) de pe panoul posterior al computerului şi celălalt capăt la reţeaua LAN. Cablu RJ 45 RJ-45 cable Porniţi computerul. Configuraţi setările necesare pentru conexiunea la Internet.
- Page 133 Pentru detalii, referiţi-vă la Recuperarea sistemului dvs din acest capitol. ASUS AI Suite II ASUS AI Suite II este o interfaţă unificată care integrează mai multe utilitare ASUS şi care le permite utilizatorilor să lanseze şi să folosească simultan aceste utilitare.
-
Page 134: Capitolul 6 Folosirea Utilitarelor
Instrument Secţiunea Instrument include panourile EPU, Probe II şi Înregistrator senzori. EPU este un instrument de eficientizare a consumului de energie în funcţie de cerinţele de calcul ale utilizatorului. Acest utilitar oferă câteva moduri pe care le puteţi selecta pentru a economisi energia consumată... - Page 135 Fila Preferinţe vă permite să particularizaţi perioadele de timp după care să se activeze alertele de senzor sau să schimbaţi unitatea de măsură pentru temperatură. Salvează configuraţia Încarcă configuraţia Încarcă valorile de prag Aplică modificările implicite pentru fiecare salvată efectuate senzor ASUS CM8250...
- Page 136 Înregistrator senzori Utilitarul Înregistrator senzori vă permite să monitorizaţi modificările efectuate asupra tensiunii sistemului, temperaturii acestuia şi vitezei ventilatoarelor, precum şi să înregistraţi respectivele modificări. Lansarea utilitarului Înregistrator senzori După instalarea aplicaţiei AI Suite II de pe DVD-ul de asistenţă, faceţi clic pe Instrument > Înregistrator senzori în bara meniului principal AI Suite II pentru a lansa PC Probe .
- Page 137 Panoul Frecvenţă CPU afişează frecvenţa şi gradul de utilizare curente ale procesorului. Faceţi clic pe Monitor > Frecvenţă CPU în bara meniului principal AI Suite II pentru a deschide panoul Frecvenţă CPU. Afişat în panoul din dreapta Panoul Senzori Panoul Frecvenţă CPU �zona cu informaţii referitoare la sistem� ASUS CM8250...
- Page 138 încărcarea BIOS-ului cu ajutorul utilitarelor de actualizare create de ASUS. ASUS Update ASUS Update este un utilitar care vă permite să gestionaţi, să salvaţi şi să actualizaţi BIOS- ul plăcii de bază în sistemele de operare Windows . Utilitarul ASUS Update vă permite să...
- Page 139 Actualizarea BIOS-ului dintr-un fişier BIOS Pentru actualizarea BIOS-ul dintr-un fişier BIOS: În ecranul ASUS Update, selectaţi Actualizare BIOS din fişier şi apoi faceţi clic pe Următorul. Reperaţi fişierul de BIOS în fereastra Deschidere şi faceţi clic pe Deschidere, apoi pe Următorul.
- Page 140 Informaţiile despre sistem Secţiunea Informaţii sistem afişează informaţiile despre placa de bază, procesor şi sloturile de memorie. Faceţi clic pe fila MB pentru a vedea detalii • despre producătorul, numele, versiunea şi BIOS-ul plăcii de bază. Faceţi clic pe fila CPU pentru a vedea •...
- Page 141 Fila Aplicaţii vă permite să selectaţi aplicaţia pe care doriţi să o activaţi. • Fila Bară vă permite să modificaţi setările pentru bară. • Fila Aspect vă permite să particularizaţi contrastul, luminozitatea, saturaţia, tonurile şi curbele de contrast ale interfeţei. ASUS CM8250...
-
Page 142: Asus Ai Manager
ASUS AI Manager ASUS AI Manager este un utilitar care vă oferă acces rapid şi simplu la aplicaţiile cel mai frecvent utilizate. Instalarea utilitarului AI Manager Pentru a instala AI Manager: Introduceţi DVD-ul de asistenţă în unitatea optică. Dacă este activată caracteristica Executare automată, va apărea expertul Instalare drivere. - Page 143 Bara de comenzi rapide AI Manager economiseşte spaţiu de pe desktop şi vă permite să lansaţi utilitarele ASUS sau să afişaţi în mod simplu informaţii despre sistem. Faceţi clic pe una dintre filele Principal, Preferinţele mele, Asistenţă şi Informaţii pentru a se afişa conţinutul Buton de ieşire...
- Page 144 AI Security Utilitarul AI Security vă permite să setaţi o parolă pentru a vă proteja dispozitive precum unităţile flash USB şi discurile CD/DVD împotriva accesului neautorizat. Pentru a bloca un dispozitiv: La prima utilizare a utilitarului AI Security vi se solicită să setaţi o parolă. Introduceţi o parolă...
- Page 145 Faceţi clic pe Deschidere în fereastra cu locaţia fişierului. Aplicaţia este adăugată la lista Preferinţele mele. Faceţi clic dreapta pe pictograma unei aplicaţii pentru a lansa, şterge sau redenumi aplicaţia respectivă. De asemenea, pentru a lansa aplicaţia selectată, puteţi face dublu clic pe ea. ASUS CM8250 6-13...
- Page 146 Asistenţă Faceţi clic pe linkurile din fereastra Asistenţă pentru a accesa site-ul Web, site-ul Web de asistenţă tehnică, site-ul Web de descărcări sau informaţiile de contact ASUS. Informaţii Faceţi clic pe filele din fereastra Informaţii pentru a vedea informaţii detaliate despre sistemul, placa de bază, procesorul, BIOS-ul, dispozitivele instalate şi memoria dvs.
-
Page 147: Nero 9
Dacă este activată caracteristica Executare automată, va apărea automat meniul principal. Dacă este dezactivată caracteristica Executare automată, faceţi clic pe fişierul SeupX.exe din directorul principal de pe DVD-ul Nero 9. În meniul principal, faceţi clic pe Nero 9 Essentials. ASUS CM8250 6-15... - Page 148 Selectaţi limba pe care doriţi să o utilizaţi pentru expertul de instalare. Faceţi clic pe Următorul. Faceţi clic pe Următorul pentru a continua. Bifaţi Accept condiţiile de licenţiere. După ce terminaţi, faceţi clic pe Următorul. 6-16 Capitolul 6: Folosirea utilitarelor...
- Page 149 Selectaţi Tipic şi apoi faceţi clic pe Următorul. Bifaţi Da, doresc să ajut trimiţând date anonime despre aplicaţie către Nero şi apoi faceţi clic pe Următorul. După ce terminaţi, faceţi clic pe Ieşire. ASUS CM8250 6-17...
- Page 150 Inscripţionarea fişierelor Pentru a inscripţiona fişiere: În meniul principal, faceţi clic pe Inscripţionare date > Adăugare. Selectaţi fişierele pe care doriţi să le inscripţionaţi. După ce terminaţi, faceţi clic pe Adăugare. 6-18 Capitolul 6: Folosirea utilitarelor...
-
Page 151: Recuperarea Sistemului
în fabrică şi nu poate fi restaurată dacă este ştearsă. Duceţi PC-ul desktop la centru de service ASUS autorizat dacă aveţi probleme cu procesul de recuperare. Utilizarea utilitarului Recovery Partition: Apăsaţi pe tasta <F9> în timpul încărcării sistemului. - Page 152 Această caracteristică vă permite să efectuaţi o copie de rezervă a DVD-ului de asistenţă. Urmaţi instrucţiunile de pe ecran pentru a finaliza procesul de recuperare. Vizitaţi site-ul Web ASUS la adresa www.asus.com pentru drivere şi utilitare actualizate. Utilizarea DVD-ului de recuperare �numai pentru anumite modele�...
-
Page 153: Capitolul 7
• Conectaţi antenele externe (opţionale) la conectorii corespunzători de pe placa WLAN ASUS şi amplasaţi-le pe suprafaţa superioară a şasiului computerului pentru a obţine cele mai bune performanţe wireless. Tastele cu săgeţi din tastatura numerică nu funcţionează. - Page 154 Pe monitor nu se afişează imagini. • Verificaţi dacă monitorul este pornit. • Asiguraţi-vă că monitorul este conectat corespunzător la portul de ieşire video de pe computer. • În cazul în care computerul este prevăzut cu o placă grafică dedicată, asiguraţi-vă...
- Page 155 • Verificaţi dacă discul este zgâriat sau deteriorat. Butonul de scoatere a sertarului unităţii DVD nu funcţionează. Faceţi clic pe > Computer. DVD RW Drive , apoi faceţi clic pe Scoatere în Faceţi clic dreapta pe meniul principal. ASUS CM8250...
- Page 156 Alimentare Problemă Cauză posibilă Acţiune • Poziţionaţi întrerupătorul pentru tensiunea de alimentare a computerului în conformitate cu tensiunea locală a reţelei. Tensiune de alimentare necorespunzătoare • Reglaţi setările de tensiune. Asiguraţi-vă că aţi deconectat cablul de alimentare de la priza electrică Computerul nu de perete.
- Page 157 Încercaţi atât portul audio frontal, cât Portul audio frontal şi cel şi portul audio posterior. Dacă un port posterior nu funcţionează. nu funcţionează, verificaţi dacă este setat la multicanal. Probleme cu driverul Reinstalaţi driverul audio ASUS CM8250...
- Page 158 Computerul este infectat repare computerul. cu viruşi • Reinstalaţi sistemul de operare. • Trimiteţi unitatea de hard disk defectă la Centrul de service ASUS pentru a fi supus operaţiilor de Unitate de hard disk service. defectă • Înlocuiţi unitatea de hard disk cu una nouă.
- Page 159 şasiului. Dacă problema persistă, consultaţi Certificatul de garanţie al PC-ului desktop şi contactaţi Centrul de service ASUS. Vizitaţi site-ul de asistenţă ASUS la adresa http://support.asus. com pentru a obţine informaţii de la Centrul de service. ASUS CM8250...
- Page 160 Capitolul 7: Depanarea...
- Page 161 Настолен компютър ASUS Essentio CG8250 Ръководство на потребителя...
- Page 162 Product warranty or service will not be extended if: (1) the product is repaired, modified or altered, unless such repair, modification of alteration is authorized in writing by ASUS; or (2) the serial number of the product is defaced or missing.
- Page 163 Съдържание Бележки .......................v Информация за безопасността ..............vii Символи, използвани в ръководството ..........viii Къде да намерите повече информация ..........viii Съдържание на пакета ................ix Глава 1 Първи стъпки Добре дошли! .................... 1-1 Запознаване с Вашия компютър............1-1 Настройка на компютъра ................ 1-5 ВКЛЮЧВАНЕ...
- Page 164 Съдържание Глава 6 Използване на помощните програми ASUS AI Suite II ..................6-1 ASUS AI Manager ..................6-10 Nero 9 ..................... 6-15 Възстановяване на системата ............. 6-19 Глава 7 Отстраняване на неизправности...
-
Page 165: Бележки
REACH Съобразено с регламента по регистрацията, оценката, разрешаването и ограничаването на химикали (REACH). Химическите вещества в нашите продукти публикуваме на уеб сайта на ASUS REACH на адрес: http://green.asus.com/english/ REACH.htm. Изявление на Федералната комисия по комуникациите (ФКК) Това устройство отговаря на част 15 от правилника на ФКК. Работата му е предмет... - Page 166 Забележка относно излагане на радиочестоти Това оборудване трябва да бъде инсталирано и използвано в съответствие с предоставените инструкции; антената(ите), предназначена(и) за този предавател трябва да бъдат монтирани така, че да има разстояние най-малко 20см от хора; антената(ите) не трябва да бъдат в близост до друга антена ил предавател. На крайните...
-
Page 167: Информация За Безопасността
Информация за безопасността Изключете AC захранването и периферните устройства преди почистване. Избършете настолния компютър с чиста целулозна гъба или гидюрия навлажнена с неабразивен почистващ препарат и няколко капки топла вода, след което подсушете излишната влага със сухо парче плат. НЕ поставяйте върху неравни или нестабилни работни повърхности. Обърнете •... -
Page 168: Символи, Използвани В Ръководството
актуализиране. Уеб страници на ASUS Уеб сайтът на ASUS предлага обновена информация за хардуерните и софтуерни продукти на ASUS. Направете справка с уеб сайта на ASUS www. asus.com. Локална техническа поддръжка на ASUS Посетете уеб сайта на ASUS http://support.asus.com/contact за информация за... -
Page 169: Съдържание На Пакета
Съдържание на пакета Настолен компютър Клавиатура x1 Мишка x1 ASUS Essentio DVD диск за Захранващ кабел x1 Помощен DVD диск x1 възстановяване на системата x1 Софтуер за запис на Ръководство за Гаранционна карта x1 дискове Nero 9 DVD x1 инсталация x1 •... -
Page 171: Глава 1
Глава 1 Първи стъпки Добре дошли! Благодарим Ви, че закупихте настолен компютър ASUS Essentio CG8250! Настолният компютър ASUS Essentio CG8250 предоставя повишена производителност, безкомпромисна надеждност и насочени към потребителя помощни програми. Всички тези стойности са капсуловани в зашеметяващо футуристична стилна кутия. - Page 172 Бутон за включване и изключване. Бутон за включване и изключване. Натиснете този бутон, за да включите своя компютър. Слот за Secure Digital™/MultiMediaCard карта. В този слот поставете Secure Digital™/MultiMediaCard карта. Слот за CompactFlash /Microdrive™ карта. В този слот поставете ® CompactFlash /Microdrive™...
- Page 173 Показания на индикатора на LAN порта ЗА ДЕЙНОСТ/ ЗА ВРЪЗКА СКОРОСТТА Индикатор за активност/Връзка Индикатор за скорост Статус Описание Статус Описание ИЗКЛ. Няма връзка ИЗКЛ. 10Mbps връзка ОРАНЖЕВО Свързан 100Mbps връзка МИГА Активност на ЗЕЛЕНО 1Gbps връзка LAN порт данни ASUS CG8250...
- Page 174 – – високоговорител Графична карта на ASUS (само за определени модели). Портовете за изходящ сигнал към дисплея, намиращи се на тази допълнителна графична карта на ASUS, може да се различават за различните модели. Конзола за разширителен слот. Отстранете конзолата на разширителния слот, когато...
-
Page 175: Настройка На Компютъра
компютъра, като например външен монитор, клавиатура, мишка и захранващ кабел. Свързване на външен монитор Използване на графичната карта на ASUS (само при определени модели) Свържете Вашия монитор към порта за изходящ сигнал към дисплея на дискретната графична карта на ASUS. - Page 176 или HDMI монитор към HDMI порта на задния панел на Вашия компютър. Включете монитора към захранване. • Ако компютърът Ви е с графична карта на ASUS, графичната карта е зададена като основния дисплей в BIOS. Следователно, свържете монитора си към порт...
- Page 177 Свържете USB клавиатурата и USB мишката към USB портовете на задния панел на Вашия компютър. Свързване на захранващия кабел Свържете единия край на захранващия кабел към конектора за захранване, намиращ се на задния панел на Вашия компютър. След това свържете другия край с електрически контакт. ASUS CG8250...
-
Page 178: Включване И Изключване На Компютъра
ВКЛЮЧВАНЕ и ИЗКЛЮЧВАНЕ на компютъра Този раздел описва как да включвате и изключвате своя компютър след настройката му. ВКЛЮЧВАНЕ на компютъра За да ВКЛЮЧИТЕ компютъра: Включете бутона за включване. ВКЛЮЧЕТЕ монитора. Натиснете бутона за включване и изключване на компютъра. Бутон за включване... -
Page 179: Глава 2
актуализации, за да зададете настройките за сигурност на Вашия компютър. За да пропуснете тази стъпка, изберете Попитай ме по-късно. Проверете настройките за часа и датата. Щракнете върху Напред. Системата зарежда новите настройки, след което се рестартира. Сега вече можете да започнете да използвате компютъра си. ASUS CG8250... -
Page 180: Използване На Работния Плот На Windows ® 7
Използване на работния плот на Windows ® Щракнете върху иконата „Старт" > "Помощ и поддръжка", за да получите повече информация относно Windows ® Меню „Старт" Лента на задачите Област за уведомяване Използване на менюто „Старт" Менюто „Старт" Ви дава достъп до програми, помощни програми и други полезни елементи... - Page 181 стартирате. Щракнете върху иконата отново, за да скриете програмата. Можете да закачите програми, които искате постояно да са показани в лентата на задачите. За повече информация вижте раздел Закачане на програми в менюто „Старт" или в лентата на задачите в настоящата глава. ASUS CG8250...
- Page 182 Закачане на елементи в списъци за прескачане Когато щракнете с десния бутон върху икона от лентата на задачите, се стартира списък за прескачане, за да получите бърз достъп до сродните връзки на програмата или елемента. Можете да закачите елементи към списък за...
- Page 183 Показване на предупредително уведомление За да покажете предупредително уведомление: • Щракнете върху иконата "Уведомление" , след което щракнете върху съобщението, за да го отворите. За повече информация вижте раздел Използване на „Работен център" на Windows в настоящата глава. ® ASUS CG8250...
- Page 184 Персонализиране на икони и увердомления Можете да изберете дали да покажете или да скриете иконите и уведомленията в лентата на задачите или областта за уведомяване. Персонализиране на икони и уведомления: От областта за уведомяване щракнете върху стрелката Щракнете върху Персонализиране. От...
-
Page 185: Управление На Вашите Файлове И Папки
Разглеждане на файлове и папки За да разглеждате файлове и папки: Стартирайте Windows Explorer. От навигацията или екрана за изглед потърсете местоположението на Вашите данни. От трасираната лента щракнете върху стрелката, за да се покаже съдържанието на устройството или папката. ASUS CG8250... - Page 186 Персонализиране на изгледа на файл/папка За да персонализирате изгледа на файл/папка: Стартирайте Windows Explorer. От навигациония екран изберете местоположението на Вашите данни. От лентата с инструменти щракнете върху иконата "Преглед" От менюто "Преглед", използвайте плъзгача, за да изберете какъв да е изгледа на папка/файл. Също...
- Page 187 За да добавите нова папка: Стартирайте Windows Explorer. От лентата с инструменти щракнете върху Нова папка. Въведете име за новата папка. Можете също така да щракнете с десния бутон на мишката върху произволно място на екрана „Преглед", щракнете върху Нова > Папка. ASUS CG8250...
-
Page 188: Възстановяване На Системата
Архивиране на файлове Настройка на архивиране За да настроите архивиране: > Програми > Поддръжка > Архивиране и възстановяване. Щракнете върху Щракнете върху Настройка за архивиране. Щракнете върху Напред. Изберете местоположение на архивирането. Щракнете върху Напред. Изберете Нека Windows избере (препоръчва се) или Нека избера като Ваш архивен... -
Page 189: Защита На Компютъра
За да стартирате „Работен център" на Windows ® За да стартирате „Работен център" на Windows 7, щракнете върху иконата "Уведомление" , след което щракнете върху Отворяне на работния център. От „Работен център" на Windows 7 щракнете върху задачата, която желаете да изпълните. ASUS CG8250 2-11... - Page 190 Използване на „Актуализация на Windows " ® „Актуализация на Windows" Ви дава възможност да проверявате и инсталирате последните актуализации, за да подобрите сигурността и производителността на Вашия компютър. Стартиране на „Актуализация на Windows " ® За да стартирате „Актуализация на Windows ": ®...
- Page 191 щракнете върху ® Добавяне на нови потребители. Изберете Управление на друг акаунт. Изберете Създаване на нов акаунт. Въведете името на новия потребител. Изберете или Стандартен потребител или Администратор за тип потребител. Когато сте готови, натиснете Създаване на акаунт. ASUS CG8250 2-13...
- Page 192 Настройка на потребителска парола За да настроите потребителска парола: Изберете потребителя, за когото искате да зададете парола. Изберете Създаване на нова парола. Въведете парола и я потвърдете. Въведете подсказка за паролата. Когато сте готови, натиснете Създаване на парола. 2-14 Глава 2: Използване на Windows ®...
-
Page 193: Получаване На Помощ И Поддръжка В Windows
използвате приложения с платформата Windows ® > Помощ и За да стартирате „Помощ и поддръжка" на Windows щракнете върху ® поддръжка. Уверете се, че сте свързани с интернет, за да можете да получите най-акталната онлайн помощ за Windows ® ASUS CG8250 2-15... - Page 194 2-16 Глава 2: Използване на Windows ®...
-
Page 195: Глава 3
който може да се премахне безопасно, отстранете USB устройството за съхранение от Вашия компютър. НЕ отстранявайте USB устройството за съхранение докато протича прехвърляне на данни. В противен случай можете да изгубите данни или да повредите USB устройството за съхранение. ASUS CG8250... -
Page 196: Свързване На Микрофон И Високоговорители
Свързване на микрофон и високоговорители Този настолен компютър има портове за микрофон и високоговорители, както на предния, така и на задния панел. Входовете и изходите, намиращи се на задния панел, Ви позволяват да свържете 2-канални, 4-канални, 6-канални или 8-канални стерео високоговорители. Свързване... - Page 197 Свързване на 4-канални високоговорители АУДИО АУДИО ВХОДОВЕ ВХОДОВЕ Отзад Отпред Свързване на 6-канални високоговорители АУДИО АУДИО АУДИО ВХОДОВЕ ВХОДОВЕ ВХОДОВЕ Централен Отзад Отпред високоговорител/ събуфър ASUS CG8250 ASUS CG8250...
- Page 198 Свързване на 8-канални високоговорители Отзад Отпред АУДИО АУДИО ВХОДОВЕ ВХОДОВЕ Страничен Централен високоговорител/ събуфър Глава 3: Свързване на устройства с Вашия компютър Глава 3: Свързване на устройства с Вашия компютър...
-
Page 199: Свързване На Множество Външни Дисплеи
информация относно свързването на монитор към Вашия компютър. При някои графични карти само мониторът, който сте задали като основен, ще работи по време на тестове при зареждане на компютъра. Функцията за двоен дисплей работи само под Windows. ASUS CG8250 ASUS CG8250... - Page 200 Включете компютъра си. Извършете някое от следните действия, за да отворите екрана за настройка Разделителна способност на екрана: > Контролен панел > Облик и персонализиране > • Щракнете върху Дисплей > Промяна на екранните настройки. • Щракнете на произволно място върху работния плот на Windows. Когато се...
-
Page 201: Свързване На Hdtv
• Необходим Ви е HDMI кабел, за да можете да свържете HDTV и компютъра. HDMI кабелът трябва да бъде закупен отделно. • За най-добри резултати на диспея, дължината на HDMI кабела не трябва да надвишава 15 метра. ASUS CG8250 ASUS CG8250... - Page 202 Глава 3: Свързване на устройства с Вашия компютър...
-
Page 203: Глава 4
за китката, за да намалите напрежението при писане. • Използвайте своя настолен компютър на място с добро осветление. Дръжте далеч от източници, които могат да причинят отблясъци, като например прозорци и пряка слънчева светлина. • Често правете кратки почивки докато използвате настолния компютър. ASUS CG8250... -
Page 204: Използване На Четец На Карти С Памет
Използване на четец на карти с памет Цифровите камери и други цифрови устройства използват карти с памет, за да съхранят цифрови снимки или мултимедийни файлове. Този вграден четец на карти с памет, намиращ се на предния панел на системата Ви, позволява да четете данни от... -
Page 205: Използване На Оптичното Устройство
• Натиснете бутона за изваждане, който се намира под капака на отделението за устройството. • Щракнете с десния бутон върху иконата на CD/DVD устройството на екрана Компютър, след което щракнете върху Извади. Отстранете диска от тавата за дискове. ASUS CG8250... -
Page 206: Използване На Мултимедийна Клавиатура
Използване на мултимедийна клавиатура (само за определени модели) Клавиатурата се разичава за различните модели. Илюстрациите в този раздел са само за справка. ASUS SK-2045 клаватура 10 11 12 13 14 15 16 17 Описание Клавиши Описание Стартира притурки на Windows®. - Page 207 ASUS-Razer Arctosa клавиатура за игри Клавиши Описание Пуска или паузира възпроизвеждането в мултимедиен плейър. Спира възпроизвеждането в мултимедиен плейър. Отива на предишен запис в мултимедиен плейър. Отива на следващ запис в мултимедиен плейър. Намалява силата на звука на системата. Усилва силата на звука на...
- Page 208 BTC 6200C клавиатура 2 3 4 5 6 7 8 9 10 11 12 13 Клавиши Описание Клавиши Описание Влиза в режим Сън. Натиснете Усилва силата на звука на произволен клавиш, за да събудите системата. своя компютър и да го върнете към предишното...
- Page 209 ASUS PRIMAX/KB2621 клавиатура с Клавиши Описание Пуска или паузира възпроизвеждането в мултимедиен плейър. Спира възпроизвеждането в мултимедиен плейър. Отива на предишен запис в мултимедиен плейър. Отива на следващ запис в мултимедиен плейър. Намалява силата на звука на системата. Усилва силата на звука на...
- Page 210 Глава 4: Използване на копютъра...
-
Page 211: Глава 5
задния панел на компютъра, а другия край - към DSL/кабелен модем. Модем Modem RJ 45 кабел RJ-45 cable Включете DSL/кабелния модем и компютъра си. Ако е необходимо, конфигурирайте настройките на интернет връзката. Свържете се със своя интернет доставчик за подробности или помощ при настройка на Вашата интернет връзка. ASUS CG8250... - Page 212 Свързване чрез локална мрежа (LAN) Свързване чрез LAN: Свържете единия край на RJ-45 кабела с LAN (RJ-45) порта, намиращ се на задния панел на компютъра, а другия край - към LAN. RJ 45 кабел RJ-45 cable Включете компютъра си. Ако е необходимо, конфигурирайте настройките на интернет връзката. Свържете...
-
Page 213: Безжична Връзка (На Определени Модели)
• За да увеличите обхвата и чувствителността на безжичния радио сигнал, свържете външна антена към конекторите на антената на безжичната карта на ASUS. • Поставете антените отгоре на компютъра за най-добри резултати при безжична мрежа. • Външните антени се предлагат като опция. ASUS CG8250... - Page 214 Свързване към безжична мрежа: Щракнете върху иконата на мрежата в областта за уведомяване, за да се покажат наличните безжични мрежи. Избеерете безжичната мрежа, към която искате да се свържете, след което щракнете върху Свързване. Възможно е да трябва да въведете ключ за защита на мрежата за защитена безжична...
- Page 215 Изчакайте докато компютърът се свързва с безжичната мрежа. Безжичната връзка е установена успешно. Показва се статусът на връзката, а иконата на мрежата показва свързан статус. ASUS CG8250...
- Page 216 Глава 5: Свързване с интернет...
- Page 217 системата. За повече информация вижте Възстановяване на системата в този раздел. ASUS AI Suite II ASUS AI Suite II е многофункционален интерфейс, който интегрира няколко ASUS помощни програми и дава възможност на потребителите да стартират и използват тези помощни програми едновременно.
-
Page 218: Глава 6 Използване На Помощните Програми
Инструмент Разделът Инструмент включва панели EPU, Probe II и Сензорни записи. EPU е инструмент за икономия на енергия, който задоволява различни нужди за изчисляване. Тази помощна програма предлага различни режими за икономия на енергия, от които можете да избирате. Ако изберете автоматичен режим, системата ще... - Page 219 Предпочитания Ви дава възможност да персонализирате интервала за аларми на сензорите или да смените единицата за измерване на температурата. Запазва Вашата конфигурация Зарежда Зарежда стойности Прилага Вашите на праговете по Вашата запазена промени подразбиране за конфигурация всеки сензор ASUS CG8250...
- Page 220 Сензорен рекордер Сензорният рекордер Ви дава възможност да наблюдавате промените в напрежението на системата, температурата и скоростта на вентилатора, както и да запишете тези промени. Стартиране на Сензорен рекордер След като инсталирате AI Suite II от помощния DVD диск, щракнете върху Инструмент...
- Page 221 процесор и използване на централния процесор. Щракнете върху Наблюдение > Честота на централния процесор в лентата на главното меню на AI Suite II, за да отворите панела Честота на централния процесор. Панел Честота на централния процесор Резидентен в десния екран (област за системна информация) Панел Сензор ASUS CG8250...
- Page 222 логото при зареждане на BIOS с помощта на помощни програми, създадени от ASUS. ASUS актуализация ASUS актуализация е помощна програма, която Ви позволява да управлявате, запазвате и актуализирате BIOS-а на дънната платка в® OS. Помощната програма ASUS актуализация Ви дава възможност да актуализирате BIOS директно от...
- Page 223 екрана, за да завършите процеса на актуализация. Актуализиране на BIOS чрез BIOS файл Актуализиране на BIOS чрез BIOS файл От екрана ASUS актуализация изберете Актуализирай BIOS от файл, след което щракнете върху Напред. Намерете BIOS файла от прозореца Отвори, щракнете...
- Page 224 Системна информация Разделът Системна информация показва информация за дънната платка, централния процесор и слотовете за памет. Щракнете върху раздел MB, за да • видите подробна информация за производителя на дънната платка, името на продукта, версията и BIOS. Щракнете върху раздел Централен •...
- Page 225 главното меню и кожата на интерфейса. • Приложение Ви позволява да изберете приложението, което искате да активирате. • Лента Ви дава възможност да промените настройката на лентата. • Кожа Ви дава възможност да промените контраста, яркостта, наситеността, оттенъка и гамата на интерфейса. ASUS CG8250...
-
Page 226: Asus Ai Manager
Стартиране на AI Manager За да стартирате AI Manager от работния плот на Windows®, щракнете върху Старт > Програми > ASUS > AI Manager > AI Manager 1.xx.xx. Бързата лента на AI Manager се появява на работния плот. След като стартирате приложението, иконата AI Manager ще се появи в лентата на... - Page 227 Бърза лента на AI Manager Бързата лента на AI Manager спестява пространство на работия плот и Ви дава възможност лесно да стартирате ASUS помощни програми или да покажете системна информация. Щракнете върху раздел Главно меню, Предпочитани, Поддръжка или Информация, за да видите информация за съдържанието на...
- Page 228 AI Security AI Security Ви дава възможност за зададете парола и да защитите устройства, като например USB фалш дискове или CD/DVD дискове, от неразрешен достъп. Заключване на устройство: Когато използвате AI Security за пръв път, ще бъдете подканени да въведете парола. Въведете парола, състояща се от не повече от 20 букви и...
- Page 229 Щракнете върху Отвори в прозореца за местоположение на файла. Приложението е добавено в списъка Предпочитани. Щракнете с десния бутон върху икона на приложение, за да го стартирате, изтриете или преименувате. Можете също така да щракнете двукратно, за да стартирате избраното приложение. ASUS CG8250 6-13...
- Page 230 Поддръжка Щракнете върху препратка в прозореца Поддръжка, за да отидете на уеб сайта на ASUS, на уеб сайт за техническа поддръжка, на уеб сайт за изтегляне или на уеб сайт с информация за контакти. Информация Шракнете в раздел в прозореца Информация, за да видите подробна информация за...
-
Page 231: Nero 9
Ако функцията Автоматично изпълнение е активирана, автоматично ще се появи главното меню. Ако функцията Автоматично изпълнение е деактивирана, щракнете върху двукратно върху файла SeupX.exe от главната директория на Вашия Nero 9 DVD диск. От главното меню щракнете върху Nero 9 Essentials. ASUS CG8250 6-15... - Page 232 Изберете езика, който искате да използвате за Съветник за инсталиране. Щракнете върху Напред. Натиснете Напред, за да продължите. Поставете отметка в Приемам условията на лицензионното споразумение. Когато сте готови, натиснете Напред. 6-16 Глава 6: Използване на помощните програми...
- Page 233 Изберете Типично и щракнете върху Напред. Поставете отметка в Да, искам да помогна като изпратя анонимни данни за приложението на Nero, след което щракнете върху Напред. Когато сте готови, натиснете Редактирай. ASUS CG8250 6-17...
- Page 234 Запис на файлове Запис на файлове: От главното меню щракнете върху Запис на данни > Добави. Изберете файловете, които искате да запишете. Когато сте готови, натиснете 6-18 Глава 6: Използване на помощните програми...
-
Page 235: Възстановяване На Системата
фабрично и не може да се възстанови ако бъде изтрит. Занесете настолния компютър в оторизиран сервизен център на ASUS ако имате проблеми с процеса по възстановяване. Използване на дяла за възстановяване на системата: Натиснете <F9> по време на зареждане на операционната система. - Page 236 Тази функция Ви дава възможност да архивирате копие на помощен DVD диск. Следвайте инструкциите на екрана, за да завършите процеса на възстановяване. Посетете уеб сайта на ASUS www.asus.com за актуализирани драйвери и помощни програми. Използване на DVD диска за възстановяване на системата (при...
- Page 237 мрежа, към която искате да се свържете. • Свържете външните антени (като опция) към конекторите за антени на ASUS WLAN картата и ги поставете отгоре на шасито на компютъра си за най-добри резултати при използване на безжични мрежи. Стрелките на цифровата клавиатура не работят.
-
Page 238: Глава 7 Отстраняване На Неизправности
На монитора не се показва нищо. • Проверете дали мониторът е включен. • Уверете се, че мониторът е правилно свързан към видео изхода на Вашия компютър. • Ако компютърът е в комплект с дискретна графична карта, уверете се, че сте свързали монитора към видео изхода на дискретната графична карта. - Page 239 • Проверете дали дискът не е надран или повреден. Бутонът за изваждане на DVD диск от устройството не отговаря. > Компютър. Натиснете DVD RW Щракнете с десния бутон върху , след кеото върху Извади от менюто. ASUS CG8250 ASUS CG8250...
- Page 240 Захранване Проблем Вероятна причина Действие • Преместете ключа за напрежението на компютъра, за да отговаря показанието на напрежението на Вашия регион. Неправилно напрежение на захранването. • Конфигурирайте настройките на напрежението. Уверете се, че захранващият кабел не е Няма включен в контакта. захранване...
- Page 241 Уверете се, че LAN индикаторът е включен. Ако не, опитайте с друг Проблеми с LAN кабела LAN кабел. Ако все още не работи, свържете се със сервизен център на ASUS. Вашият компютър не е Уверете се, че Вашият компютър Няма достъп правилно свързан към...
- Page 242 вирус • Преинсталирайте операционната система. • Изпратете повредения твърд диск на сервизен център на Повреда на твърдия диск ASUS за ремонт. • Заменете твърдия диск с нов. • Сменете със съвместими модули памет. Системата Пролеми с модулите • Отстранете допълнителните...
- Page 243 опитайте се да почистите вътрешността на шасито. Ако проблемът не изчезне, вижте гаранционната карта на Вашия настолен компютър и се свържете със сервизния център на ASUS. Посетете уеб сайта за поддържка http://support.asus.com за информация за сервизни центрове. ASUS CG8250 ASUS CG8250...
Need help?
Do you have a question about the Essentio CG8250 and is the answer not in the manual?
Questions and answers