Epson UB-E02 User Manual
Hide thumbs
Also See for UB-E02:
- Technical reference manual (84 pages) ,
- Technical reference manual (86 pages)
Table of Contents
Advertisement
Quick Links
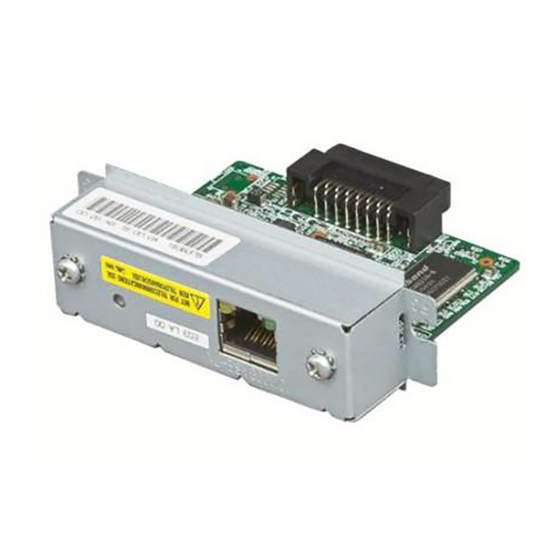
Introduction
The UB-E02, designed for EPSON
Ethernet interface board.
This manual provides instructions, including a simple setup for operators of
POS systems in which the UB-E02 is installed so that the operators can use the
UB-E02 safely and correctly.
Key to Symbols
The symbols in this manual are identified by their level of importance, as
defined below. Read the following carefully before handling the product.
CAUTION:
Cautions must be observed to avoid minor injury to yourself, damage to
your equipment, or loss of data.
Note:
Notes have important information and useful tips on the operation of your equipment.
Caution Label
The following caution label is visible near the display module connector.
The label has the following meaning:
"The display module connector and the drawer kick-out connector use the
same type of the Ethernet connector; therefore, be sure not to connect the
Ethernet connector cable or the telephone line to the display module connector
or the drawer kick-out connector."
Features and Functions
❏
Protocols: TCP, UDP, ICMP, IP, LP/LPR (for APD), TCP socket port (for
OPOS)
❏
Communication standard: 10Base-T/100Base-TX, Full duplex/half
duplex
❏
OPOS, JavaPOS, APD support
UB-E02 User's Manual
Copyright © SEIKO EPSON CORPORATION 2004
®
TM printers, is a 10BASE-T/100BASE-TX
1
405223600
Printed in China 2004.01
Advertisement
Table of Contents

Related Manuals for Epson UB-E02


Summary of Contents for Epson UB-E02
- Page 1 TM printers, is a 10BASE-T/100BASE-TX Ethernet interface board. This manual provides instructions, including a simple setup for operators of POS systems in which the UB-E02 is installed so that the operators can use the UB-E02 safely and correctly. Key to Symbols The symbols in this manual are identified by their level of importance, as defined below.
- Page 2 TM printer cannot be used when the UB-E02 is installed. Note: This photograph shows the TM-H6000II printer with the UB-E02 installed. Switches When using this interface board, the DIP switches of the TM printer must be set to “parallel” with the appropriate settings. Set the reset signal for pin 31 to “enabled”...
- Page 3 Printing a Status Sheet Power on the printer. Then, hold down the push button on the interface card for more than 3 seconds. The printer prints the parameters for the UB-E02. You can check all setting values necessary (IP address, Subnet mask, Gateway address) for the network connection.
- Page 4 Neither Seiko Epson Corporation nor its affiliates shall be liable to the purchaser of this product or third parties for damages, losses, costs, or expenses incurred by purchaser or third parties as a result of: accident, misuse, or abuse of this product or unauthorized modifications, repairs, or alterations to this product, or (excluding the U.S.) failure to strictly comply with Seiko Epson Corporation’s...
- Page 5 UB-E02 ユーザーズマニュアル 405223600 © セイコーエプソン株式会社 2004 Printed in China 2004.01 はじめに ® 本製品は EPSON TM プリンタ用に開発された、10BASE-T/100BASE-TX イーサーネットインタフェースボードです。 本書には、UB-E02 が取り付けられた POS システムを操作するお客様に、 UB-E02 を安全に、正しく取り扱っていただくための説明および簡単な設置方 法が書かれています。 取り扱いや設定の詳細については、UB-E02 詳細取扱説明書をお読みくださ い。UB-E02 詳細取扱説明書は、下記 URL からダウンロードしてご使用くだ さい。 http://www.i-love-epson.co.jp/dl-sd/ マニュアルの記号について 本書では、以下の記号が使われています。記号の意味をよく理解してから取 り扱ってください。 注意 この表示を無視して、誤った取り扱いをすると、人が傷害を負う可能性が想 定される内容および物的損害のみの発生が想定される内容を示しています。 注記 製品の性能を維持するための必要な制限事項、および本製品の取り扱いにつ いて有効な情報を示しています。...
- Page 6 LED ( 緑 ) LED ( 黄 ) プッシュボタン ドロワーキックアウト コネクタ カスタマディスプレイ コネクタ UB-E02 を取り付ける と、TM プリンタのカス タマディスプレイコネ クタは使用できません 注記 : 写真は TM-H6000II プリンタに UB-E02 を取り付けた状態を示しています。 スイッチ UB-E02 を使用するときは、必ずプリンタのディップスイッチの設定を、パラ レルインタフェースの設定にしてください。#31 ピンリセット信号の設定が 可能なプリンタをご使用の場合は、設定を「使用する」にしてください。詳 細は、プリンタのマニュアルのパラレルインタフェースの設定を参照してく ださい。 TM-T90/L90/J2000/J2100/J7000/J7100/J7500/J7600 においては、メモリス イッチの #25 ピンリセット信号を有効にしてください。今後の新製品の設定 については、製品をお買い求めの販売店にお問い合わせください。...
- Page 7 ケーブルの接続 プリンタおよびホストコンピュータの電源がオフであることを確認しま す。 UB-E02 の 10BASE-T/100BASE-TX イーサーネットコネクタに、 10BASE-T/100BASE-TX ケーブルをカチッという音がするまで押し込み ます。 注意 UB-E02 の 10BASE-T/100BASE-TX イーサーネットコネクタには、カスタマ ディスプレイコネクタケーブル、ドロワーキックアウトコネクタケーブルお よび一般公衆回線を差し込まないでください。 注記 UB-E02 を取り付けると、 プリンタ本体側のカスタマディスプレイコネク タは使用できなくなります。 電源ケーブルをプリンタに接続します。 イーサーネット通信の設定 設定の前に ステータスシートの印字 プリンタの電源を入れます。インタフェースボードのプッシュボタンを3秒 以上押し続けると、プリンタが UB-E02 のパラメータを印字します。このス テータスシートによって、ネットワークの接続に必要なすべての設定(IP ア ドレス、サブネットマスク、ゲートウェイアドレス)を確認することができ ます。 接続 PC の設定を、ステータスシートで確認したネットワークの設定に合わせてく ださい。 コマンドプロンプトに ping コマンドを入力することで、プリンタの接続が正...
- Page 8 ❏ Web ブラウザを使用する Windows のインターネットエクスプローラ(お使いの Web ブラウ ザ)を起動します。 ブラウザアドレスバーに、UB-E02 の IP アドレスを入力し、Enter キーを押します(例:http://192.168.192.168 [ 初期設定値 ])。 3. ブラウザ上に、初期画面が表示されます。 メニューに従って、必要なパラメータの設定を行います。各設定ご と、Submit キーを押して設定内容を UB-E02 に送信し、Reset キー を押して設定を有効にします。 IP アドレスなどを変更する場合は、 必ず PC の設定をプリンタの設定 に合わせてください。 ❏ TMNetWinConfig を使用する 本ユーティリティは、下記 URL からダウンロードしてご使用ください。 http://www.i-love-epson.co.jp/dl-sd/ EPSON はセイコーエプソン株式会社の登録商標です。...
Need help?
Do you have a question about the UB-E02 and is the answer not in the manual?
Questions and answers