Table of Contents
Advertisement
Quick Links
Advertisement
Table of Contents

Related Manuals for DAS HILLS VoiceNav Lite


Summary of Contents for DAS HILLS VoiceNav Lite
- Page 1 User Manual HILLS VOICENAV LITE...
-
Page 2: Table Of Contents
Introduction......................2 Warnings ......................2 Glossary of Terms ....................4 Legend........................6 Indicators, Icons and Lights.................. 7 Away Arming ......................8 Arming your system in the “Away Mode” ............8 Stay Arming ......................8 Arming your system in the “Stay Mode” ............8 Disarming ...................... -
Page 3: Introduction
Introduction Your VoiceNav Lite is an intuitive interface for users of your security system. It delivers one of the most user friendly experiences for controlling a security system available today. Its voice prompts enable even the newest users to immediately utilise the full power of your security system. We trust that you will enjoy your VoiceNav Lite, and we would like to thank you for choosing a Hills Security System. - Page 4 This page is intentionally left blank Hills – VoiceNav Lite User Manual V1.1...
-
Page 5: Glossary Of Terms
Glossary of Terms Authority Level The level of access assigned to a User PIN code. To turn your security system On. Area A group of zones within the security system configured with individual control. Users of the security system are assigned areas that they are allowed to control. - Page 6 Monitored A security system that is configured to send all alarm signals to a central station. Outputs Where external devices are configured. These devices can be controlled from your security system. Perimeter The outer edge of the protected area. IE: doors and windows Quick Arm An option that allows you to turn on (ARM) the security system by touching the [AWAY].
-
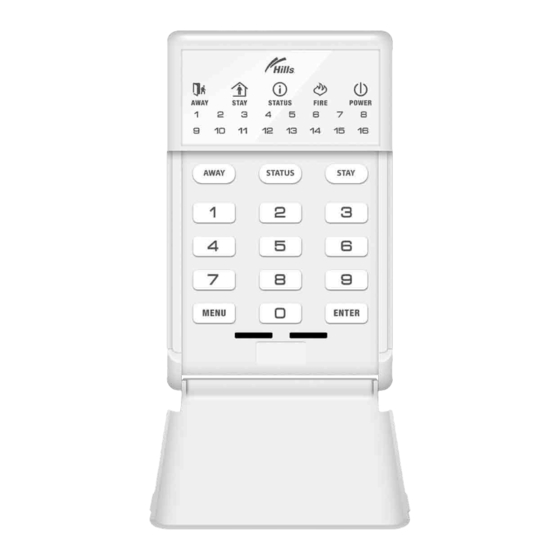
Page 7: Legend
Legend Vital visual information for you to review Press the corresponding number on the keypad [AWAY] Press the corresponding key on the keypad Press the corresponding number on the keypad followed by [?] - [ENTER] enter key. [?]-[?]-[?]-[?] Press the corresponding number sequence on the keypad [ENTER] followed by enter key. -
Page 8: Indicators, Icons And Lights
Indicators, Icons and Lights Green System is ready. Yellow System message present. Red (Flashing) One or more zones are in alarm condition. Red (Steady) System trouble message present. To hear system messages, press the status key. Green Area is disarmed, and is ready to arm Area is not ready to arm, check zones Area is armed in the “AWAY”... -
Page 9: Away Arming
Away Arming Away arming is used when the you are leaving and you want the premises protected in your absence. If your service provider has enabled the “forced arming” feature, you will be able to arm your security system with pre- programmed zones not secure. -
Page 10: Disarming
Disarming Make your way to the VoiceNav through one of the designated entry / exit doors. When you are detected entering, your VoiceNav will repeat a warning message for the duration of the entry delay until a valid PIN code is entered. Your sirens and communicator will activate at the end of the entry delay time if a valid PIN code is not entered. -
Page 11: Understanding The Main Menu
Understanding the Main Menu Pressing the [MENU] key access the VoiceNav Lite’s main menu, here you will find the 10 main features used for customisation and setup of your security system. From the moment you press the menu key, the VoiceNav Lite’s personal voice guide (PVG) will guide you through your chosen selection. -
Page 12: Bypassing Zones
Menu 1 Zone bypass The zone bypass menu is used to bypass (isolate) selected zones in your security system. A bypassed zone is not capable of activating an alarm, as it is temporarily disabled from your system. This option is commonly used to bypass zones that require service, or zones that you wish to temporarily add to your “stay mode”. -
Page 13: Control Chime Mode
Menu 2 Zone Chime You can setup your VoiceNav Lite so that it will “beep” when selected zones are tripped or activated, this is called chime. Chime mode does not trigger any alarms, and it is only used as a low level alert such as a customer entry door. You can add and delete zones from the “chime group”... -
Page 14: To Review Alarm Memory Or History Events
Menu 3 System Event History Last alarm memory Event history The Event History menu is used to listen to the last 185 events that occurred in your security system. These events are held within your security systems memory, and include events such as, arming, disarming, system faults and alarmed zones. - Page 15 Menu 4 System Test Siren Test Communicator Test Battery Test Zone Walk Test System Version number Your security system is made up of different components, brought together to produce a very powerful, yet easy to use security system. These components are your sirens, communicator, back up battery and detection devices.
-
Page 16: Perform A Siren Test
3. Battery Test The backup battery is housed within your security systems main control box and provides power when mains power has been interrupted. Prolonged operation using only the backup battery will result in total system failure, so the condition of the battery is critical to sustain the power required for the longest period of time. -
Page 17: Perform A Communicator Test
Perform a communicator test Step [MENU] - [4] Selects main menu - Option 4, System Test [?]-[?]-[?]-[?] Enter your master PIN code Selects communicator test [MENU] Moves back to system test menu (step 3) [MENU] Moves back to main menu [MENU] Exits main menu Perform a battery test... -
Page 18: Configure (Set Up) A New Pin Code For A Specific User
Menu 5 User Configuration User PIN User Area User Authority The user configuration menu is where user authority levels, PIN codes and areas are assigned to users of your security system. User PIN – This is the code used to arm and disarm areas within your security system. -
Page 19: Delete A Pin Code From A Specific User
Delete a PIN code from a specific user Step [MENU] - [5] Selects main menu - User configuration [?]-[?]-[?]-[?] Enter your master PIN code Selects configure user PIN [?] - [ENTER] Select the user to delete [0] - [ENTER] Disables user [MENU] Moves back to user configuration menu (step 3) [MENU]... -
Page 20: Configure (Set Up) Authority Levels For A Specific User
Configure (set up) authority levels for a specific user Step [MENU] - [5] Selects main menu - User configuration [?]-[?]-[?]-[?] Enter your master PIN code Selects configure user authority [?] - [ENTER] Select the user to configure Select the options required for this user (See table 1) Note: zone lights will indicate selected authority options. - Page 21 Hills ComNav. Please contact your service provider for further information on the additional features offered by the Hills ComNav, or visit www.das.com.au SMS phone numbers 1, 2 and 3 will be sent text messages, upon the activation of certain events from within the security system.
-
Page 22: Enter Alarm Phone Numbers
Enter alarm phone numbers Step [MENU] - [6] Selects main menu - Phone number configuration [?]-[?]-[?]-[?] Enter your master PIN code Select which alarm phone number is to be dialled 1 = alarm phone number 1 2 = alarm phone number 2 3 = alarm phone number 3 Phone Enter the phone number to dial... -
Page 23: Enter Divert Phone Numbers
Enter divert phone numbers Step [MENU] - [6] Selects main menu - Phone number configuration [?]-[?]-[?]-[?] Enter your master PIN code Select which divert phone number is to be dialled 4 = divert phone number 1 5 = divert phone number 2 6 = divert phone number 3 Phone Enter the phone number to dial... -
Page 24: Control Connected Outputs
Menu 7 Output control Your security system can be configured to control up to 16 outputs. These outputs can be used for a variety of applications, such as external lighting control, electric shutter control or even garage door control. As additional equipment is required to enable these features, please contact your service provider for further details Control connected outputs... -
Page 25: Configure A Zone Name, Area Name Or Output Name
Menu 8 Voice message recording Zone name configuration Area name configuration Output name configuration Menu 8 allows you to build your own custom names for zones, areas and outputs using words from the word library table (Page 31). Up to eight words may be strung together to build a more detailed name. Configure a zone name, area name or output name Step [MENU] - [8] Selects main menu - Voice message recording... - Page 26 Menu 9 Basic system configuration Time and date Area entry time Area exit time Code pad light intensity Voice options Reserved Reset detector in alarm Call back Call answer Volume level Use this menu to • Adjust / set the time and date to match your location •...
-
Page 27: Set The Time And Date
Set the time and date Step [MENU] - [9] Selects main menu - Basic system configuration Selects time and date menu [?]-[?]-[?]-[?] Enter your master PIN code 1 = To configure the time 2 = To configure the date [?] - [ENTER] Select the hours value from 1 ~ 12 [?] - [ENTER] Select the minutes time from 1 ~ 59 1 = Select AM time 2 = Select PM time... -
Page 28: Adjust Area Entry Time
Adjust area entry time Step [MENU] - [9] Selects main menu - Basic system configuration Selects area entry time menu [?]-[?]-[?]-[?] Enter your master PIN code Select the area number you wish to adjust from 1 ~ 8 [?] - [ENTER] Enter the new entry time in seconds (1 ~ 255 seconds). [MENU] Moves back to area selection (step 4). -
Page 29: Set Code Pad Led Light Intensity
Set code pad led light intensity Step [MENU] - [9] Selects main menu - Basic system configuration Selects code pad LED light intensity [?]-[?]-[?]-[?] Enter your master PIN code 1 = Display run mode led intensity 2 = Display idle mode led intensity 3 = Backlight run mode led intensity 4 = Backlight idle mode led intensity 5 = Logo On / Off... -
Page 30: Activate / Deactivate Individual Voice Options
Activate / deactivate individual voice options Step [MENU] - [9] Selects main menu - Basic system configuration Selects voice options [?]-[?]-[?]-[?] Enter your master PIN code Select required feature to activate / deactivate. Refer to table 2 below [MENU] Moves back to basic system configuration menu (step 2) [MENU] Moves back to main menu [MENU]... -
Page 31: Adjust The Volume Level
Adjust the volume level Step [MENU] - [9] Selects main menu - Basic system configuration Selects volume level [?]-[?]-[?]-[?] Enter your master PIN code Select required volume level from 1 ~ 8 [MENU] Moves back to basic system configuration menu (step 2) [MENU] Moves back to main menu [MENU]... -
Page 32: Word Library
Remote Word Library Boat Roof Cabinet Hall Room Three Car park Hallway Rumpus Four Ceiling Heat Safe Five Cellar Heating Security Child’s Hold-up Sensor Seven Alert Home Shed Eight Closet Home theatre Shock Nine Computer Infrared Shop Cool Inside Side Eleven Curtain Instant... - Page 33 Programmed phone number 1.………………………………………………..……………..…... Programmed phone number 2………………………………………………..……………..…..Programmed phone number 3.…………………………………………………………………... Zone List Service provider……………………………………………………Phone…………………………………………….. Monitoring station………………………………………….……... Phone…………………………………………….. System type.……………………… ……………………………...Date of installation…………………………….. Hills – VoiceNav Lite User Manual V1.1...
- Page 34 www.das.com.au...