Table of Contents
Advertisement
Quick Links
Advertisement
Table of Contents
Troubleshooting

Related Manuals for National Instruments USRP-29 Series


Summary of Contents for National Instruments USRP-29 Series
- Page 1 NI USRP -29xx ™ Getting Started Guide ni.com/usrp...
-
Page 2: Table Of Contents
NI USRP-29xx Universal Software Radio Peripheral This document explains how to install, configure, and test the National Instruments universal software radio peripheral (USRP) 2920, 2921, 2922, 2930, 2932, 2940R, 2942R, 2943R, 2950R, 2952R, or 2953R (NI 29xx) device. The NI USRP-29xx can send and receive signals for use in various communications applications. -
Page 3: Electromagnetic Compatibility Guidelines
Troubleshooting........................20 Device Troubleshooting....................20 Network Troubleshooting....................21 Front Panels, Back Panels, and Connectors................22 NI USRP-2920........................22 NI USRP-2921........................24 NI USRP-2922........................26 NI USRP-2930........................28 NI USRP-2932........................30 NI USRP-2940R......................32 NI USRP-2942R......................35 NI USRP-2943R......................39 NI USRP-2950R......................42 NI USRP-2952R......................45 NI USRP-2953R......................49 Where to Go Next........................53 Worldwide Support and Services....................53 Electromagnetic Compatibility Guidelines This product was tested and complies with the regulatory requirements and limits for electromagnetic compatibility (EMC) stated in the product specifications. -
Page 4: Quick Start Steps
Installing the Software on page 7 Installing NI 29xx Devices on page 7 Updating Device Firmware and FPGA Images on page 14 Programming the NI 29xx on page 19 NI USRP-29xx Getting Started Guide | © National Instruments | 3... -
Page 5: Verifying The System Requirements
Product misuse can result in a hazard. You can compromise the safety protection built into the product if the product is damaged in any way. If the product is damaged, return it to National Instruments for repair. 4 | ni.com | NI USRP-29xx Getting Started Guide... -
Page 6: Verifying The Kit Contents
If you plan to connect to the device using PCI Express, you need an MXI Express interface card, such as the NI PCIe-8371. • One or more of the recommended antennas shown in the following table. NI USRP-29xx Getting Started Guide | © National Instruments | 5... -
Page 7: Optional Items
Table 1. Recommended Antennas Device Antenna NI Part Number NI USRP-2920/2922/2930/2932/2940R/2942R/2950R/2952R VERT 400— 781915-01 144 MHz, 400 MHz, and 1,200 MHz tri- band vertical antenna NI USRP-2921/2922/2932/2942R/2943R/2952R/2953R VERT 2450— 781913-01 2.4 GHz to 2.48 GHz and 4.9 GHz to 5.9 GHz to 5.9 GHz dual- band vertical antenna... -
Page 8: Installing The Software
PWR button. If your computer was powered off, you can now power on the computer. Windows automatically recognizes the NI USRP device. Related Information Updating USRP N2xx/NI 29xx Firmware and FPGA Images on page 14 NI USRP-29xx Getting Started Guide | © National Instruments | 7... -
Page 9: Configuring Ni 29Xx Devices
Configuring NI 29xx Devices Setting Up the Network (Ethernet Only) The device communicates with a host computer over gigabit Ethernet. Set up the network to enable communication with the device. Note The IP addresses for the host computer and each connected NI USRP device must be unique. - Page 10 The utility prompts you to confirm your selection. Click OK if your selection is correct; otherwise, click Cancel. The utility displays a confirmation to indicate the process is complete. Click OK. Power cycle the device to apply the changes. NI USRP-29xx Getting Started Guide | © National Instruments | 9...
- Page 11 10. After you change the IP address, you must power cycle the device and click Find Devices in the utility to update the list of devices. Confirming Network Connection Select Start»All Programs»National Instruments»NI-USRP»NI-USRP Configuration Utility to open the NI-USRP Configuration Utility. Select the Change IP Address tab of the utility.
- Page 12 NI USRP devices connected to the switch. Assign the host Ethernet interface a subnet, and assign each device an address in that subnet, as shown in the following table. NI USRP-29xx Getting Started Guide | © National Instruments | 11...
-
Page 13: Using The Optional Ni Expresscard Slot - Mxi Express Interface Kit For Usrp Rio To Connect To A Laptop Computer
Table 5. Single Host Ethernet Interface—Unmanaged Switch Configuration Device Host IP Address Host Subnet Mask Device IP Address NI USRP Device 0 192.168.10.1 255.255.255.0 192.168.10.2 NI USRP Device 1 192.168.10.1 255.255.255.0 192.168.10.3 Related Information Setting Up the Network (Ethernet Only) on page 8 Using the Optional NI ExpressCard Slot - MXI Express Interface Kit for USRP RIO to Connect to a Laptop... -
Page 14: Using The Optional Ni Pcie - Mxi Express Interface Kit For Usrp Rio To Connect To A Desktop Computer
Using the Optional NI PXIe - MXI Express Interface Kit for USRP RIO to Connect to a PXI Express Chassis Power down your NI 294x/295x device. Power down your PXI Express chassis. NI USRP-29xx Getting Started Guide | © National Instruments | 13... -
Page 15: Updating Device Firmware And Fpga Images
FPGA images. If connected to the device using Ethernet, verify that the host Ethernet interface is configured correctly. Select Start»All Programs»National Instruments»NI-USRP»NI-USRP Configuration Utility to open the NI-USRP Configuration Utility. Select the N2xx/NI-29xx Image Updater tab. The utility should automatically populate the Firmware Image and FPGA Image fields with the paths to the default firmware and 14 | ni.com | NI USRP-29xx Getting Started Guide... - Page 16 Click the Manually Add Device button, enter the IP address of the device in the dialog box that displays, and click OK. The manually added device appears in the device list, similar to the following figure. NI USRP-29xx Getting Started Guide | © National Instruments | 15...
- Page 17 Figure 5. Manually Added Device Select the device to update from the device list, and verify that you selected the correct device. Verify that the version of the FPGA image file matches the board revision for the device you are updating. On Ettus devices, locate the board revision on a label on the back of the device.
-
Page 18: Updating Usrp2 Firmware And Fpga Images
Verify that the firmware and FPGA image paths are entered correctly because the utility updates both files in the same operation. The utility should appear similar to the following figure. NI USRP-29xx Getting Started Guide | © National Instruments | 17... - Page 19 Figure 6. USRP2 SD Card Burner Click the Refresh Device List button, and select the drive letter that corresponds to the SD card interface connected to your computer. If the drive letter for the SD card interface does not appear in the list, verify that the SD card interface appears in My Computer and the SD card is inserted in the SD card interface.
-
Page 20: Programming The Ni 29Xx
The NI-USRP software contains sample projects that are a starting point for application development. You can open the projects in LabVIEW by selecting File»Create Project»NI-USRP. You must install the LabVIEW FPGA Module to customize the behavior of the device FPGA. NI USRP-29xx Getting Started Guide | © National Instruments | 19... -
Page 21: Troubleshooting
Troubleshooting If an issue persists after you complete a troubleshooting procedure, contact NI technical support or visit ni.com/support. Device Troubleshooting The NI USRP Device Does Not Appear in MAX MAX supports only NI 294x/295x devices configured with a PCI Express connection. If you are using an NI USRP 292x/293x device, or if you are using an NI 294x/295x device configured with an Ethernet connection, use the NI-USRP Configuration Utility instead. -
Page 22: Network Troubleshooting
UDP broadcast packets. Windows installs and enables a firewall by default. To allow UDP communication with a device, disable any firewall software associated with the network interface for the device. NI USRP-29xx Getting Started Guide | © National Instruments | 21... -
Page 23: Front Panels, Back Panels, And Connectors
The Device IP Address Does Not Reset to the Default If you cannot reset the default device IP address, your device may be on a different subnet than the host network adapter. You can power cycle the device in a safe (read-only) image, which sets the device to the default IP address of 192.168.10.2 Open the device enclosure, making sure to take appropriate static precautions. - Page 24 GREEN—The module is transmitting data. Indicates the status of the physical MIMO cable link: OFF—The modules are not connected using the MIMO cable. GREEN—The modules are connected using the MIMO cable. NI USRP-29xx Getting Started Guide | © National Instruments | 23...
-
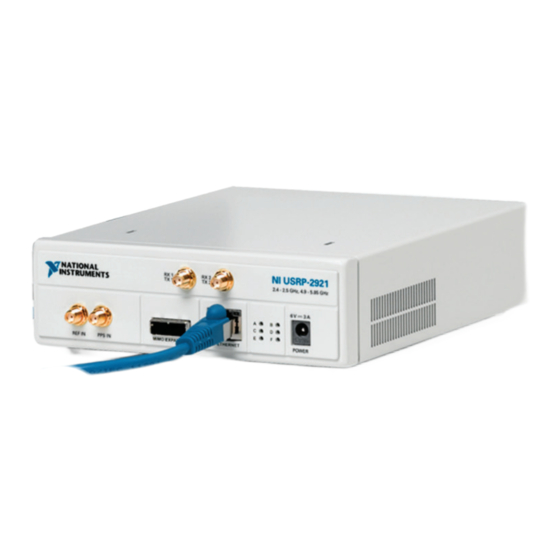
Page 25: Ni Usrp-2921
Table 7. NI USRP-2920 Module LEDs (Continued) Indication Indicates the receive status of the module: OFF—The module is not receiving data. GREEN—The module is receiving data. Indicates the firmware status of the module: OFF—The firmware is not loaded. GREEN—The firmware is loaded. Indicates the reference lock status of the LO on the module: OFF—There is no reference signal, or the LO is not locked to a reference signal. - Page 26 Indicates the receive status of the module: OFF—The module is not receiving data. GREEN—The module is receiving data. Indicates the firmware status of the module: OFF—The firmware is not loaded. GREEN—The firmware is loaded. NI USRP-29xx Getting Started Guide | © National Instruments | 25...
-
Page 27: Ni Usrp-2922
Table 9. NI USRP-2921 Module LEDs (Continued) Indication Indicates the reference lock status of the LO on the module: OFF—There is no reference signal, or the LO is not locked to a reference signal. BLINKING—The LO is not locked to a reference signal. GREEN—The LO is locked to a reference signal. - Page 28 Indicates the receive status of the module: OFF—The module is not receiving data. GREEN—The module is receiving data. Indicates the firmware status of the module: OFF—The firmware is not loaded. GREEN—The firmware is loaded. NI USRP-29xx Getting Started Guide | © National Instruments | 27...
-
Page 29: Ni Usrp-2930
Table 11. NI USRP-2922 Module LEDs (Continued) Indication Indicates the reference lock status of the LO on the module: OFF—There is no reference signal, or the LO is not locked to a reference signal. BLINKING—The LO is not locked to a reference signal. GREEN—The LO is locked to a reference signal. - Page 30 BLINKING—The LO is not locked to a reference signal. GREEN—The LO is locked to a reference signal. Indicates the power status of the module: OFF—The module is powered off. GREEN—The module is powered on. NI USRP-29xx Getting Started Guide | © National Instruments | 29...
-
Page 31: Ni Usrp-2932
Figure 11. NI USRP-2930 Back Panel GPS ANT is the input terminal for the GPS antenna signal. GPS ANT is an SMA (f) connector with an impedance of 50 Ω. NI USRP-2932 Figure 12. NI USRP-2932 Front Panel NI USRP - 2932 RX 1 RX 2 TX 1... - Page 32 BLINKING—The LO is not locked to a reference signal. GREEN—The LO is locked to a reference signal. Indicates the power status of the module: OFF—The module is powered off. GREEN—The module is powered on. NI USRP-29xx Getting Started Guide | © National Instruments | 31...
-
Page 33: Ni Usrp-2940R
Figure 13. NI USRP-2932 Back Panel GPS ANT is the input terminal for the GPS antenna signal. GPS ANT is an SMA (f) connector with an impedance of 50 Ω. NI USRP-2940R Figure 14. NI USRP-2940R Front Panel NI USRP-2940R RF 0 RF 1 50 MHz - 2.2 GHz... - Page 34 GREEN—The device is locked to the reference time signal. Indicates whether the GPSDO is locked: OFF—There is no GPSDO or the GPSDO is not locked. GREEN—The GPSDO is locked. NI USRP-29xx Getting Started Guide | © National Instruments | 33...
- Page 35 Table 17. NI USRP-2940R Module LEDs (Continued) Indication LINK Indicates the status of the link to a host computer: OFF—There is no link to a host computer. GREEN/YELLOW/RED—The host is actively communicating with the device. RF 1 TX1/ Indicates the transmit status of the module: OFF—The module is not active.
-
Page 36: Ni Usrp-2942R
400 MHz - 4.4 GHz AUX I/O JTAG 3.3 VDC MAX TX1 RX1 LINK TX1 RX1 TX OUTPUT MAX +20 dBm, RX INPUT MAX -15 dBm, ALL RF PORTS 50 Ω NI USRP-29xx Getting Started Guide | © National Instruments | 35... - Page 37 Table 19. NI USRP-2942R Module Front Panel Connectors Connector JTAG A USB port that connects the host computer to the device FPGA for development and debugging. LabVIEW FPGA does not currently support configuring or programming the device FPGA using the JTAG connector. RF 0 TX1 RX1 Input and output terminal for the RF signal.
- Page 38 Figure 17. NI USRP-2942R Module Back Panel PCIe x4 1G/10G ETH TRIG TRIG 9-16V DC SFP+Ports 7.5 A MAX 3.3 V +15 dBm –15 dBm 3.3V 5V MAX 5V DC NI USRP-29xx Getting Started Guide | © National Instruments | 37...
- Page 39 Table 21. NI USRP-2942R Module Back Panel Connectors Connector The power input accepts a 9 V to 16 V, 6 A external DC power connector. 1G/10G ETH The Ethernet ports accept 1G SFP modules and 10G SFP+ modules. With a 1G ETH module inserted, the ports accept gigabit Ethernet-compatible cables (Category 5, Category 5e, or Category 6).
-
Page 40: Ni Usrp-2943R
The LED indications described in the following table occur only when you use the NI-USRP API with the default FPGA image. When you use LabVIEW FPGA, you customize the LED indications. NI USRP-29xx Getting Started Guide | © National Instruments | 39... - Page 41 Table 23. NI USRP-2943R Module LEDs Indication RF 0 TX1/ Indicates the transmit status of the module: OFF—The module is not active. RED—The module is receiving data. GREEN—The module is transmitting data. Indicates the receive status of the module: OFF—The module is not receiving. GREEN—The modules is receiving.
- Page 42 15 dBm (3.56 V ) for a square wave or sine wave. pk-pk PCIe x4 This port accepts a PCI Express Generation 1, x4 bus connection through an MXI Express four-lane cable. NI USRP-29xx Getting Started Guide | © National Instruments | 41...
-
Page 43: Ni Usrp-2950R
Table 24. NI USRP-2943R Module Back Panel Connectors (Continued) Connector PPS TRIG Output terminal for PPS timing reference. PPS TRIG OUT is an SMA (f) connector with an impedance of 50 Ω and is a single-ended input. PPS TRIG OUT outputs 0 V to 3.3 V TTL. You can also use this port as a triggered output (TRIG OUT) that you control using NI-USRP software. - Page 44 OFF—There is no reference signal or the device is not locked to the reference signal. BLINKING—The device is not locked to the reference signal. GREEN—The device is locked to the reference time signal. NI USRP-29xx Getting Started Guide | © National Instruments | 43...
- Page 45 Table 26. NI USRP-2950R Module LEDs (Continued) Indication Indicates whether the GPSDO is locked: OFF—There is no GPSDO or the GPSDO is not locked. GREEN—The GPSDO is locked. LINK Indicates the status of the link to a host computer: OFF—There is no link to a host computer. GREEN/YELLOW/RED—The host is actively communicating with the device.
-
Page 46: Ni Usrp-2952R
400 MHz - 4.4 GHz AUX I/O JTAG 3.3 VDC MAX TX1 RX1 LINK TX1 RX1 TX OUTPUT MAX +20 dBm, RX INPUT MAX -15 dBm, ALL RF PORTS 50 Ω NI USRP-29xx Getting Started Guide | © National Instruments | 45... - Page 47 Table 28. NI USRP-2952R Module Front Panel Connectors Connector JTAG A USB port that connects the host computer to the device FPGA for development and debugging. LabVIEW FPGA does not currently support configuring or programming the device FPGA using the JTAG connector. RF 0 TX1 RX1 Input and output terminal for the RF signal.
- Page 48 Figure 23. NI USRP-2952R Module Back Panel PCIe x4 1G/10G ETH TRIG TRIG 9-16V DC SFP+Ports 7.5 A MAX 3.3 V +15 dBm –15 dBm 3.3V 5V MAX 5V DC NI USRP-29xx Getting Started Guide | © National Instruments | 47...
- Page 49 Table 30. NI USRP-2952R Module Back Panel Connectors Connector The power input accepts a 9 V to 16 V, 6 A external DC power connector. 1G/10G ETH The Ethernet ports accept 1G SFP modules and 10G SFP+ modules. With a 1G ETH module inserted, the ports accept gigabit Ethernet-compatible cables (Category 5, Category 5e, or Category 6).
-
Page 50: Ni Usrp-2953R
The LED indications described in the following table occur only when you use the NI-USRP API with the default FPGA image. When you use LabVIEW FPGA, you customize the LED indications. NI USRP-29xx Getting Started Guide | © National Instruments | 49... - Page 51 Table 32. NI USRP-2953R Module LEDs Indication RF 0 TX1/ Indicates the transmit status of the module: OFF—The module is not active. RED—The module is receiving data. GREEN—The module is transmitting data. Indicates the receive status of the module: OFF—The module is not receiving. GREEN—The modules is receiving.
- Page 52 15 dBm (3.56 V ) for a square wave or sine wave. pk-pk PCIe x4 This port accepts a PCI Express Generation 1, x4 bus connection through an MXI Express four-lane cable. NI USRP-29xx Getting Started Guide | © National Instruments | 51...
- Page 53 Table 33. NI USRP-2953R Module Back Panel Connectors (Continued) Connector PPS TRIG Output terminal for PPS timing reference. PPS TRIG OUT is an SMA (f) connector with an impedance of 50 Ω and is a single-ended input. PPS TRIG OUT outputs 0 V to 3.3 V TTL. You can also use this port as a triggered output (TRIG OUT) that you control using NI-USRP software.
-
Page 54: Where To Go Next
RF fundamentals, device features, and programming with NI-USRP. Worldwide Support and Services The National Instruments website is your complete resource for technical support. At ni.com/ support you have access to everything from troubleshooting and application development self- help resources to email and phone assistance from NI Application Engineers. - Page 55 Other product and company names mentioned herein are trademarks or trade names of their respective companies. For patents covering National Instruments products/technology, refer to the appropriate location: Help»Patents in your software, the file on your media, or the National Instruments Patent Notice at .
- Page 56 375717E-01 Feb14...
Need help?
Do you have a question about the USRP-29 Series and is the answer not in the manual?
Questions and answers