Table of Contents
Advertisement
Quick Links
Enjoy Your
USE AND CARE GUIDE
Assembly, Care And Use Instructions
Read Carefully Important:Retain These
Instructions For Future Reference.
quality products designed to enhance your home. Visit us online to see our full line of products available for your home improvement needs.
E02GR010
Questions, problems, missing parts? Before returning to the store,
please contact our Customer Service
service@alphamarts.com
Thank you for choosing Captiva Desings!
h
This appliance is for Household use only.
This is not a commercial appliance.
THANK YOU
inually create
Advertisement
Table of Contents

Related Manuals for Captiva Designs E02GR010


Summary of Contents for Captiva Designs E02GR010
- Page 1 Enjoy Your USE AND CARE GUIDE E02GR010 This appliance is for Household use only. Assembly, Care And Use Instructions This is not a commercial appliance. Read Carefully Important:Retain These Instructions For Future Reference. Questions, problems, missing parts? Before returning to the store, please contact our Customer Service service@alphamarts.com...
-
Page 2: Table Of Contents
Table of Contents Safety Information Troubleshooting First-time Operation Warnings Care and Maintenance 23-24 Package Contents Product Speci cations Preparation Assembly Instructions Warranty 8-17 Operation Instructions 18-20 Safety Information Assembler/Installer This instruction manual contains important information necessary for the proper assembly and safe use of this appliance. -
Page 3: Warnings
IMPORTANT SAFETY Please read this manual carefully and before installing or using your Captiva Designs gas grill to ensure proper operation, installation, and servicing, and to reduce the risk of re, burn hazard, and/or other injury. This manual should be retained for your information. - Page 4 Never use charcoal or any other solid fuel in the grill. PROPER USE This Captiva Designs grill in NOT intended for commercial use. Do not operate the grill in a building, garage, or any other enclosed areas. This could result in carbon monoxide buildup, which may cause injury or death.
- Page 5 Warnings The self-contained LP system appliance is design-certi ed to be used with a standard 20-lb., 12 1/4”-diameter, 18”-tall cylinder with right-handed connection threads. This is the maximum size LP tank to be used with this grill. The cylinder must be marked in accordance with the latest U.S. Department of Transportation speci cations for LP gas cylinders.
-
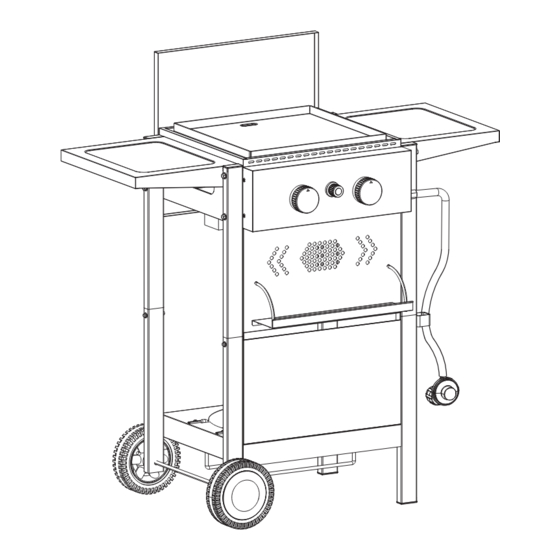
Page 6: Package Contents
Package Contents... - Page 7 Package Contents Name Name Attachment Strap Body Assembly (in screw bag) Flame Tamer Front Cart Plate(down) Cooking Grill Bottom -right Leg unit Griddle Plate Base Wheel Cover Lid Handle Wheel Gas Support Stand Axle Front Cart Plate(Up) Bottom left Leg unit Spice Rack Hook Upright Leg unit Spice Rack...
-
Page 8: Preparation
Preparation Before beginning assembly of product, make sure all parts are present. Compare parts with package contents list on previous page and hardware contents below. If any part is missing or damaged, do not attempt to assemble the product. Contact customer service for replacement parts. Estimated Assembly Time: 40 minutes with 2 people. - Page 9 Assembly Instructions...
- Page 10 Assembly Instructions...
- Page 11 Assembly Instructions...
- Page 12 Assembly Instructions Installation guide for barbecue Place the ame tamer (13)and cooking grill(14) inside of the grill body(12) as shown below.
- Page 13 Assembly Instructions Installation guide for griddle Take out the ame tamer and cooking grill inside of the grill body as shown below. Place the griddle plate inside of the grill body as shown below.
- Page 14 Assembly Instructions...
- Page 15 Assembly Instructions back front...
- Page 16 Assembly Instructions...
- Page 17 Assembly Instructions The electronic ignition requires 1“ AA” alkaline battery which is excluded. WARNING: DO NOT mix old and new batteries. DO NOT mix alkaline, standard (Carbon-Zinc), or rechargeable (Nickel-Cadmium) batteries. DO NOT dispose of batteries in re. Improper disposal may cause batteries to leak or explode.
-
Page 18: Operation Instructions
Operation Instructions CHECKING FOR LEAKS After all connection are made, check all connections and ttings on the LP gas tank valve, gas hose gas hose and regulator for leaks with a water and soap solution. To prevent re or explosion while testing for a leak: •... - Page 19 Operation Instructions CONNECTING GAS CYLINDER The propane gas supply cylinder to be used must be constructed and marked in accordance with the speci cations for LP gas Cylinders of the U.S. Department of Transportation(D.O.T) or the National Standard of Canada, CAN/CSA-B339, Cylinders, Spheres and Tubes for Transportation of Dangerous Goods;...
- Page 20 Operation Instructions Other cylinders may be acceptable for use with this appliance if they are compatible NOTE: with the appliance nesting hole and retention means. Refer to Page 19-20 of the Assembly Instructions for correct cylinder to cylinder holder connection. WARNING: ALL INSTRUCTIONS AND SAFEGUARDS ON THIS PAGE MUST BE FOLLOWED TO PREVENT FIRE, DAMAGE AND/OR INJURY.
-
Page 21: Troubleshooting
Troubleshooting Problem Possible Cause Solution Close the cylinder valve immediately. Prevent any ame or spark formation(do not switch on any electrical appliances). Tighten all connections on the gas system. There is a smell Leak in the gas system Check all components of the gas system of gas for visible damage replace defective parts with original spare parts. -
Page 22: First-Time Operation
First-time Operation Prior to using your Captiva Designs gas grill, verify that all of the following is true: • The burner tube is free of any debris or obstruction. • The proper gas type, gas connection, and regulator settings have been installed. -
Page 23: Care And Maintenance
Care and Maintenance Cooking Grate The best time to ‘burn-off’ the cooking grate is after every use (approx. 15 minutes). The grill is already hot from cooking thus requiring less fuel to obtain necessary temperature for ‘burn-off’. To ‘burn off’ or heat clean your grill, turn the burners to highest position and run for 15 minutes . Then turn off the burners and use a wire brush to clean excess food residue from the grates. - Page 24 Care and Maintenance Burner Assembly Removing The Burner Assembly 1. Make sure all control knobs are in the OFF position, the LP gas supply valve has been closed, and the gas hose is disconnected from the gas supply. 2. Open lid and remove cooking grate, ame tamers, clip for burner and burners. 3.
-
Page 25: Product Speci Cations
Installation, repair, and maintenance work should be performed by an authorized service technician. Work by unquali ed persons could be dangerous and will void the warranty. All Captiva Designs gas grills must have a quali ed installer complete the installation for the warranty to be in effect. Incorrect installation of the grill will void the warranty.
Need help?
Do you have a question about the E02GR010 and is the answer not in the manual?
Questions and answers