
Summary of Contents for All-Power APWC420
- Page 1 WOOD CHIPPER User Manual SAFETY AND OPERATION INSTRUCTIONS APWC420,APWC420E, APWC460E,APWC9420C IMPORTANT: Read safety rules and instructions carefully before operating equipment.
-
Page 3: Table Of Contents
Table of Contents Table of Contents Limited Warranty..........................2 PART I: General Safety Rules......................3 PART II: Familiar with the Wood Chipper..................9 PART III: Operating the Wood Chipper....................10 PART IV: Maintaining the Wood Chipper..................21 PART V: Troubleshooting and Parts List..................22 Conventions used in this manual WARNING This indicates a hazardous situation, which, if not avoided, could result in death or serious... -
Page 4: Limited Warranty
Limited Warranty Limited Warranty JD North America warrants to the original purchaser who uses the product in a consumer application (personal, residential or household usage) that all products covered under this warranty are free from defects in material and workmanship for 1 year or 300 hours whichever comes first (1-year parts and labor and following 1 year parts only) from the date of purchase. -
Page 5: Part I: General Safety Rules
Part I: General Safety Rules PART I: General Safety Rules Safety Labels Found on Your Unit... - Page 6 Part I: General Safety Rules *If your chipper is electric start model, connect the battery as the figure shows. WARNING Read this Safety & Operating Instructions manual before you use the Wood Chipper. Become familiar with the operation and service recommendations to ensure the best performance of your machine.
- Page 7 Part I: General Safety Rules Before using the wood chipper NOTICE A. Operators must be fully trained before using this machine. B.User Manual is read and understood. C. Machine is positioned on level ground, all guards are fitted and in good condition. D....
- Page 8 Part I: General Safety Rules Safety for Children and Pets WARNING Tragic accidents can occur if the operator is not alert to the presence of children and pets. Children are often attracted to the machine and the chipping activity. Never assume that children will remain where you last saw them.
- Page 9 Part I: General Safety Rules Keep combustible substances away from the engine when it is hot. Never cover the machine while the muffler is still hot. K. Do not operate the engine with the air cleaner or the carburetor air intake cover removed.
- Page 10 Part I: General Safety Rules O. Stay alert for hidden hazards or traffic. Keep all nuts and bolts tight and keep the equipment in good operating condition. A Note to All Users List of warnings and cautions cannot be all-inclusive. If situations occur that are not covered by this manual, the operator must apply common sense and operate this WOOD CHIPPER in a safe manner.
-
Page 11: Part Ii: Familiar With The Wood Chipper
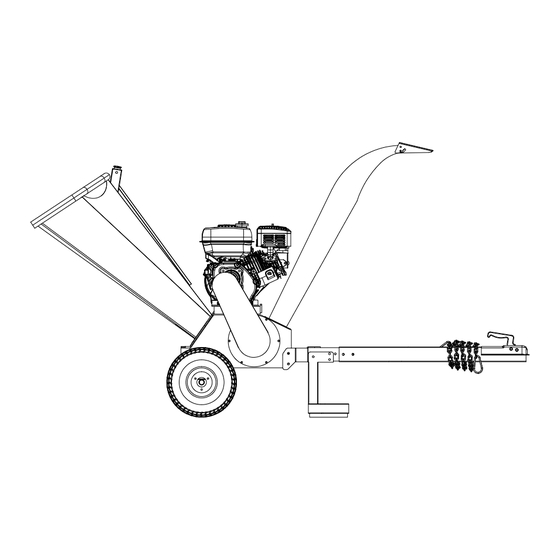
PART II: Familiar with the Wood Chipper It may be helpful to familiarize yourself with the controls and features of the Wood Chipper. If you have any question, please contact the dealers in your area. TECHNICAL SPECIFICATIONS APWC420(E)/APWC9420C APWC460E Engine 15HP/420cc four strokes... -
Page 12: Part Iii: Operating The Wood Chipper
Part III: Operating the Wood Chipper PART III: Operating the Wood Chipper It may be helpful to better familiarize yourself with the features of your Wood Chipper before beginning the steps outlined in this chapter. WARNING A. Read and understand all instructions, safety precautions, and/or warnings listed in “PART I: General Safety Rules”... - Page 13 Part III: Operating the Wood Chipper 1. Unpack the machine from the crate, the parts you find will be as the below figure shows: 2. Assemble the wheels After removing the unit from the crate, locate the 2 wheels and the correct hardware needed to assemble the wheels (M10*25 bolt, spring washer, flat washer*2, lock nut)*8 ***NOTE: OFF ROAD USE ONLY!...
- Page 14 Part III: Operating the Wood Chipper 3. Assemble the Infeed hopper(M10*35 bolt, flat washer, spring washer, lock nut)*2 A. locate the Infeed Hopper, the hardware needed to assemble it, and the side of the unit, that the hopper installs on the base of the unit. B.
- Page 15 Part III: Operating the Wood Chipper 5. Assemble the tow bar on the foot frame(spring washer, flat washer*2, M10*65, lock nut)*2 6. Locate the discharge chute, the hardware needed to assemble it(M10*35, flat washer, spring washer)*2...
- Page 16 Part III: Operating the Wood Chipper 7. Connect the emergency stop wire located at the base of the hopper coming from the engine. This can be done by inserting the bullet male wire into the bullet female wire connector. 8. Assemble the battery and its wires(optional, electric start only)(M8*25,flat washer*2, spring washer, lock nut)*2, (M6*15, M6 nut)*2...
- Page 17 Part III: Operating the Wood Chipper Starting 1. Position your Wood Chipper on flat, dry ground, and then stop the front wheel with brake, make sure the machine cannot be moved. 2. Before start the machine, make sure all nuts are tightened, remove the sticker and cable-tie from the stop button.
- Page 18 Part III: Operating the Wood Chipper Belt Adjustment and Replacement If you need to adjust the tightness of the belts or replace old belts, please follow the steps below: Step 1: Unscrew the 4 “Bolts” from the belt cover and remove the belt cover from the machine. Step 2: Remove the old belts and replace with new belts.
- Page 19 Part III: Operating the Wood Chipper Blade Replacement If you need to replace old blade or use another edge of the blade, please follow the steps below: Step 1: Remove the "Bearing cover" and open or remove the "Infeed hopper". Step 2: Use "Special Spanner"...
- Page 20 Part III: Operating the Wood Chipper Step 3: (WITH CAUTION) Use the "T-Socket" tool to unscrew the 5 "Blade bolts". Once the blade is replaced and in position, tighten the 5 "Blade bolts". Blade Adjustment If needed, adjust the “Gap” between the “Blade” and “Anvil” as shown in the figure below: (Usually the smaller one of the two "Gap"...
- Page 21 Part III: Operating the Wood Chipper As shown in the figure below (viewing from the bottom at the infeed hopper side): Step 1: Loosen the 5 "Anvil bolts". Step 2: Use the "Adjust bolts" to adjust the position of the "angle bar" until the gap between the "Anvil"...
- Page 22 Part III: Operating the Wood Chipper Wood Chipping NOTICE Woods’ and branches’ diameter should be no bigger than 120mm. WARNING Do not place your hands into the chute when loading. This is a very UNSAFE method and could result in injury to your hands. Do not reach or step across the rail while the Wood Chipper is running.
-
Page 23: Part Iv: Maintaining The Wood Chipper
Part IV: Maintaining The Wood Chipper PART IV: Maintaining the Wood Chipper Regular maintenance is the way to ensure the best performance and long life of your machine. Please refer to this manual and the engine manufacturer's user manual for maintenance procedures. -
Page 24: Part V: Troubleshooting And Parts List
Part VI: Troubleshooting and Parts List PART V: Troubleshooting and Parts List Most problems are easy to fix. Consult the Troubleshooting Table below for common problems and their solutions. If you continue to experience problems, contact the dealers in your area. WARNING Before performing any maintenance procedure or inspection, stop the engine, wait five minutes to allow all parts to cool. - Page 25 Part VI: Troubleshooting and Parts List Explosion View and parts list...
- Page 26 Part VI: Troubleshooting and Parts List Explosion View and parts list Ref.No. Description Ref.No. Description APWC420-01-DR Foundation APWC420-36-DR Foot fixation APWC420-02-DR M10 lock nut APWC420-37-DR M10*80 hex bolt APWC420-03-DR M10 washer APWC420-38-DR M10*65 hex bolt APWC420-04-DR M10*25 hex bolt APWC420-39-DR...
Need help?
Do you have a question about the APWC420 and is the answer not in the manual?
Questions and answers