Advertisement
Quick Links
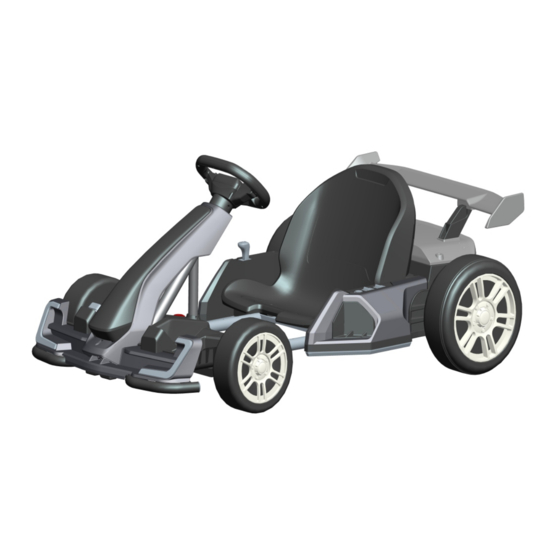
CHILDREN'S ELECTRIC DRIFT GO KART
Please read entire manual before starting assembly.
Keep this manual along with your purchase receipt for future reference.
WARNING:
CHOKING HAZARD-Small parts.
Not for children under 3 years.
CAUTION
Screws contain potentially
hazardous sharp points or sharp
edges. Adult assembly required.
Contents, colors and decorations may vary from those shown.
IMPORTANT, RETAIN FOR FUTURE REFERENCE: READ CAREFULLY
OWNER'S MANUAL
WARNING:
Toy must be assembled by adult before use.
WARNING
To reduce the risk of injury, adult
supervision is required. Never use on road
ways, near motor vehicles, on or near steep
inclines or steps,swimming pools or other
bodies of water. Always wear shoes, and
never allow more than one rider.
IN230700076V01_US
370-287V80
EN
Advertisement

Related Manuals for Aosom 370-287V80


Summary of Contents for Aosom 370-287V80
- Page 1 IN230700076V01_US 370-287V80 CHILDREN'S ELECTRIC DRIFT GO KART Please read entire manual before starting assembly. Keep this manual along with your purchase receipt for future reference. WARNING: WARNING: CHOKING HAZARD-Small parts. Toy must be assembled by adult before use. Not for children under 3 years.
- Page 2 Specifications: Battery: 24V/5AH*1 Motor: 24V 750# 150W*2 Suitable ages: 6+ years Maximum weight: 50kg Speed : 6-12km/h Power way: Charging type Charg: 12 hours ; Use: 83 hours Use of time: Input AC -240V, 50/60Hz, output DC 24V 1000 mA Charger: WARNING 1.The pictures in this instruction is only for explaining the operation and structure of...
- Page 3 STORAGE BATTERY INFORMATION AND MAINTENANCE ● Please charge hours before first time use. ● Please use the suitable adapter to charge storage battery, otherwise the ride-on will be damaged. ● Please charge the car once the speed is slower than normal, otherwise it will decrease storage battery life.
- Page 4 PREVENT FIRE AND ELECTRIC SHOCK: - Use the only rechargeable battery and charger supplied with your vehicle. - NEVER substitute the battery or the charger with another brand. Using another battery or charger may cause a fire or explosion. - Do not use the battery or charger for any other product. Overheating, fire or explosion could occur.
- Page 5 Charger Socket Charge the Battery The first charge will take about 12 hours. 1.Insert the charger connector into the charger port. 2.Plug the charger into a standard 120V or 230V wall outlet. 3.After charging it complete( at least 8-10 hours, but not more than 24 hours, with first charge taking about 12 hours)unplug the charger from the wall outlet and unplug the battery connector from the charger port.
- Page 6 Spoiler Main body Faceguard Front Hub Caps-small Steering wheel Seat size Rear Hub Caps-big size Front Wheel Rear Wheel Rear Axle Steering Rod Steering Fork Toolbox Cover Fixed Part M4*12 M4*16...
-
Page 7: Assembly Instruction
Note: • Please identify all parts before assembly and save all packaging material until assembly is completed to ensure that no parts are discarded. • Metal parts have been coated with lubricant for protection during shipment. Wipe all metal parts with a paper towel to remove any excess lubricant. Assembly tools required: Socket tool x2 Screwdriver... - Page 8 Front Fork Assembly 1.Put the fork to the right place of the body. 2.Lift the screw until it is aligned with the hole and nut, insert a M5X30 screw , and tighten a M5 nut on the opposite side. Faceguard Assembly...
- Page 9 1.Lift the faceguard. 2.Plug the connector from the vehicle body into the connector on the faceguard. 3.Put the fixed part to the faceguard. 4.Tighten two M4x16 screws through the fixed part into the faceguard. 5.Tighten one M4x16 screw through the faceguard into the vehicle body. Steering Rod Assembly 1.
- Page 10 1. Lift the steering wheel. 2. Plug the connector from the steering wheel into the terminal on the faceguard. 3. Lift the screw until it is aligned with the hole and nut, insert a M5X53 screw, and tighten a M5 nut on the opposite side. Rear Axle A ssembly Insert the rear axle to the main body from left to right ,make the two side with the same length.
- Page 11 1. Slide the rear wheel onto the rear axel, and keep the rear wheel match up with the gear box. 2. Slide the M8X1.3 washer onto the rear axel. 3. Tighten a M8 screw nut to the end of the rear axle with a socket tool, take the same precedure on the other side at the same time.
- Page 12 1.Put the seat to the main body in the right place. 2.Fasten the seat with two M4X16 screws(left& right) by the screwdriver (not included) Connect the Power Supply Plug the connector from the battery to the terminal from the vehicle body, match the same color.
-
Page 13: Operating Your Vehicle
1.Fit the spoiler into the groove in the toolbox cover. 2.Fasten it with two M4X12 screws by the screwdriver(not included). 3.Fit the spoiler assembly into the groove at the back of the main body. Operating your vehicle... - Page 14 1. Power switch: Turns the product on and off. 2. Light Button 3. High/Low speed switch: Operates the product to move forward in high or low speed. 4. Drift/Sport Mode: Operates the product at the Sport Mode, press the Drift Mode if want to have the function.
-
Page 15: Troubleshooting
Troubleshooting Problem Possible Cause Solution Circuit breaker tripped Circuit breaker may "trip" and stop the vehicle if it is overloaded or the driving conditions too severe. The breaker will automatically reset after approximately 10 seconds, and the vehicle will operate normally. - Page 16 Problem Possible Cause Solution Check all wires and connectors. Make sure that the motor harness connector Loose wire or connectors is plugged into the battery tightly, and that there are no loose wires around the motor. Circuit breaker may "trip" and stop the vehicle if it is overloaded or the driving Car was conditions too severe.
- Page 17 Problem Possible Cause Solution A new battery should have been charged for at least 12hours before using the vehicle for the first time. After that, it must Undercharged be recharge the battery for at least 8-10 battery hours after each use. Never charge longer than 24 hours.
-
Page 18: Parts Diagram
Parts diagram Parts diagram Note: Some parts shown are assembled to both sides of the vehicle. No. Part Quantity No. Part Quantity 1. Steering Rod 10. Rear Hub Cap 2. Main Body 11. Rear Wheel 3. Lock Nut 12. Toolbox Cover 4. - Page 19 If you have any questions, please contact our customer care center. Our contact details are below: 001-877-644-9366 customerservice@aosom.com Imported by Aosom LLC 27150 SW Kinsman Rd Wilsonville, OR 97070 USA MADE IN CHINA...
Need help?
Do you have a question about the 370-287V80 and is the answer not in the manual?
Questions and answers