Advertisement
Quick Links
THE CABINETRY AND BATH COLLECTIONS
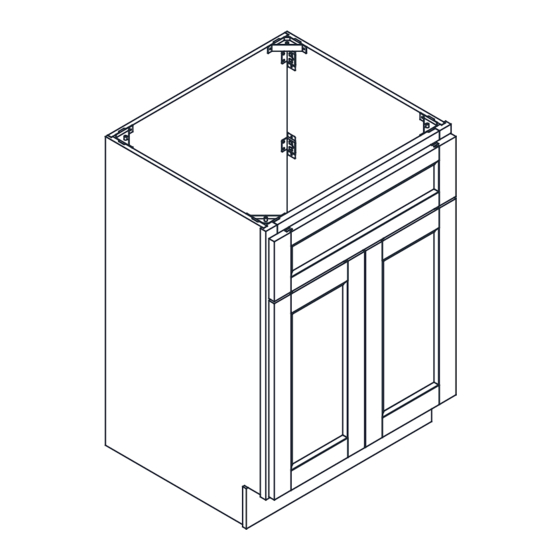
VANITY CABINET ASSEMBLY GUIDE
Item No: RTAV-24"-OHG / 605-0180
WELCOME TO AURAFINA READY-TO-ASSEMBLE VANITIES
Thank you for purchasing an AURAFINA ready to assemble vanity. You are on your
way to a beautiful, new bathroom vanity. There are a few simple tools necessary, and
some set up of your preparation/work area before you get started.
Our vanities go together easily, but you may want to ask a friend for assistance
when putting together larger vanities. One of you can align the components while
the other screws them together. Once you get going, assembly gets easier as you
improve your learning curve! While DIY-ing just remember, by assembling your own
vanity, you are saving the thousands that companies charge for "semi-custom" built
in style vanities.
Equipment: Phillips Head screw driver, flat head screw driver, cordless electric drill with the
flat and Phillips attachment bits (not necessary, but is a time saver) and a rubber mallet.
Prep Area: A dirt free carpet or the foam sheets and cardboard from your cabinet will provide
you with a scratch free cushioned work area. To save your back, working at table height is
always a good idea.
Unpack your AURAFINA vanity components and spread out the panels on your smooth prep
surface. Keep tools and the package of hardware screws, brackets, etc close by, but not under
any of the panels. Vanities ship with the hinges already secured to the door frame faces,
making installation quicker. We pre-mark all screw holes for easy acceptance of our hardware.
All hardware, mounting brackets, shelves and screws (plus extra) are provided. Hardware is
packaged in plastic bags separately from the cabinet panels so there is no damage.
1
PAGE
PREPARING VANITY FOR ASSEMBLY
R
www.AURAFINA.com
Advertisement

Related Manuals for AURAFINA RTAV-24-OHG


Summary of Contents for AURAFINA RTAV-24-OHG
- Page 1 Item No: RTAV-24"-OHG / 605-0180 WELCOME TO AURAFINA READY-TO-ASSEMBLE VANITIES Thank you for purchasing an AURAFINA ready to assemble vanity. You are on your way to a beautiful, new bathroom vanity. There are a few simple tools necessary, and some set up of your preparation/work area before you get started.
-
Page 2: Parts List
Toe Kick Back Panel 1 pc 1 pc HARDWARE LIST 3 x 12mm Male Bracket Female Bracket Plastic Bracket Round Head Screw 13 pcs 13 pcs 4 pcs 73 pcs 3 x 25mm Round Head Screw 2 pcs PAGE www.AURAFINA.com... - Page 3 Place front frame (A) and back panel (E) and toe tick (F) upside down on a smooth, flat surface to avoid any scratches. Attach the male bracket (1) to front frame (A) and back panel (E) and toe tick (F) using round head screws (4) and screw driver (not included) to Fasten. PAGE www.AURAFINA.com...
- Page 4 Screws to be tightened later on in the installation process. Note: Make sure the set screw hole is set, hole side directed towards the inside of the vanity PAGE www.AURAFINA.com...
- Page 5 PRO TIP: When placing side panels into brackets, slide female end over male going into slot over the face frame. While doing this, if you slightly angle the panel as the bracket makes female to male connection, it helps lock the fasteners into the groove. PAGE www.AURAFINA.com...
- Page 6 Slide bottom panel (D) into the grooves of right side (B) and left side (C), Lock fasteners in place and fasten with round head screw (4). Install Set Screws but do not tighten fully, this will allow for easier installation to other components of the vanity. PAGE www.AURAFINA.com...
- Page 7 (not included) to Fasten. Install Set Screws but do not tighten fully, this will allow for easier installation to other components of the vanity. Once back panel is installed we suggest to go back and tighten all female brackets hardware screws. PAGE www.AURAFINA.com...
-
Page 8: Toe Kick Installation
TOE KICK INSTALLATION With the finished side of the toe kick facing out, line the toe kick (F) to the right side (B) and left side (C). Lock fasteners in place and fasten with round head screw (4). PAGE www.AURAFINA.com... - Page 9 Attach plastic bracket (3) to the vanity, using round head screw (4). Please Note: A hole will need to be drilled in the back of the vanity to accommodate for the plumbing. We suggest you refer to your plumbing installer before drilling plumbing holes. PAGE www.AURAFINA.com...
Need help?
Do you have a question about the RTAV-24-OHG and is the answer not in the manual?
Questions and answers