Maverick HD-8 - Digital Alert Roasting Thermometer Manual
- Instruction manual (2 pages)
Advertisement
Introduction
Congratulations on your purchase of the Digital Alert Roasting Thermometer, a programmable food thermometer.
Unit Features

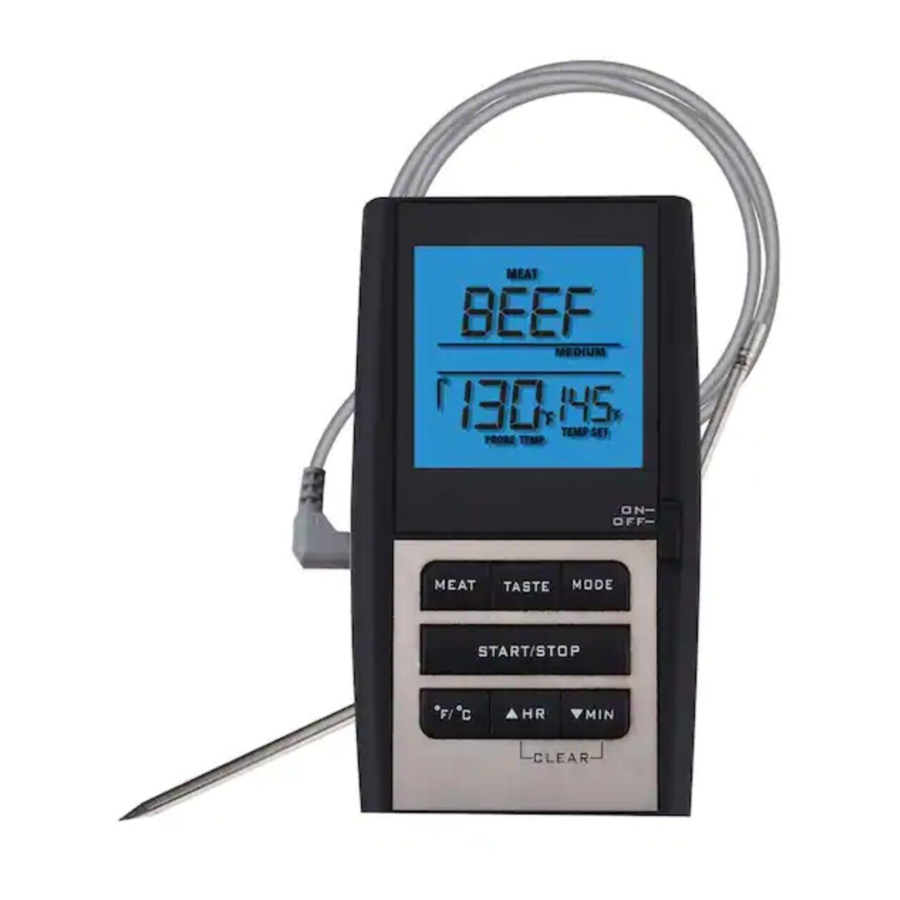
LCD (Liquid Crystal Display) – Displays all icons, temperature and timer.
The LCD color coded screen will change colors as per the following:
Blue – Will flash blue when the temperature has risen 10°F from the lowest temperature.
Green – Will flash green then the temperature is within 15° F of the set temperature.
Red- Will flash red when the temperature reaches the set temperature.
The LCD will display temperatures from 16- 482°F. (-9-250°C)
See LCD diagram for detailed information.
BATTERY COMPARTMENT – Holds 2 AAA batteries (Batteries are included).
Buttons
- MODE – Press to select thermometer or timer mode.
- HR – In timer mode, press to set hour. Press & hold for 2 seconds, the hours will increase 10 hours per second. In thermometer mode, press to increase the temperature value. Press & hold for 2 seconds, the temperature value will increase 10 degrees per second.
- °F/°C – In thermometer mode press to select temperature readings in Celsius or Fahrenheit.
- MIN – In timer mode, press to set minutes. Press & hold for 2 seconds, the minutes will increase 10 minutes per second. In thermometer mode, press to decrease the temperature value. Press & hold for 2 seconds, the temperature value will decrease 10 degrees per second.
- MEAT – In thermometer mode, press to select meat type, PROG (program), GBEEF (ground beef), GPOUL (ground poultry), BEEF, VEAL, CHCKE (chicken), PORK, POULT (poultry), LAMB & FISH. In Timer mode switches between hour/minute timer to a minute/second timer and back.
- START/STOP– In timer mode, press to start or stop the timer.
- TASTE – In thermometer mode, select the meat taste level, RARE, MED RARE, MEDIUM, MED WELL and WELL DONE.
LCD Diagram

Measure meat temperature to USDA doneness temperature range
- Press MODE to select thermometer mode. The upper display will show a small MEAT and a meat type such as BEEF.
- Press MEAT to select meat type. PROG (program), GBEEF (ground beef), GPOUL (ground poultry), BEEF, VEAL, CHCKE (chicken), PORK, POULT (poultry), LAMB & FISH.
- Press TASTE to select the level of doneness for the meat type selected. RARE, MED RARE, MEDIUM, MED WELL and WELL DONE.
Note: The temperature displayed to the right of the actual meat temperature PROBE TEMP will show the preset temperature TEMP SET according to USDA doneness levels. Example: Beef will be Well Done at 165°F. - Once the temperature of meat reaches the preset doneness level the Unit will beep and the LCD backlight will turn red.
Measure meat temperature set to your specific taste
- Press MODE to select thermometer mode. The upper display will show a small MEAT and a meat type such as BEEF.
- Press HR or MIN to raise or lower the set temperature. As you press HR or Min the display changes to PROG (program). Holding the button will raise or lower the temperature setting rapidly. Pressing MEAT will return you to the preset USDA ranges.
- Once the temperature of meat reaches the preset doneness level the UNIT will beep and the LCD backlight will turn red.
Using the Timer Count down
- Press MODE to select timer mode. The upper display will show a small TIMER and 0:00.
- Press HR and MIN button to set the timer. Press START/STOP button to start countdown. "T" will blink for every second.
- To stop the countdown process, press START/STOP button. The "T" becomes solid.
- Press HR & MIN buttons together to clear the setting back to 0:00.
Note: The minimum setting for the timer is 1 minute. When the timer counts down below 1 hour 1:00 the display will change to 59'59" display advising 59 minutes 59 seconds. The seconds will be shown counting down then. When the countdown reaches 0'00" the timer starts counting up and it will beep for 60 seconds. The timer and "ST" will blink. Press the START/STOP button to stop beeping. When the count up reaches 23:59:59 (59 seconds are not displayed) the display will turn to 0:00, the unit beeps and "ST" will blink for 60 seconds.
Count up
- Press MODE to select timer mode. The upper display will show a small TIMER and 0:00.
- Press START/STOP button to start count up. The "S" will blink for every second.
- To stop the count up process, press START/STOP button. The "S" becomes solid.
- Press CLEAR button to clear the setting back to 0:00.
HELPFUL HINTS
Do not use the probe wire above 662 °F (350 °C).
Do not allow the probe or probe wire to come into contact with flames. If cooking with grill cover closed, only use medium or low heat.
If the LCD display LLL or HHH instead of the probe temperature, wait for probe to reach room temperature. If LLL or HHH is still displayed it is likely the internal probe wire has shorted out either through moisture or heat damage.
If the probe becomes defective within 90 day warranty period please return defective probe to address below along with return address and we will send you new probe no charge.
If the temperature displayed seems to read too high or the temperature seems to increase too quickly check to make sure the probe tip is not poking through the food to outside. Reposition the probe tip in the center of the thickest part of food. Avoid touching bone or heavy fat areas.

Not Intended for Use by Persons ages 12 and under.
Do not use the UNIT in the rain. It is not waterproof.
Do not expose the plug of the stainless steel probe or the plug in hole of the Unit to water or any liquid. This will result in a bad connection and faulty readings.
Do not expose the Unit to direct heat or surface heat.
Do not use stainless steel probe in microwave oven.
Cleaning
Wash the metal probe tip with hot soapy water and dry thoroughly. Do not immerse the probe in water while cleaning.
Wipe the UNIT with damp cloth. Do not immerse in water.
Documents / ResourcesDownload manual
Here you can download full pdf version of manual, it may contain additional safety instructions, warranty information, FCC rules, etc.
Download Maverick HD-8 - Digital Alert Roasting Thermometer Manual
Advertisement


Need help?
Do you have a question about the HD-8 and is the answer not in the manual?
Questions and answers