
Related Manuals for Metro Mobility Patriot


Summary of Contents for Metro Mobility Patriot
- Page 1 USER MANUAL Model: Patriot Non-medical Device This product is not a medical device and is not intended to assist, treat, diagnose or alleviate any medical condition or disability.
- Page 2 How to Use This Manual Please read the user manual carefully before taking the product into use. ・ This manual applies to our model: Patriot ・ This manual contains operations and assembly methods. ・ This manual contains scooter maintenance and self inspection methods. Please store in proper place.
-
Page 3: Table Of Contents
Content Introduction ..........................03 Safety Guide ..........................04 III. Operation ..........................05 IV. Seat Removal and Adjustment ..................10 Tiller, Battery and Charging....................11 VI. Transportation..........................14 VII. Guidance for Safe Operation and Use................15 VIII. Battery and Charging Information ...................18 IX. General Warning ........................20 Specifications .......................... -
Page 4: Introduction
All of our Scooters undergo rigorous tests to ensure they meet our requirements for comfort, safety and durability. Metro Mobility is based in product quality, value and genuinely caring for our customers. We pride ourselves not only on designing and building the most innovative products, but also on our commitment to offer an excellent standard of customer service both in sale and after sale. -
Page 5: Safety Guide
Safty Guide DO NOT OPERATE THE SCOOTER BEFORE READING AND UNDERSTANDING THIS INSTRUCTION MANUAL. IF YOU ARE IN DOUBT ABOUT THE MEANING OF THESE INSTRUCTIONS, OR ANY OF THE CAU- TIONS AND WARNINGS, PLEASE CONSULT YOUR HEALTHCARE PROFESSIONAL, DEALER OR RELEVANT TECHNICAL PERSONNEL. -
Page 6: Operation
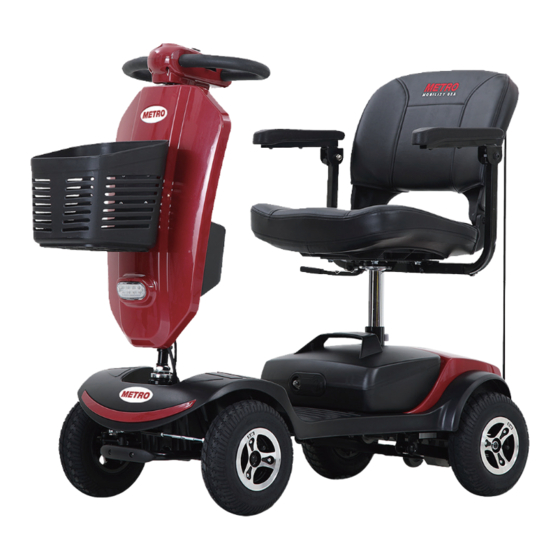
Operation PARTS DESCRIPTION Control Panel Adjustable Armests Basket Headlight Battery Tires CONTROL PANEL All of the drive controls for the scooter are to be found on the tiller control box. 1. Battery Gauge 2. Speed Knob 3. Throttle Control Lever 4. - Page 7 Operation The Preset Speed Knob Turning this knob to the left, reduces your avail- able maximum speed. Turning it to the right, increases the available maximum speed (see figure 1). The Battery Gauge This gives an approximation of battery charge and is illuminated for clarity.
- Page 8 Operation Throttle Lever The throttle lever controls the speed as well as the forward and reverse motion of the scooter. To move the scooter in a FORWARD motion, PULL the lever with the RIGHT hand or PUSH the lever with the LEFT THUMB. To move the scooter in a REVERSE motion, PULL the lever with the LEFT HAND or PUSH the lever with the RIGHT THUMB.
- Page 9 Operation Make sure that the switch is in the OFF position before getting on or off the scooter. To ensure that the scooter is OFF, remove the key. Charging Socket The socket to connect the charger is located on the battery pack (see figure 5 and 6). To use the socket, swivel the plastic cover to the left or right to reveal the socket connec- tions.
- Page 10 Operation WARNING Use extreme caution in the freewheel mode, especially on slopes/in- clines. In these circumstances, letting go of your scooter will cause the scooter to roll. Please ensure that the freewheel function is disengaged when intend- ing to ride the scooter and that after use, it is reengaged. Failure to do so may result in injury.
-
Page 11: Seat Removal And Adjustment
Seat Removal and Adjustment Removing the Seat 1. Lift armrests up for easier access to the seat lever (see figure 8). 2. Stand behind the seat and fold the backrest down (see figure 9). 3. Grab the seat base and while pulling the seat lever up, lift the seat vertically (see figure 10). -
Page 12: Tiller, Battery And Charging
Tiller, Battery and Charging Tiller Adjustment The scooter features an infinitely adjust- able tiller which allows you to lock the tiller in the most comfortable position for driving. This feature also lets you fold the tiller down fully, for transportation and stowage (see figure 13).The folding knob is located on the bottom of the tiller. - Page 13 Tiller, Battery and Charging Battery Charging Your scooter is supplied with a charger. Please note that only chargers supplied by your local authorized dealer with a capacity of minimum 2.0 Amps and maximum of 6.0 Amps should be used. Turn off scooter before charging.
- Page 14 Tiller, Battery and Charging WARNING! Only use the original charger from our company. Using another brand’s charger may shorten your warranty period, using an unknown charger may cause damage to your scooters, and using the wrong charger may cause a fire. Use extreme caution to manage the battery and charger.
-
Page 15: Transportation
Transportation Disassembling Transportation 1. Switch off the scooter 2. Remove the basket 3. Remove the seat 4. Take out the detent pin and remove the seat post 5. Using the folding knob, lower the tiller to lock into its lowest setting 6. -
Page 16: Guidance For Safe Operation And Use
Guidance for Safe Operation and Use Basic Driving It is advisable, for the first few sessions of operating your scooter, that the area around you is clear of obstacles and pedestrians. Before operating your scooter, ensure the seat height and position has been adjusted to your satisfaction and that the tiller angle has been set for optimal safety and comfort. - Page 17 Guidance for Safe Operation and Use Hill climbing capability and the distance travelled between battery charges will be adversely affected by things such as: · The weight of the user. · The use and weight of accessories · The terrain (e.g. grass or gravel). ·...
- Page 18 Guidance for Safe Operation and Use Emergency Braking In an emergency or the unlikely event of an unwanted movement of the scooter, switch- ing off the key switch will bring the scooter to a stop. Though very effective, emergency braking is extremely abrupt and must never be used under normal circumstances. Letting go of the throttle lever will slow the scooter to a controlled stop.
-
Page 19: Battery And Charging Information
Battery and Charging Information General information Batteries are the power source for almost all of the modern mobility products available today. The design of batteries used in mobility products is significantly different from other batteries. Car batteries, for example are designed to release a large amount of power over a short period of time, while mobility batteries (commonly called deep cycle batteries) release their power evenly over a long period of time. - Page 20 Battery and Charging Information This type of battery uses GEL electrolytes which are totally sealed within the battery’s outer case. As the battery case is sealed, you can safely transport this type of battery without fear of acid spilling. Furthermore, they are approved for transportation on aircraft, boats and trains.
-
Page 21: General Warning
General Warning Never operate the scooter Never use electronic radio Make sure that there are no while you are under the transmitters such obstacles behind you when influence of alcohol. walkie-talkies cellular reversing. phones while operating. >10° Do not ride your scooter in DO not attempt to climb, Do not ride your scooter in snow to avoid an accident... - Page 22 General Warning Attention: Switch on the scooter lights to make yourself visible when there are low levels of light, day or night. The rear body panel (where fitted) is designed to cover the Drive Assembly, Wiring Harness and Electrical Connectors. DO NOT stand on any of the body panels, only the foot pedal.
-
Page 23: Specifications
Specifications Measurements are for guidance only. Small differences may occur. PARAMETER Patriot LENGTH 1040mm REAR WIDTH 510mm HEIGHT 920mm MAX. USER WEIGHT 136 kg (300 lbs) BATTERY CAPACITY 12Ah MAX SAFE SLOPE 8 degrees at 136kg TURN RADIUS 1100mm NARROWEST FOR TURNNING... - Page 24 Specifications Classification of operation Continuous operation Volts of the mobility scooter power 24VDC(2 units) Type of power D.C.24V...
-
Page 25: Routine Maintenance
Routine Maintenance The following gives an indication as to when routine maintenance checks should be made. Daily Look at the battery charge indicator on the tiller, before use, to ensure batteries were charged. Weekly Use a damp soft cloth and mild detergent on panels, battery wells, tiller and seat. Each tire should be free of debris, oil, deep cuts, or distortion. -
Page 26: Trouble Shooting Guide
Trouble Shooting Guide Sympton Possible Cause Solution Batteries have been Charge batteries for eight charged for enough time hours or more Shortened range Batteries are weak and cannot Replace battery pack hold charge Replace charger Battery pack fault Charge fault Contact local mobility dealer Charger loom or plug damaged Check plugs and looms... - Page 27 Trouble Shooting Guide Sympton Possible Cause Solution Electrical malfunction Contact dealer Motor runs irregularly and/or noisily Control system fault Contact dealer Do not attempt to open any parts of the scooter control system, battery pack, looms, plugs, or battery charger. This is critical for your safety as there are no user serviceable parts.
- Page 28 Trouble Shooting Guide Number of beeps Represent Possible cause Solution Accelerate variable Check all the accelerate Speed limit resistor, Speed variable resistor, Speed resistor issue limited variable limited variable resistor resistor other or other wiring wiring issue Motor voltage issue Motor other Check Motor and other...
-
Page 29: Warranty
Warranty will also be refused if damage is deemed to have been caused through misuse or an accident for which Metro Mobility cannot be deemed responsible. NOTE: Metro Mobility provides parts only under warranty. Your authorized Metro Mobility dealer is responsible for labor and services.
Need help?
Do you have a question about the Patriot and is the answer not in the manual?
Questions and answers
how to adjust the seat back
To adjust the seat back on a Metro Mobility Patriot:
1. Lift the armrests up for easier access to the seat lever.
2. Stand behind the seat and fold the backrest down.
3. Grab the seat base and, while pulling the seat lever up, lift the seat vertically.
4. Place the seat at the desired location for stowage.
For seat height adjustment:
1. Remove the seat base as described earlier.
2. Change the seat post to the new position and refit the detent pin.
3. Put the seat base back on.
For armrest adjustment:
1. Loosen the adjustable screws.
2. Move the armrests to the desired position.
3. Re-tighten the adjustable screws to secure the new position.
This answer is automatically generated