
Related Manuals for GRIND FITNESS CHAOS4000


Summary of Contents for GRIND FITNESS CHAOS4000
- Page 1 CHAOS4000 Half Rack Assembly Instructions WARNING Read the assembly, installation, care, maintenance, and use instructions in this manual prior to assembling and using this equipment. Save this manual for future reference.
-
Page 2: Part List
PART LIST Key No. Qty. Description Key No. Qty. Description Back Plate Right Base Left Base Support Plate Cross Bar M10x20mm Bolt Front Upright M10x70mm Bolt Rear Upright M10x95mm Bolt Crossmember M10 Nut Pull-Up Bar M10 Spring Washer M10 Washer Weight Storage Peg Bumper Right J-Cup... -
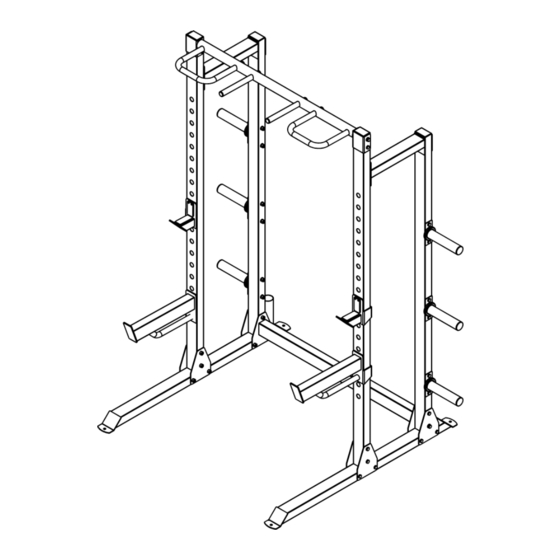
Page 3: Exploded Drawing
EXPLODED DRAWING... - Page 4 ASSEMBLY Two adults required for assembly. STEP 1 Identify the Right Base (1) and the Left Base (2), and orient them as shown. Attach the Support Plate (14) to Base with M10x95mm Bolts (17).
- Page 5 STEP 2 Attach the Rear Upright (5) to the Left Base with two M10x95mm Bolts (17), M10 Spring Washer (19) and M10 Washer (20) as shown.
- Page 6 STEP 3 Attach the Cross Bar (3) to Left Base as shown, secure with three M10 Nuts (18). Do not fully tighten the bolts yet.
- Page 7 STEP 4 Attach the Rear Upright (5) to the Right Base with two M10x95mm Bolts (17), M10 Spring Washer (19) and M10 Washer (20) as shown.
- Page 8 STEP 5 Attach the Cross Bar (3) to Right Base as shown, secure with three M10 Nuts (18). Do not fully tighten the bolts yet.
- Page 9 STEP 6 Attach the Support Plate (14) to Left Base with M10x95mm Bolts (17).
- Page 10 STEP 7 Attach the Front Upright (4) to the Left Base with two M10x95mm Bolts (17) as shown. Please note the indicated holes are in the position as shown.
- Page 11 STEP 8 Attach a Support Plate (14) to Left Base as shown, secure with four M10 Nuts (18). Do not fully tighten the bolts yet.
- Page 12 STEP 9 Repeat steps 6-8 to assemble the Right Front Upright (4).
- Page 13 STEP 10 Orient the Crossmember (6) and Back Plate (13) as shown, secure with M10X70mm Bolts (16), M10 Spring Washers (19), M10 Washers (20) and M10 Nuts (18) as shown. Then attach the Crossmember (6) to Front Upright with M10x20mm Bolts (15), M10 Spring Washers (19), M10 Washers (20) as shown.
- Page 14 STEP 11 bracket Identify the Pull-Up Bar (7) and orient as shown. Make sure that the long side of the bracket is in the indicated location. Attach the Pull-Up Bar (7) to the Front Upright (4) with two M10x95mm Bolts (17), an M10 Spring Washer (19), an M10 Washer (20), and an M10 Nut (18) Repeat this step on the other side of the weight rack.
- Page 15 STEP 12 Next, attach a Weight Storage Peg (8) to the Rear Upright (5) with two M10x95mm Bolts (17), two M10 Washers (20), and two M10 Nuts (18). Then, slide a Bumper (21) onto the Weight Storage Peg (8). Attach two more Weight Storage Pegs (8) to the Right Rear Upright (5) in the same way.
- Page 16 STEP 13 Insert the Right J-Cup (9) into the desired adjustment hole in the Right Front Upright (4). Then, insert the Right Spotter Arm (11) into an adjustment hole below the Right J-Cup. Repeat this step on the other side of the weight rack.
- Page 17 » Inspect equipment prior to use. DO NOT use if it appears damaged or inoperable » DO NOT attempt to fix broken equipment. Call GRIND Fitness for assistance 701-566-5204 » Use equipment only for the intended use. DO NOT modify the equipment »...
- Page 18 PRx Performance LLC, DBA GRIND Fitness warrants to the original consumer purchaser that this product will be free of defects in material and workmanship for 30 days from the date of purchase. GRIND Fitness will repair or replace the product, at our sole discretion, in the event of such a defect within the warranty period.
Need help?
Do you have a question about the CHAOS4000 and is the answer not in the manual?
Questions and answers