
Related Manuals for WattBox WB-800I-FP


Summary of Contents for WattBox WB-800I-FP
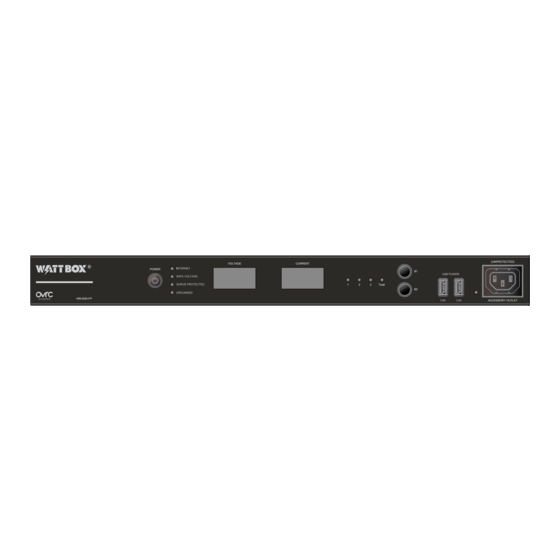
- Page 1 WB-800I-FP WattBox® Rack Mountable Faceplate Display | 220 - 240V (UNPROTECTED) VOLTAGE CURRENT POWER Total WB-800I-FP ACCESSORY OUTLET Quick Start Guide...
-
Page 2: Important Safety Instructions
Important Safety Instructions Read and observe the following safety points at all times. Notice For indoor user only. Internal components are not sealed form the environment. The device can only be used in a fixed location such as a telecommunication centre, or a dedicated computer room. When you install the device, ensure that the protective earthing connection of the socket-outlet is verified by a skilled person. -
Page 3: Key Features
• Accessory outlet on the front panel (unprotected and non-controllable). Package Contents (UNPROTECTED) VOLTAGE CURRENT POWER Total WB-800I-FP ACCESSORY OUTLET Removable, region-specific power cord Rubber feet (4) Face plate (in over-pack box, not PDU carton) Pre-installed rack ears (2) IEC sleeve (1) -
Page 4: Rear Panel
Pin 2 - Orange Pin 6 - Green Pin 3 - White/Green Pin 7 - White/Brown TIA/EIA-568-B connect it to a compatible 800I series WattBox PDU on firmware version 2.3.0.0 or Pin 4 - Blue Pin 8 - Brown newer. Note:... - Page 5 Now, the faceplate will remain on when resetting all outlets of the connected 800I series WattBox. Once the faceplate and 800I series WattBox PDU are connected, firmware updates are automatically pushed from the WattBox connected to PDU port 1. During this update process the LEDs turn off and the faceplate is unresponsive. Allow five minutes for the update to complete.
-
Page 6: Front Panel
CURRENT POWER Total WB-800I-FP ACCESSORY OUTLET AC Power Button – Press and hold for three seconds to manually toggle the outlets on or off on all connected PDUs. Outlets configured as Disabled or Reset Only are not affected on each connected PDU. - Page 7 How to Manually Sequence Through Individual PDUs • Tap B1 to sequence through PDUs 1-3 & Total (moving left to right). • Tap B2 to sequence through Total and PDUs 3-1 (moving right to left). As you sequence through the PDUs, the corresponding PDU LED flashes to indicate the selected PDU. The displays show the corresponding voltage and current for the selected PDU.
- Page 8 How to Manually Reset All Outlets From the Faceplate Press and hold B1 and B2 at the same time for 3 seconds to reset all PDU outlets plugged into the faceplate. The Current display shows a rotating 0 as the PDU outlets reset. Note: Outlets configured as Disabled do not reset.
-
Page 9: Led Operation
LED Operation Blue (Solid) All host pings are successful across all connected PDUs. Internet Blue (Slow Blink) Host ping partial fail across at least one of the connected PDUs. Red (Solid) All host pings are failing on at least one of the connected PDUs. Blue (Solid) Enabled and safe on all connected PDUs. -
Page 10: Mounting Options
Mounting Options The WB-800I-FP can be rack-mounted or placed in a cabinet. 0I -F Rack Mounting Install the WattBox faceplate into the rack using the pre-in- ta l stalled rack ears and four 10-32 rack screws for AV racks, or 12-24 rack screws for IT racks (rack screws not included). - Page 11 B -8 I- F (UNPROTECTED) VOLTAGE CURRENT POWER Total ta l WB-800I-FP ACCESSORY OUTLET (UNPROTECTED) VOLTAGE CURRENT POWER Total WB-800I-FP ACCESSORY OUTLET...
- Page 12 One, LLC (formerly known as Wirepath Home Systems, LLC), in the United States and/or other countries. 4Store, 4Sight, Control4, Control4 My Home, SnapAV, and WattBox are also registered trademarks or trademarks of Snap One, LLC. Other names and brands may be claimed as the property of their respective owners. Snap One makes no claim that the information contained herein covers all installation scenarios and contingencies, or product use risks.
Need help?
Do you have a question about the WB-800I-FP and is the answer not in the manual?
Questions and answers