Table of Contents
Advertisement
Quick Links
Advertisement
Table of Contents

Related Manuals for WattBox WB-800-FP

Summary of Contents for WattBox WB-800-FP
- Page 1 WB-800-FP WattBox® Rack Mountable Faceplate Display Quick Start Guide...
-
Page 2: Key Features
• Three buttons for faceplate navigation and outlet control. • Accessory outlet on the front panel (unprotected and non-controllable). Package Contents • 1x WB-800-FP • 2x Rack ears with included chassis screws (already installed) • 1x 6ft power cord • 1x Locking clip to secure IEC power cord •... -
Page 3: Rear Panel
Pin 5 - White/Blue 1 2 3 4 5 6 7 8 Pin 2 - Orange Pin 6 - Green in OvrC, you must connect it to a compatible 800 series WattBox Pin 3 - White/Green Pin 7 - White/Brown TIA/EIA-568-B... - Page 4 Once the faceplate and 800 series WattBox PDU are connected, firmware updates are automatically pushed from the WattBox connected to PDU port 1. During this update process the LEDs turn off and the faceplate is unresponsive. Allow five minutes for the update to complete.
-
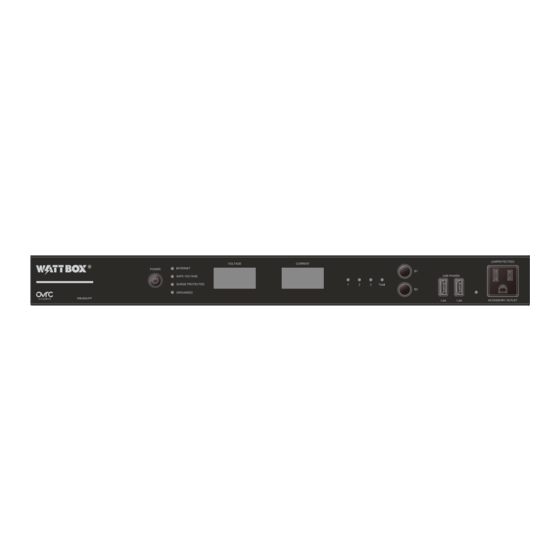
Page 5: Front Panel
Front Panel 6 7 8 AC Power Button – Press and hold to manually toggle the outlets on or off on all connected PDUs. Outlets configured as Disabled or Reset Only are not affected on each connected PDU. LED Indicators – See the status of the internet, safe voltage, surge protected, and whether the unit is properly Grounded. - Page 6 specified PDU. Aggregate of all PDUs display when landing on Total. This button is also used to reset individual PDUs. See “How to Manually Reset Individual PDUs From the Faceplate” on page 7. USB Ports – For powering USB devices. 1.5A maximum per port. Accessory Outlet (Unprotected and Non-Controllable) –...
- Page 7 How to Manually Reset Individual PDUs From the Faceplate Tap B1 or B2 to sequence through the PDUs. With the PDU number that needs to be reset flashing, press and hold B1 OR B2 for 3 seconds. The Current display shows a rotating 0 as the outlet resets. Note: Outlets configured as Disabled do not reset.
-
Page 8: Led Operation
LED Operation Blue (Solid) All host pings are successful across all connected PDUs. Internet Blue (Slow Blink) Host ping partial fail across at least one of the connected PDUs. Red (Solid) All host pings are failing on at least one of the connected PDUs. Blue (Solid) Enabled and safe on all connected PDUs. -
Page 9: Mounting Options
10-32 rack screws for AV racks, or 12-24 rack screws for IT racks (rack screws not included). Cabinet Placement Remove the pre-installed rack ears, if desired, and attach the supplied feet to the bottom of the WattBox faceplate for cabinet placement. - Page 10 Snap One, LLC (formerly known as Wirepath Home Systems, LLC), in the United States and/or other countries. 4Store, 4Sight, Control4, Control4 My Home, SnapAV, and WattBox are also registered trademarks or trademarks of Snap One, LLC. Other names and brands may be claimed as the property of their respective owners. Snap One makes no claim that the information contained herein covers all installation scenarios and contingencies, or product use risks.
Need help?
Do you have a question about the WB-800-FP and is the answer not in the manual?
Questions and answers