
Subscribe to Our Youtube Channel
Related Manuals for Milestone pro MP-SUH43-KVM


Summary of Contents for Milestone pro MP-SUH43-KVM
- Page 1 User Manual MP-SUH43-KVM 18G 4x3 VC Switcher w/ Charging All Rights Reserved Version: MP-SUH43-KVM_2023V1.0...
-
Page 2: Table Of Contents
Table of Contents 1. Product Introduction ....................1 1.1 Features ......................1 1.2 Package List ...................... 2 2. Specification ....................... 3 3. Panel Description ......................4 3.1 Front Panel ......................4 3.2 Rear Panel ......................5 4. Video Mode ......................... 6 4.1 BYOM Mode ...................... -
Page 3: Product Introduction
1. Product Introduction Thanks for choosing the MP-SUH43-KVM HDMI 2.0 Web-Conferencing Room Switcher! The matrix switcher simplifies meeting room and presentation space system integration by providing two video mode (BYOM mode and Standard mode) with three HDMI inputs, one USB-C input and three HDMI output. The USB-C input supports video, data (USB host) and power charging up to 60w. -
Page 4: Package List
1.2 Package List 1x MP-SUH43-KVM ⚫ 4x Mounting Ear Screws ⚫ 4x Plastic Cushions ⚫ 1x RS232 Cable (USB-A to Mini-USB) ⚫ 1x Power Adaptor (24V DC 5A) ⚫ 1x User Manual ⚫ Note: Please contact your distributor immediately if any damage or defect in the... -
Page 5: Specification
2. Specification Video Input Video Input (3) HDMI, (1) USB-C Video Input Connector (3) Type-A female HDMI, (1) USB-C Video input Video Resolution Up to 4K@60Hz 4:4:4, HDR Video Output Video Output (3) HDMI Video Output Connector (3) Type-A Female HDMI Video output Video Resolution HDMI: Up to 4K@60Hz 4:4:4, HDR Audio Output... -
Page 6: Panel Description
3. Panel Description 3.1 Front Panel ① MODE: A mode switch to select auto/manual switching. AUTO: The unit will automatically switch between BYOM and STANDARD ⚫ mode by detecting input signals. MANUAL: User can select BYOM or STANDARD mode manually. CONTACT ⚫... -
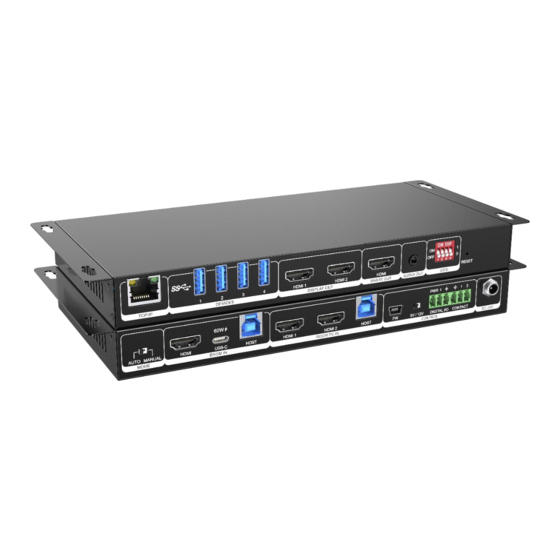
Page 7: Rear Panel
3.2 Rear Panel ① TCP/IP: Connects to the LAN to control the switcher by Web GUI. ② DEVICES: 4 port USB3.0 client hub. ③ DISPLAY OUT: 2 HDMI output ports. ④ SHARE OUT: 1 HDMI output port. ⑤ AUDIO OUT: Connects to audio playback device for audio de-embedding. ⑥... -
Page 8: Video Mode
4. Video Mode 4.1 BYOM Mode BYOM (Bring Your Own Meeting) mode allows users to bring their own device to meeting. USB-C or HDMI of LAPTOP IN will switch to 2 HDMI outputs of DISPLAY OUT. USB devices will switch to the USB Host of LAPTOP-IN (USB-B port if HDMI source is using and USB-C port if USB-C source is using). -
Page 9: Standard Mode
4.2 Standard Mode 2 HDMI inputs of ROOM PC-IN will switch to DISPLAY separately. USB-C or HDMI of LAPTOP IN will switch to SHARE OUT. USB devices will switch to the USB-B Host of ROOM PC-IN. Audio output will de-embedded from HDMI 1 of ROOM PC-IN. -
Page 10: Switching Mode
5. Switching Mode 5.1 Manual Switching When the DIP switch of rear panel is selected to MANUAL, the switcher is in manual switching mode. User can select BYOM or STANDARD mode via Web GUI manually. 5.2 Auto Switching When the DIP switch of rear panel is selected to AUTO, the switcher is in auto- switching mode. -
Page 11: Gui Control
6. GUI Control The switcher can be controlled via TCP/IP. The default IP settings are: IP Address: 192.168.0.178 Subnet Mask: 255.255.255.0 Type 192.168.0.178 in the internet browser, it will enter the below Operation page: Mode Selection: Select BYOM or Standard mode. ⚫... -
Page 12: Manage Page
6.1 Manage Page ⚫ Event list: 6 events list here, click the pencil for event setting ⚫ Information: Event’s information like label, description, button show, display icon. ⚫ Trigger: 7 triggers can be selection. 1) USB detect-laptop 2) HDMI Sync-laptop 3) Digital I/O 4) Contact 1 5) Contact 2 6) Schedule ON 7) Schedule OFF... -
Page 13: Schedule
6.2 Schedule Current Date/ Time setting. ⚫ System on/off setting. ⚫ 6.3 Network Setting IPv4 and IPv6 setting. ⚫... -
Page 14: System Setting
6.4 System Setting Room name, Logo setting. ⚫ Time setting: ⚫ Auto/ Manual setting. Daylight saving time. System Configuration: ⚫ Upload or download configuration file. Firmware update. Factory Reset. -
Page 15: Gui Upgrade
6.5 GUI Upgrade Please visit at http://192.168.0.178:100 for GUI online upgrade. Type the username and password (the same as the GUI log-in setting, modified password will be available only after rebooting) to login the configuration interface. After that, click Administration in the source menu, and then click Upload Firmware, select the desired update file and press Apply, it will start upgrading then. -
Page 16: Edid Switch
7. EDID Switch The DIP switch on rear panel is an EDID selector, please see details below. EDID 0000 1920x1080@60 8bit Stereo (default) 0001 WUXGA 1920x1200 0010 1920x1080@60 8bit High Definition Audio 0011 3840x2160@60Hz 4:2:0 Deep Color Stereo Audio 0100 3840x2160@60Hz Deep Color Stereo Audio 0101 3840x2160@30Hz 8bit Stereo Audio... -
Page 17: Rs232
8. RS232 RS232 commands can be transmitted to the unit for local control. RS232 Control Software Installation/uninstallation ⚫ Installation: Copy the control software file to the computer connected with the transmitter. ⚫ Uninstallation: Delete all the control software files in corresponding file path. Basic Settings First connect the transmitter with all input devices and output devices needed, then connect it with a PC which is installed with RS232 control software. -
Page 18: Rs232 Control Commands
8.1 RS232 CONTROL COMMANDS Communication protocol: RS232 Communication Protocol Baud rate: 115200 Data bit: 8 Stop bit: 1 Parity bit: none The end mark of command is “<CR><LF>”. Command Function Command & Feedback Example >Help <Set the HDMI switch Get the list of all commands mode >SetAV Param Param = M1,M2... - Page 19 (default) 01 - WUXGA 1920x1200 02 - 1920x1080@60 8bit High Definition Audio 03 - 3840x2160@60Hz 4:2:0 Deep Color Stereo Audio 04 - 3840x2160@60Hz Deep Color Stereo Audio 05 - 3840x2160@30Hz 8bit Stereo Audio 06 - 3840x2160@60Hz Deep Color High Definition Audio 07 - 3840x2160@60Hz Deep Color HDR LPCM 6CH 08 - copy EDID from Share...
- Page 20 1 - IO Mode 1 2 - IO Mode 2 >GetIOMode >GetIOMode >GetIOMode <IOMode 1 >SetCtlCecOn Param >SetCtlCecOn ON Param = ON,FF >SetCtlCecOn ON - ON <CtlCecOn ON FF - OFF >GetCtlCecOn >GetCtlCecOn >GetCtlCecOn <CtlCecOn ON >SetSchedule >SetSchedule >SetSchedule <Param1,Param2,Param3,Para <1,0,1,0,0,1,1,1,1,1,1 m4,Param5,Param6,Param7,Pa >...
- Page 21 >GetDaylight >GetDaylight >GetDaylight <Daylight On >SetTime <Param,Param1,Param2,Param 3,Param4,Param5> >SetTime Param = 1970 ~ 2099(year) <2020,1,1,1,1,1> >SetTime Param1 = 1 ~ 12(month) <SetTime Param2 = 1 ~ 31(date) <2020,1,1,1,1,1> Param3 = 0 ~ 24(hour) Param4 = 0 ~ 60(min) Param5 = 0 ~ 60(sec) >GetTime >GetTime >GetTime...
- Page 22 <192.168.0.1> >SetCecSrcMenu Param >SetCecSrcMenu 1 >SetCecSrcMen Param = 1~3 1 - HOSTA HDMI <CecSrcMenu 1 2 - HOSTB(L) HDMI 3 - HOSTB(R) HDMI >SetCecSrcUp Param >SetCecSrcUp 1 <CecSrcUp 1 Param = 1~3 >SetCecSrcUp 1 - HOSTA HDMI 2 - HOSTB(L) HDMI 3 - HOSTB(R) HDMI >SetCecSrcDown Param >SetCecSrcDown 1...
- Page 23 Param = 1~3 <CecSrcEnter 1 1 - HOSTA HDMI 2 - HOSTB(L) HDMI 3 - HOSTB(R) HDMI >SetCecSrcOn Param >SetCecSrcOn 1 Param = 1~3 >SetCecSrcOn 1 - HOSTA HDMI <CecSrcOn 1 2 - HOSTB(L) HDMI 3 - HOSTB(R) HDMI >SetCecSrcOff Param >SetCecSrcOff 1 Param = 1~3 >SetCecSrcOff...
- Page 24 Param = 1~3 <CecSrcPrev 1 1 - HOSTA HDMI 2 - HOSTB(L) HDMI 3 - HOSTB(R) HDMI >SetCecSrcNext Param >SetCecSrcNext 1 >SetCecSrcNex Param = 1~3 1 - HOSTA HDMI <CecSrcNext 1 2 - HOSTB(L) HDMI 3 - HOSTB(R) HDMI >SetCecSrcRewind Param >SetCecSrcRewind 1 >SetCecSrcRew Param = 1~3...
- Page 25 3 - HDMI SHARE OUT >SetCecDisplayMute Param >SetCecDisplayMute >SetCecDisplay Param = 1~3 Mute 1 - Display HDMI OUT L <CecODisplayMute 1 2 - Display HDMI OUT R 3 - HDMI SHARE OUT >SetCecDisplayVOLPlus Param >SetCecDisplayVOL Plus 1 >SetCecDisplay Param = 1~3 VOLPlus 1 - Display HDMI OUT L <CecDisplayVOLPlus...
-
Page 26: Firmware Upgrade
9. Firmware Upgrade User can upgrade the firmware via Web GUI or FW port. Please follow the steps as below to upgrade firmware by the FW port on the rear panel: 1) Prepare the latest upgrade file on PC. 2) Power off the switcher, and connect the FW port of switcher to the PC with a suitable cable, make sure the RS232 port works normally (Baud Rate: 115200).
Need help?
Do you have a question about the MP-SUH43-KVM and is the answer not in the manual?
Questions and answers