AKASO Brave 8 - Action Camera Manual
- User manual (283 pages) ,
- User manual (33 pages) ,
- User manual (30 pages)
Advertisement
- 1 WHAT'S IN THE BOX
- 2 OVERVIEW
- 3 GETTING STARTED
- 4 OVERVIEW OF MODES
- 5 COMPREHENSIVE FUNCTIONS
- 6 INSTRUCTIONS
- 7 CAMERA SETTINGS
- 8 RESOLUTION SETTING
- 9 PERSONALIZED SETTINGS
- 10 CONNECTING TO APP
- 11 PLAYING BACK YOUR CONTENT
- 12 CONNECTING TO USB
- 13 MAINTAINING YOUR CAMERA
- 14 MAINTAINING YOUR BATTERY
- 15 REMOTE BUTTON OPERATION INSTRUCTIONS
- 16 Documents / Resources
WHAT'S IN THE BOX

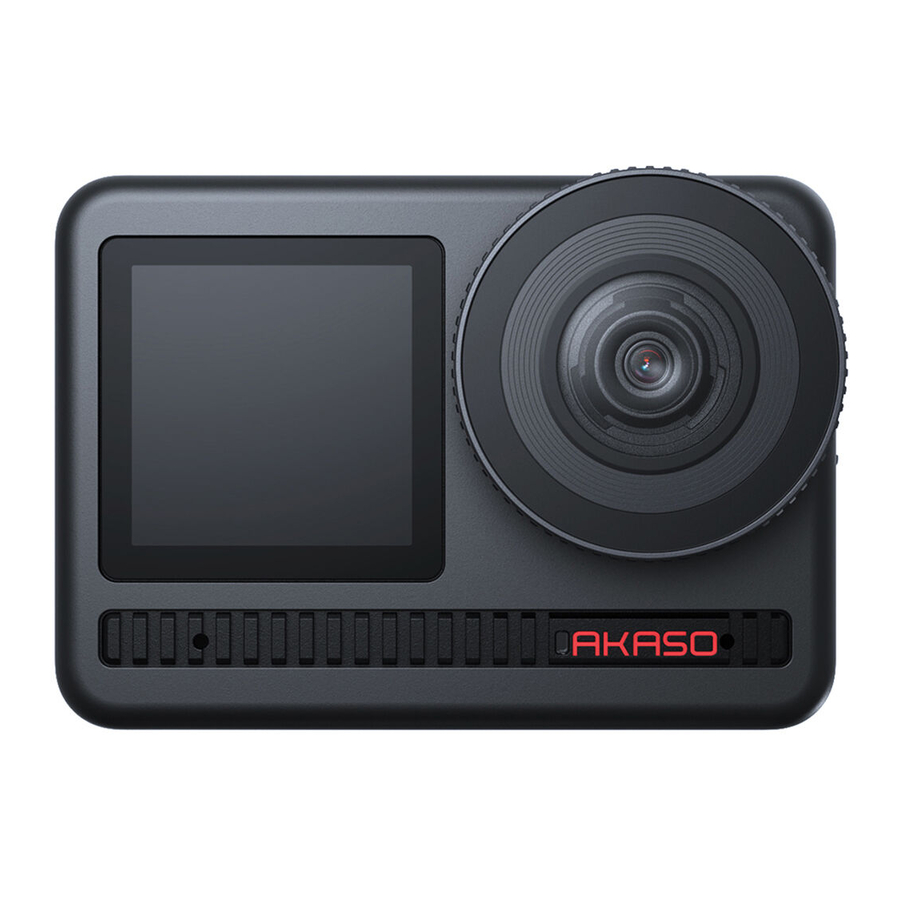
OVERVIEW

- Shutter/Confirm Button
- Front Screen
- Lens
- Power Button
- Speaker
- Memory Card Slot
- USB-C Port

- Charging/Wifi Indicator
- Screen
- Mode Button
- Battery Cover
Button Operation Instructions
- Power Button:
Press to wake the device from sleep. Press and hold to power on/off. - Mode Button:
Press to switch shooting modes.
Press and hold to switch between front and rear screens.
Notes:
- You can't switch screens during recording.
- Front and rear screens cannot work at the same time.

- Memory Card Icon:
Displays remaining recording time/number of photos. - Battery Level:
Displays the percentage of battery. - Audio switch:
Turns on or off the sound when recording a video. - Photo Mode:
Switches modes or display the current mode. - Resolution Ratio:
Displays the current resolution ratio or set the resolution ratio. - Zoom:
Adjusts the shooting angle. - Photo Page:
Controls video shooting under Video mode.
Note: The camera will not record sounds when it is in the waterproof case.
GETTING STARTED
Welcome to your AKASO Brave 8. To capture videos and photos, you need a memory card (not included) that meets the following requirements.
Memory Card
- U3.
- Memory capacity up to 512GB.
Note:
- To keep your memory card in good condition, please format the memory card in the camera before using it. (Reformatting will delete all your data, so be sure to back up your photos and videos).
- The FAT32 format memory card will stop recording when the storage of each file exceeds 4GB and start to record again on a new file.
POWERING ON / OFF
To Power On:
Press and hold the power button for 3 seconds to turn on your camera.
To Power Off:
Press and hold the power button for 3 seconds again to turn off your camera.
Quick Start Guide
When you use the camera for the first time or each time you reset it, a quick start guide will display how to use the camera and settings. You can click "Skip" to ignore the guide.
Operation Instructions
Swipe down to enter the quick menu.
Swipe up to the specification settings.
Swipe right to switch modes.
Swipe left to enter the playback page.

- Mode Switching:
- When the camera is turned on, swipe right to switch modes.
- Tap the mode icon to enter the mode you choose.
- General Settings:
Swipe down to enter the quick menu, tap "Preferences" to enter the preferences page, then scroll down to General Settings and set up your Brave 8. - Playback:
Swipe left to enter the playback page and to record videos, preview, or delete photos. - Specification Settings:
Swipe up to the specification settings and choose options according to your needs.
OVERVIEW OF MODES
Swipe right to choose the following modes. Tap the mode icon to enter the mode you choose.
Video Mode
- Video Mode
Default mode: Video Mode
In Video Mode, press the Shutter button, the camera starts recording videos. Press the Shutter button again to stop recording. - Time-Lapse Video Mode
Time Lapse turns long events into short videos by taking a frame of the video at set intervals. This mode is deal for street scenes, art works and other extended activities. - Motion Time-Lapse Video Mode
It can shorten the video time and record super stable time-lapse videos when moving. Compare with the time-lapse mode, this function improves the anti-shake feature, but delivers relatively blurry videos. - Slow Motion Video Mode
In Slow Motion Video Mode, the camera records video in high resolution and can slow down to 1/16, 1/8, or 1/4. For example, the camera achieves 16x super slow motion when you select 720P and set the multi-speed to 16x.
Photo Mode
- Photo Mode
In Photo Mode, press the Shutter button, the camera takes a photo. Or adjust the burst photo menu to take several photos at the same time. You can also adjust the countdown menu to take a timed selfie. - Time Lapse Photo Mode
Press the Shutter button. The camera will automatically start the countdown and continuously take photos at the specific interval till you press the Shutter button again.
COMPREHENSIVE FUNCTIONS
Image Stabilization Function
When this function is enabled, the camera can record smooth videos even in severe shakes. Turn on the camera, tap the resolution icon on the screen to set Image Stabilization. Options include Image Stabilization and SuperSmooth. Image Stabilization can be experienced directly on this device. To experience the SuperSmooth feature, however, you need to download a SuperSmooth video from the AKASO GO APP.
INSTRUCTIONS

- Memory Card Capacity
- Time
- Battery Level
- Voice Control
- Wifi
- Screen Brightness (3 Levels)
- Screen Lock
- One Key Fast Shooting
- Preferences
- Grid
CAMERA SETTINGS

You can swipe down to General Settings and set up your camera. The settings are as follows:
| Functions | Specifications | Note |
| Voice Control | Power on /Power off (default) | AKASO Video start AKASO Stop video AKASO Take photo AKASO Power off |
| Language | Support 9 languages | English/Deutsch/Français/ Español/ Italiano/日本語/简体中文/繁體中文 /한국인 |
| Standard | NTSC (default)/PAL | |
| Code | H.264 (default)/H.265 | If you choose H.265 for video encoding, the video volume will be reduced, but the power consumption will increase. |
| Wireless Connection | On/Off (default) | Connecting Device | Camera Information | Wifi Band-5G (default)/2.4G | |
| Remote | On/Off (default) | Turn on this setting on the camera, then turn on the included remote, you can control your camera with the remote after successfully connecting them. |
| One Key Fast Shooting | On (default)/Off | Swipe down to enter the quick menu, tap  to turn on One Key Fast Shooting. Press and hold Shutter button when the camera is off, it will automatically turn on and start recording. (The recording parameters are the state saved in the last recording.) Press the Shutter button again, the camera will stop recording and shut down. If you don't need to use this function, just press and hold the Power button normally to start recording or press the again to turn it off. to turn on One Key Fast Shooting. Press and hold Shutter button when the camera is off, it will automatically turn on and start recording. (The recording parameters are the state saved in the last recording.) Press the Shutter button again, the camera will stop recording and shut down. If you don't need to use this function, just press and hold the Power button normally to start recording or press the again to turn it off. |
| Gyroscope | On/Off (default) | |
| General Setting | ||
| Screen Brightness | 0-100% | Adjustable |
| Sound Indicator Light On (default)/Off | 0-100% - Volume On (default)/Off- Key Tone| Beep Tone | Photo Beep Tone | Adjustable |
| Video Sound | On (default)/Off | |
| Auto Power Off Never/2 Minutes/5 Minutes | (default)/10 Minutes / 20 Minutes/30 Minutes | |
| Screen Saver | Never/15 seconds/30 seconds / 1 Minute (default)/ 2 Minutes/ 5 Minutes | |
| Time Date | Date: YY/MM/DD Time: HH/MM (AM/PM/24 Hours) | |
| Date Stamp | On/Off (default) | |
| Formatting | Format Memory Card - Cancel/ Confirm | Memory Card Capacity | |
| Factory Reset | Cancel/Confirm | |
| About | Camera Information |
RESOLUTION SETTING
When the camera is turned on, tap the resolution icon on the screen to enter the home screen. You can adjust the resolution, image stabilization characteristics and time interval of the camera.

- Video
| Functions | Specifications |
| Video Mode | NTSC: 4K30 4:3/4K60 16:9/4K30 16:9/2.7K90 4:3/2.7K60 4:3/2.7K30 4:3/2.7K120 16:9/2.7K90 16:9/2.7K60 16:9/2.7K30 16:9/1440P180/ 1440P120/1440P90/1440P60/1440P30/1080P200/1080P120/ 1080P90/1080P60/1080P30 PAL: 4K25 4:3/4K50 16:9/4K25 16:9/2.7K75 4:3/2.7K50 4:3/2.7K25 4:3/ 2.7K100 16:9/2.7K75 16:9/2.7K50 16:9/2.7K25 16:9/1440P150/ 1440P100/1440P75/1440P50/1440P25/1080P200/1080P100/ 1080P75/1080P50/1080P25 |
| Time Lapse Video Mode | Resolution ratio: 8K/4K4:3/4K16:9/2.7K4:3/2.7K16:9/1440P/1080P Time interval: 0.5s/1s/2s/5s/10s/30s/1min/2min/5min/10min/30min/1h |
| Motion Time- Lapse Video Mode | Resolution ratio: 4K 16:9/2.7K 4:3/2.7K 16:9/1440P/1080P Multiple speed: 2x/5x/10x/15x/30x |
| Slow Motion Video Mode | Resolution ratio: 2.7K/1440P/1080P/720P Multiple speed: 2x/4x/8x/16x |
| Image Stabilization |  Off / Off /  Image Stabilization / SuperSmooth Image Stabilization / SuperSmooth |
- Photo
| Functions | Specifications |
| Photo Mode | 48M/12M |
| Time Lapse Photo Mode | 48M/12M Time interval: 0.5s/1s/2s/5s/10s/30s/1min/2min/5min/10min/30min/1h |
PERSONALIZED SETTINGS
Swipe up to the specification settings of videos and photos. Specifications are as follows:

- Video
| Functions | Specifications | Note |
| Resolution Ratio | 4K30 4:3/4K60 16:9/4K30 16:9/2.7K90 4:3/2.7K60 4:3/2.7K30 4:3/2.7K120 16:9/2.7K90 16:9/2.7K60 16:9/2.7K30 16:9/1440P180/1440P120/1440P90/ 1440P60/1440P30/1080P200/1080P 120/1080P90/1080P60/1080P30 | Video Mode |
| 8K16:9/4K4:3/4K16:9/2.7K4:3/2.7K16:9/ 1440P/1080P Time interval: 0.5s/1s/2s/5s/10s/30s/ 1min/2min/5min/10min/30min/1h Motion Time-lapse multiple speed: 2x/ 5x/6x/10x/15x/30x | Time Lapse Video Mode/ Motion Time-Lapse Video Mode | |
| Resolution ratio: 2.7K/1440P/ 1080P/720P Multiple speed: 2x/4x/8x/16x | Slow Motion Video Mode | |
| Image Stabilization | Off/Normal/SuperSmooth | Off: Turn off Video Stabilization. Normal: Basic video stabilization feature that will crop the field of view. SuperSmooth: Enhanced video stabilization feature that will crop the field of view. You need to download a SuperSmooth video from the APP to experience this feature. |
| Metering | CAM/AM/CM/SM/AFM | CAM(Center Average Metering): A metering mode thatmainly bases the center of the screen and complements the surroundings. AM(Average Metering): Ametering mode that bases the whole screen. CM(Center Metering): A metering mode that bases the center of the screen. SM(Spot Metering): Ametering mode that bases the screen's specific position selected by the user. AFM(AI Face Metering): A dynamic metering mode that recognizes and bases the face in the screen. |
| EV | 3.0EV/2.5EV/2.0EV/1.5EV/1.0EV/ 0.5EV/0EV/-0.5EV/-1.0EV/-1.5EV/ -2.0EV/-2.5EV/-3.0EV | Sets the brightness of photos and videos. |
| ISO | Auto/100/200/400/800/1600/ 3200/6400 | Sets ISO values of photos and videos. |
| White Balance | Auto/2300K/2800K/3200K/4000K /4500K/5000K/5500K/6000k/ 6500K | Sets the hue of photos and videos. |
| Sharpness | 0/1/2/3/4/5/6 | Controls the quality of details in your photos or videos. |
| Bit Rate | High/Medium/Low | Affects the file size and image quality. The lower the bite rate, the smaller the video file, and the lower the image quality, and vice versa. |
| Color | Normal/Vivid | Sets different colors. |
| Fragment | Off/15S/30S/15S Loop/30S Loop | Fragment: Films a 15s or 30s video which can be easily offloaded to your phone and shared on social media. Loop Video: Continuously films a few sectional videos of 15s or 30s. When the memory card is full, the camera will automatically delete the earliest videos to guarantee the shooting. |
| Audio | Stereo/HM | Stereo: Records stereo audio of better sound quality. HM(Human Mode): Records monophonic audio, and eliminates the background noises for clear human voice. |
| Dark Light Mode | Turn off/Turn on | Boosts the brightness by extending the exposure time. Not suitable for sport activities. |
| Distortion Correction | Turn off/Turn on | This function does not support resolutions of 4K30 4:3/4K60 16:9/ 2.7 K90 4:3/2.7K60 4:3/2.7K90 16:9/ 2.7 K120 16:9/1440P90/1440P120/ 1440P180/1080P 200/1080P120/ 1080P90. If you select the resolutions above, the function will be disabled. |
- Photo
| Functions | Specifications | Note |
| Resolution | 48M/12M | General |
| Ratio | 48M/12M Time interval: 0.5s/1s/2s/5s/10s/ 30s/1min/2min/5min/10min/ 30min/1h | Time Lapse Photo Mode. |
| Metering | CAM/AM/CM/SM/AFM | |
| EV | 3.0EV/2.5EV/2.0EV/1.5EV/1.0EV/ 0.5EV/0EV/-0.5EV/-1.0EV/-1.5EV/ -2.0EV/-2.5EV/-3.0EV | Sets the brightness of photos and videos. The higher the value, the brighter the video or photo. |
| ISO | Auto/100/200/400/800/1600 | Sets ISO values of photos and videos. |
| Shutter | Auto, 5S,2S,1/125S,1/250S,1/500S, 1/1000S,1/2000S | Sets the shutter time. |
| White Balance | Auto/2300K/2800K/3200K/4000K /4500K/5000K/5500K/6000k/ 6500K | Sets the hue of photos and videos. |
| Sharpness | 0/1/2/3/4/5/6 | Controls the quality of details in your photos or videos. |
| Color | Normal/Vivid | Sets different colors. |
| Self-Time | Turn off/3seconds/5seconds/ 10seconds/30seconds | General |
| Image Format | JPG/JPG+RAW | Sets the output format for the image. |
| Number of Burst Photo | Turn off/3/5/8 | Sets the number of burst photos. Press the Shutter button once, you can continuously take up to 8 photos. Note: Do not move the camera until the end of the burst shooting. |
CONNECTING TO APP
To connect your camera to the AKASO GO APP, you need to connect the camera Wifi which is enabled by default only when you start up the camera. It will be turned off by default in other processes. If there is no connection within 5 minutes, the Wifi will be automatically turned off. If you do not connect the app within 5 minutes, it will be automatically disconnected. At this time, you can manually reconnect it.
- Turn on Wifi in one of the three ways:
- Turn on the camera by default.
- Tap the Wifi icon on the quick menu.
- Turn on the wireless connection in the Settings.
- Connect Wifi in one of the two ways:
- Swipe down to enter the quick menu, tap Preferences to enter the preferences page, then scroll down to General Settings →Wireless Connection, turn on Wireless Connection, then go to Camera Information. Wifi SSID and Password will be shown on the screen. Go to your phone's Wifi settings, select "Brave 8_xxxx", and enter the default password for connection.

- Swipe down to enter the quick menu and tap the Wifi icon
![]() to turn on Wifi. The Wifi information will be shown on the screen. Go to your phone's Wifi settings, select "Brave 8_xxxx", and enter the default password for connection.
to turn on Wifi. The Wifi information will be shown on the screen. Go to your phone's Wifi settings, select "Brave 8_xxxx", and enter the default password for connection.

Wifi connected: Wifi indicator light ONScreen display: Connected to Brave 8_xxxx
- Swipe down to enter the quick menu, tap Preferences to enter the preferences page, then scroll down to General Settings →Wireless Connection, turn on Wireless Connection, then go to Camera Information. Wifi SSID and Password will be shown on the screen. Go to your phone's Wifi settings, select "Brave 8_xxxx", and enter the default password for connection.
- Connect to the AKASO GO App
Open the AKASO GO APP, tap "Device" →"Add device", find Brave8 and click on it. Click "C...ct" and "Join", and then click "Connect". Your camera is connected to the app.


- Control your camera with the Phone APP. You can record, shoot, play back, download, delete and edit via the AKASO GO APP.
- When the camera is connected to the APP, press the Mode button to turn off the camera Wifi, and exit the connection interface. The APP will be disconnected with the camera.
- SuperSmooth Instructions
- After connecting to the camera, click
![]() - Image stabilization, choose Super Smooth, then click
- Image stabilization, choose Super Smooth, then click ![]() in the upper left corner until it goes back to the camera page.
in the upper left corner until it goes back to the camera page.
Note: SuperSmooth can be enabled on the camera (select SuperSmooth on the Image Stabilization option) or via the app (as shown below).

- Click
![]() choose the video with
choose the video with ![]() , click... and select Download - Supersmooth, then the video with the supersmooth effect will be downloaded to the phone's album.
, click... and select Download - Supersmooth, then the video with the supersmooth effect will be downloaded to the phone's album.

- After connecting to the camera, click
- Firmware Upgrade Instructions
- After connecting to the camera, click Upgrade firmware on the pop-up window. Then click Download.
Note: Please insert the memory card before upgrading the firmware. You can also choose Do not upgrade now. Click Connect and then click![]() , Select Firmware update on the setting menu, and click Download.
, Select Firmware update on the setting menu, and click Download.

- Click SWITCH NETWORK and select a Wifi that works well, and click Done when it displays connected.

- Tap on the Connect camera option once the download success page appeared.
Then choose Connect and wait for the system to upgrade.

- Now just click Try it now and the camera firmware has been upgraded to the latest version.

- After connecting to the camera, click Upgrade firmware on the pop-up window. Then click Download.


PLAYING BACK YOUR CONTENT
Swipe from right to left to enter the playback interface. Tap grid view to change the thumbnail browse mode. Swipe the screen to browse the file. Click the file to preview, then tap the "Playback" icon to play the file. To delete the file, tap the Delete icon and click "Confirm".

CONNECTING TO USB
Plug in your camera with the USB cable. When the message appears on the camera screen, select USB Storage, then copy files from the memory card to PC. Select Camera Mode to use the camera as a Web camera. Select Charging Mode to charge the camera.
MAINTAINING YOUR CAMERA
Please follow these guidelines to get the best performance of your camera:
- For best audio performance, shake the camera or blow the mic to remove debris from the microphone holes.
- To clean the lens, wipe it with a soft and lint-free cloth.
- Do not insert any object around the lens.
- Do not touch the lens directly with your fingers.
- Keep the camera away from drops and bumps, which may cause damage to the parts inside.
- Keep the camera away from high temperature and exposure to strong sunray.
MAINTAINING YOUR BATTERY
If the battery reaches 0% while recording, the camera will save the file and the power goes off.
To maximize battery life, please follow these guidelines if possible:
- Turn off Wireless Connections when not using
- Capture videos at lower frame rates and resolutions
- Use screen protection setting
Battery storage and operation
- Do not expose the camera to extreme cold or hot weather. It will shorten the battery life or cause malfunction to the camera with those conditions. Please avoid the extreme changes in temperature or humidity as condensation may form on or inside the camera.
- Do not dry the camera or battery with microwave ovens or hair dryers. Damage to the camera or battery caused by liquid is excluded from the warranty.
- Do not store the battery with metal objects such as coins, keys or necklaces. If the battery terminals come close to metal objects, fire may be caused.
- Do not make any unauthorized alterations to the camera as this may compromise the safety, regulatory compliance, or performance, and may void the warranty.
REMOTE BUTTON OPERATION INSTRUCTIONS

- Remote Power on/off
| Function | Operation Status | Operation | Detail |
| Power on | Off | Press the Power button | Press the Power button to turn on the remote. The red and blue indicators will be flashing quickly. |
| Pair | Pairing | Press Set and Record buttons |
|
| Power off | On | Press the Power button | Press the Power button again to turn off the remote control. |
- Photos/Videos
| Function | Operation Status | Operation | Detail |
| Record videos | Video Mode On | Press the Record button | Press the Record button to start recording. Press again to stop recording. |
| Take photos | Photo Mode On | Press the Record button | Press the Record button to start taking photos. |
- Switch Mode
| Function | Operation Status | Operation | Detail |
| Switch mode | Video or Photo Mode On | Press the Set button | Press the Set button to switch the video or photo mode. |
- Turn off the Camera
| Function | Operation Status | Operation | Detail |
| Control the camera to shut down | On | Press and hold the Power button for 5 seconds | Press and hold the Power button for 5 seconds, you can control the camera to shut down, and the remote control also automatically shuts down. |
- Indicator Status Description
| Blue Light | Red Light | Status Description |
| Off | Off | Power off |
| Flash quickly | Flash quickly | Not paired |
| Off | Off | Work mode (power on) |
| Flash slowly | / | Video Recording |
| / | Keep on (charging status) | The remote is charging |
| / | Off (charging status) | The remote is fully charged |

Documents / ResourcesDownload manual
Here you can download full pdf version of manual, it may contain additional safety instructions, warranty information, FCC rules, etc.
Advertisement


Need help?
Do you have a question about the Brave 8 and is the answer not in the manual?
Questions and answers